Page 14
www.oldschoolmodels.com
Construction Manual
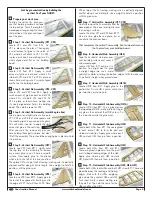
Glue one CG9 to each side of CG8, making sure they're nice and
perfectly aligned. Then do the same to create the other CG8/CG9
sandwich
- mmmmmm, yummy!
■
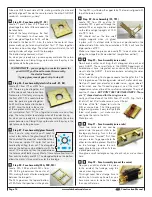
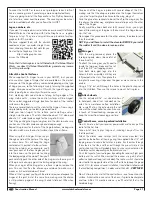
Step 85 - Fuse Assembly (F1, F2)
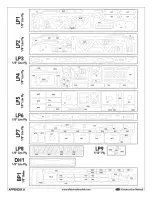
Locate F1 and F2 from LP5. These are
glued together, but a little care needs to
be taken here.
Note all the fancy etching on the front
of F1. This needs to show once the
parts are glued together. So F2 will be
attached to the back of F1. Also, the hole in the center of these
pieces match up, but are not symmetrical. Test "fi t" them together
to make sure how they align. The cutout circles will match, the left
and right sides will align, as will the top edge.
The bottom edge however, will not.
So, when you're ready mix up some epoxy and make these two
pieces become one. Clamp things up to make sure they stay in the
right place while the glue cures.
IF, AND ONLY IF
- you are going to use electric power for
your GHOST, you'll need to make this assembly -
the electric fi rewall.
If going glow, sounds good - skip to step 88.
■
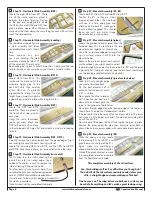
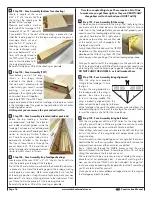
Step 86 - Fuse Assembly (electric fi rewall - E1, E2)
Locate EF1 from LP7 and EF2 from
LP5. These are glued together, but
a little care needs to be taken here.
Note more of that fancy etching on
the front of EF1. This needs to show
once the parts are glued together.
So EF2 will be attached to the back
of EF1. Also, the hole in the center
of these pieces match up, but are
not symmetrical. Test "fi t" them together to make sure how they
align. The cutout circles should align when all the sides line up.
So, when you're ready mix up some epoxy and make these two
pieces become one. Clamp things up to make sure they stay in the
right place while the glue cures.
■
Step 87 - Fuse Assembly (glow fi rewall)
Also, if you're using electric you'll need to
cutout a few holes in the glow fi rewall (F1/F2).
We've etched the areas that should be cutout.
The holes are simple 1/4" holes that can be
handled by drilling them out. The elongated
hole on the bottom can be drilled out with the
same 1/4" on each end, then the area between
the holes can be fi led/cut away. Most of these holes allow for air to
fl ow over the battery and ESC. The elongated hole on the bottom
allows the motor's three wires to enter the fuselage.
■
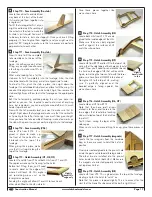
Step 88 - Fuse Assembly (F4A, F4B, F4C)
Locate F4A, F4B and both F4Cs from
LP5. F4B is glued across the center of
F4A, making the sets of holes are aligned
between the two parts.
The F4Cs go across the top and bottom
of F4A. Note their positions in the photo.
The top F4C is just below the upper tabs. The lower is aligned with
top of the lowest cutout.
■
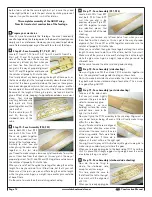
Step 89 - Fuse Assembly (F3, TR1)
Locate TR1 from LP4 and the F3
assembly. TR1 is pushed through the
center of F3 at an angle, then rotated
so the left and right uprights of F3 fi t
into TR1's slots.
TR1 should rest on the two small
triangle supports when it's glued
in place, with it's etched circle in the corner, positioned on the
starboard side. Also note the orientation of F3B, it will face the
larger portion of TR1.
Make sure these two pieces are exactly 90° to each other when
gluing them together. (Remember that triangle from earlier?)
■ ■
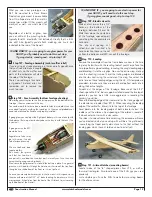
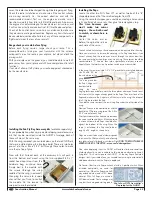
Step 90 - Fuse Assembly (servo rails)
Now here's another cool thing that's designed into each and
every GHOST. Those smart folks in the OSMW Department of
Awesomeness have integrated our exclusive Multi-Size Servo
mounts into the GHOST - they're everywhere, including the sides
of the fuselage.
So, let's do this thing. You're gonna need a few things for this. The
fi rst is to grab one of the fuselage sides - doesn't matter which one.
Next you'll need your elevator or rudder servo - again doesn't
matter which one. You'll need to pop out six of the small "
h
"
shaped servo rails and two of the small servo rectangles. They're all
over the LP sheets -
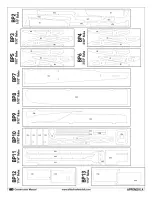
BUT DON'T USE THE ONES ON BP8 - Those
are "L" shaped and used for the wing's servos.
Lastly, you'll need one of the SHGs from LP1 or LP2. Yup, that's a
lot of stuff, but it'll all make sense in just a little bit.
Put three of the “
h
” shaped rails into the
SHG as shown here. This little guide/jig/
thing-a-ma-jig makes it easy to align these
three small pieces - just make sure you
don't glue the rails to the SHG.
Make two rails.
■ ■
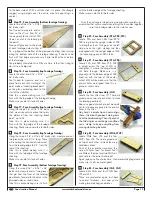
Step 91 - Fuse Assembly (servo rails)
Those two servo rails can now be
pushed into the pre-cut slots in the
fuselage ply framing. Push in the rail
that'll be more "forward" fi rst, then
use your servo to gauge where the
other rail should be placed. Mark this
on the fuselage, remove the rails,
apply glue to them and then fi x them
in place permanently.
Also glue a small rectangle on top of each rail, as we've shown
here.
■ ■
Step 92 - Fuse Assembly (mount the servo)
Now you can drill and attach the servo
to the inside of the fuselage, using the
servo's mounting screws.
This might seem like a strange time to
do this, but it works quite well, as you
have more room to make this happen
than you will later on.
WH6
F3B
WH4
WH7
WH7
WH7
WH7
CG9
CG9
WH2
F1
F4A
F4C
F4B
F2
EF2
W1P
W1P
W2
S2
F3A
H8
CG8
CG8
CG9
CG9
TR1
T2
T4
H2
H1
T2
T3
T3


