
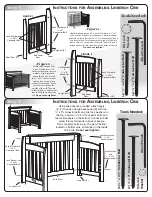

1. Remove front panel by unscrewing two ¼" x 3" connector bolts and two ¼" x 4¾"
connector bolts. Store this panel in dry place for later use as footboard of double bed. Attach
conversion board (I) to bottom hole on posts (D,G) with two ¼" x 4¾" connector bolts. Make
sure crib spring (G) is set low enough to allow child to climb in and out of bed easily.
Figure 1:
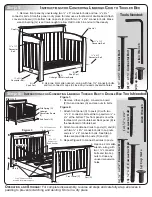
1. Remove crib spring (G), conversion board
(F),two end panels (A) and cap nuts to bolts.
Figure 2:
1. Attach front panel (C) to posts (D) with two
¼" x
3
" connector bolts at the top and two ¼" x
4¾" at the bottom. This front panel is now the
footboard of your double bed. Back panel (B) is
the headboard of double bed.
2. Attach two double bed rails to posts (D) and (E)
with two ¼" x
2½
" connector bolts to cap nuts
and six ¼" x 2" connector bolts. See Step 5.
Holes are pre-drilled in posts (D) and (E).
3. Repeat Figure 2 to connect bed rails to posts.
Step 5
Step 6
Tools Needed:
Tools Needed:
I
nstructIons
for
c
onvertIng
l
Inbergh
c
rIb
to
t
oddler
b
ed
I
nstructIons
for
c
onvertIng
l
Inbergh
t
oddler
b
ed
to
d
ouble
b
ed
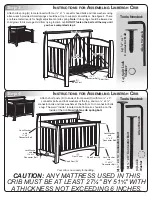
2. Use one 4mm allen wrench, along with two 1¾" connector bolts
and two connector caps to close any unused conversion holes.
Allen W
rench
Allen W
rench
(2) ¼" x 4¾" Connector Bolt
(2) ¼" x 1¾" Connector Bolt
(2) Cap Nuts
Headboard
Figure 1
Figure 2
Post (E)
Crib Spring (G)
Linbergh
Conversion Board
(F)
End Panels (A)
Support Slats
4. Use one 4 mm allen
wrench, along with
two 1¾" connector
bolts and two cap
nuts to close any
unused conversion
holes.
¼" x 4¾"
Connector Bolt
¼" x 4¾"
Connector Bolt
¼" x 1¾"
Connector Bolt
(I)
Linbergh Conversion Board
(D)
Short Post
(G)
Short Post
Cap Nut
¼" x 1¾"
Connector
Bolt
Cap Nut
O
peratiOn
and
S
tOrage
:
For complete disassembly, reverse all steps and carefully wrap all pieces in
padding to prevent scratching and denting. Store in a dry place.
¼" x 2" Connector Bolt
screwed into insert on post
¼" x 1¾" Connector
Bolt & Cap Nut
¼" x 2½"
Connector
Bolt & Cap Nut
(6) ¼" x 2" Connector Bolt
(4) Cap Nuts
(2) ¼" x 2½" Connector Bolt
Post (D)
Post (D)
Footboard
Front Panel (C)
(2)
¼
" x 1¾"
Connector Bolt


