background image


38

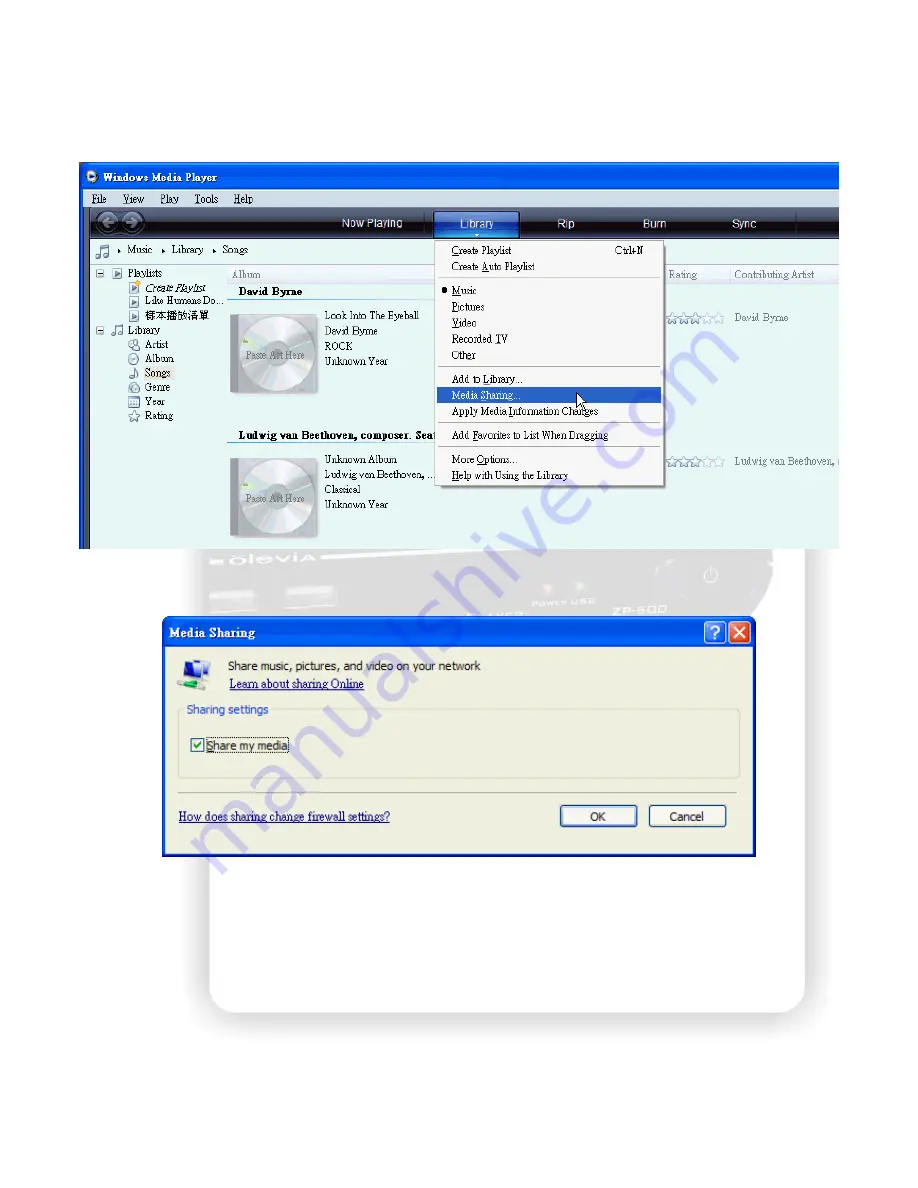
Windows Media Player 11 Setup (on Windows XP/Vista) 

Before configuring Media Player, make sure the network is setup and passing through Ethernet or 

WLAN to this computer. Open the Media Player 11, and click the button “Library, Media Sharing”. 


In the pop-up window, check the item “Share my media” and click “OK”. 


Now look at the TV screen to operate the player, go to the first page and enter “UPNP”. You 

should be able to see your computer in the list. Please continue to the next step to setup the Media 
Player. 


Summary of Contents for ZP-500

Page 1: ......

Page 2: ...Music 20 Zoom in and pan the focus 20 Rotating the photo 21 All 21 Edit the media files 22 Rename 22 Delete 22 DVD ROM 23 Network player 24 Setup the IP Address 25 Setup the IP Address for PC manuall...

Page 3: ...humbnail function 42 Can t see subtitle through UPnP playback 42 Can t playback the video 42 Connect DVI to HDMI converter 42 Smooth playback through Ethernet Wireless LAN 42 TV Overscan issue 42 Vide...

Page 4: ...ports the subtitle format Dynamically change the subtitle display by remote control z Photo playback via HD Supports Up to 4 mega pixel photo files 16X Zoom in 3 direction rotation z Slide show mode w...

Page 5: ...wake up this player Panel Back side Video connection Please select one below to connect the TV set HDMI output This port is to connect with HDMI receiver or HDMI TV set YPbPr This port is for the YPbP...

Page 6: ...e LEFT f RIGHT d DOWN ENTER ENTER RETURN go up one folder Exit the current menu MENU open System Setup page EDIT Delete Rename the folders and the files INFO Display the information during playback 1...

Page 7: ...r to the section of Audio setting HDMI output to HDMI receiver Connect HDMI input to the HDMI receiver and then connects another HDMI cable from the receiver to TV set like ZP 500 HDMI receiver HDMI T...

Page 8: ...ng to your TV set and the connection between this play and TV set z For HDMI TV set the device detects the available resolution of your TV set and lists them on screen In the list of resolution the av...

Page 9: ...oose 16 9 Use button to select one and press ENTER to confirm The initial setting can be configured anytime in the setup menu Please refer to the setup menu Setup Menu You can press MENU to open the s...

Page 10: ...tion here won t be applied Screen Saver Select to turn off no the screen saver The default setting is on which displays icon randomly on screen after 5 minutes idle When using the device on the plasma...

Page 11: ...et TV System Resolution Standard Definition High Definition NTSC NTSC 480p 720p 60Hz 1080i 60Hz 1080p 60Hz PAL PAL 576p 720p 50Hz 1080i 50Hz 1080p 50Hz Only HDMI and YPbPr connection can output HD TV...

Page 12: ...audio The RAW data of the audio will be sent to the HDMI receiver for decoding SPDIF Only LPCM 2CH When connecting to the SPDIF receiver select this option to output the LPCM 2CH audio SPDIF Only RAW...

Page 13: ...ther to use Infrastructure AP or Peer to Peer Ad Hoc The Infrastructure mode requires an Access Point to access and the Ad Hoc mode is for the dongle to dongle network The procedure divides into two w...

Page 14: ...on Press blue key to continue Enter the key If choose WEP use virtual keyboard to input the key For WEP key the length of password could be 10 or 26 hex digits The other Dongle associating to this Pee...

Page 15: ...LED on the player will be off and the following message will show on screen USB Removed The USB device has been removed You cannot browse it anymore When selecting USB the following message may pop up...

Page 16: ...key to play file Press Pause key to hold the playing Press Play key again to continue playing REPEAT When playing the media press to switch the repeat modes among the following modes Repeat Title to...

Page 17: ...color key to toggle the respective function Green key In the browser press it to edit the file name You can rename or delete the file Please refer to the edit section for details Blue key In the brow...

Page 18: ...lay next file till the last file You can also use the playback control while playing the video Press Play key to playback Press Pause key to hold the playback Press Play key again to continue playing...

Page 19: ...sign on screen Photo Press the PHOTO button to enter the interface Navigate to highlight the file and press ENTER to playback the file When the file is highlighted the right panel shows the detail inf...

Page 20: ...list Note The thumbnail function only applies under Photo tab and browsing photo files Slide show with Music Before viewing the photo you can enter the Music interface to playback Music files first D...

Page 21: ...ll category to browse all files including Movies Music and Photo Navigate to highlight the file and press ENTER to playback the file When the file is highlighted the right panel shows the detail infor...

Page 22: ...press Return key on the remote control Rename Choose Rename and the keyboard will be pop up for entering new name Use the arrow key to highlight the key and press ENTER to input the character When th...

Page 23: ...io Select Browse to browse the DVD VIDEO as the data disk Select Return to return to previous page Refer to the section of video playback for the operation DVD Data if the data DVD or data CD is loade...

Page 24: ...s and the network connection you can sit down in the living room and watch the TV to operate this device to browse and playback the Video Music and photo on your computer even it s in your study room...

Page 25: ...n IP Address in the same IP domain of PC Please refer to the setup section for details Setup the IP Address for PC manually If you connect the player to PC directly or don t have a DHCP server you nee...

Page 26: ...ck Use the following IP address and input the IP Address The Static IP Address for the PC should be in the same domain as the one of the player For example setup 192 168 2 3 for PC and then setup 192...

Page 27: ...PC In the beginning you need to check the computer name and the workgroup of your PC The computer name and the workgroup are exposed in the LAN for being browsed and accessed Right click on the My Com...

Page 28: ...e simplest network environment we recommend choosing WORKGROUP as your workgroup The workgroup and the computer can be found by the player in the procedure later If you want to change the computer nam...

Page 29: ...29 When applying the new computer name and the new workgroup the system will remind you to restart the system to take effect Confirm it in the next two windows The PC will restart...

Page 30: ...shared folder can be accessed by the player or other PC in the LAN In order to browse the media files on your PC from the player you have to put the files in the folder and then make it to be a share...

Page 31: ...in the first page The scanned workgroup will be showed in the list In our example the My Shortcuts and WORKGROUP are displayed in the list The My Shortcuts is empty now because not set yet so choose...

Page 32: ...pops up Green Key When you want to re enter the User ID and the Password press the key to pop up the window again to input them In the virtual keyboard navigate the highlighted key on the keyboard an...

Page 33: ...e folder select the file to browse The Network Speed will be showed in the right panel The operation of playback is the same as the precious section Please refer it for the operation Red Key Press it...

Page 34: ...re are 3 actions can be taken You can add a shortcut or modify a shortcut or delete the shortcut The Modify and the Delete function can only be performed when at least one shortcut exists After choosi...

Page 35: ...Enter it if it is required in your network environment Multiple accounts for login For the advanced user he may hope to login the PC with more than one account with different priorities For example t...

Page 36: ...ayer 11 to add the device and then use the player to view the media files Note For media player the UPnP is only supported at version 11 or above in the future The setup for Windows XP The UPnP User I...

Page 37: ...nistrative Tools and then the Services Find the items below in the Services and change their Startup Type to Automatic to make sure they run in the system background Check item Windows Media Player Ne...

Page 38: ...WLAN to this computer Open the Media Player 11 and click the button Library Media Sharing In the pop up window check the item Share my media and click OK Now look at the TV screen to operate the playe...

Page 39: ...nter UPNP again and it should display If the player is still missing in the window click Settings and check the option Allow new devices and computers automatically not recommended and then operate th...

Page 40: ...to Windows help for more setting Browse through UPnP During the setup of Windows Media Player we already browse the UPNP server on this player Now select the name of your computer in the list The medi...

Page 41: ...he power button it takes about 8 seconds In this short time the remote control unit and the power button are not functional Battery When the distance of remote control is dropped dramatically please r...

Page 42: ...e in the manual If it is not in the table then the player can t support it Pease visit the URL to download the software http mediainfo sourceforge net Connect DVI to HDMI converter When using the DVI...

Page 43: ...MPEG 4 Visual MPEG 4 SP ASP Xvid AVI MKV MP4 Real Video Real Video 8 9 10 Up to 720 30P RM RMVB AVC H 264 BP L3 H 264 MP L4 1 H 264 HP L4 1 TS AVI MKV WMV VC 1 WMV9 VC 1 AP L3 TS WMV AVI MKV ASP MOV M...

Page 44: ...resolution Baseline JPEG JPG JPEG Photo BMP PNG GIF TIF TIFF Specification Model name ZP 500 Disc format FAT16 FAT32 NTFS UDF EXT3 Subtitle Chinese Traditional Chinese Simplified UTF8 Resolution 1080p...

Page 45: ...AV ASF AAC OGG Vorbis FLAC iTune M4A AAC M3U Playlist PHOTO JPG 40 mega pixel without limitation of resolution Baseline BMP PNG GIF TIF TIFF Power rating 12V 1 5A Power consumption Operation 4 8 W USB...

Page 46: ...he receiver Be careful with electricity z Power outlet To prevent electric shock make sure to connect the power adapter only to a power source that operates at 12V 1 5A z Power overloading Avoid overl...

Page 47: ...such as a power amplifier z Risk of Fire Do not place the product on top of any easily combustible material such as carpet or fabric z Proper Connections Make sure all cables and equipment are connec...

Reviews: