OLIMEX© 2018
A20-OLinuXino-MICRO user's manual
2.8 Connecting a display and calibrating touchscreen
One of the ways to interact with the board is via an external display (with or without touchscreen
component). The 40-pin male connector LCD_CON has the typical 0.1'' pin step. All Olimex
displays have corresponding 40-pin male connector. You would only need a 0.1'' female-female
cable for the hardware connection.
All LCD displays made by Olimex have at least a 0.1'' LCD connector. Going for an LCD output
you would also need need and a cable to attach the display to the board. The cable is sold separately.
After the hardware connection is established, you need to execute shell script that would change the
video output of the board to fit the screen (refer to previous chapter).
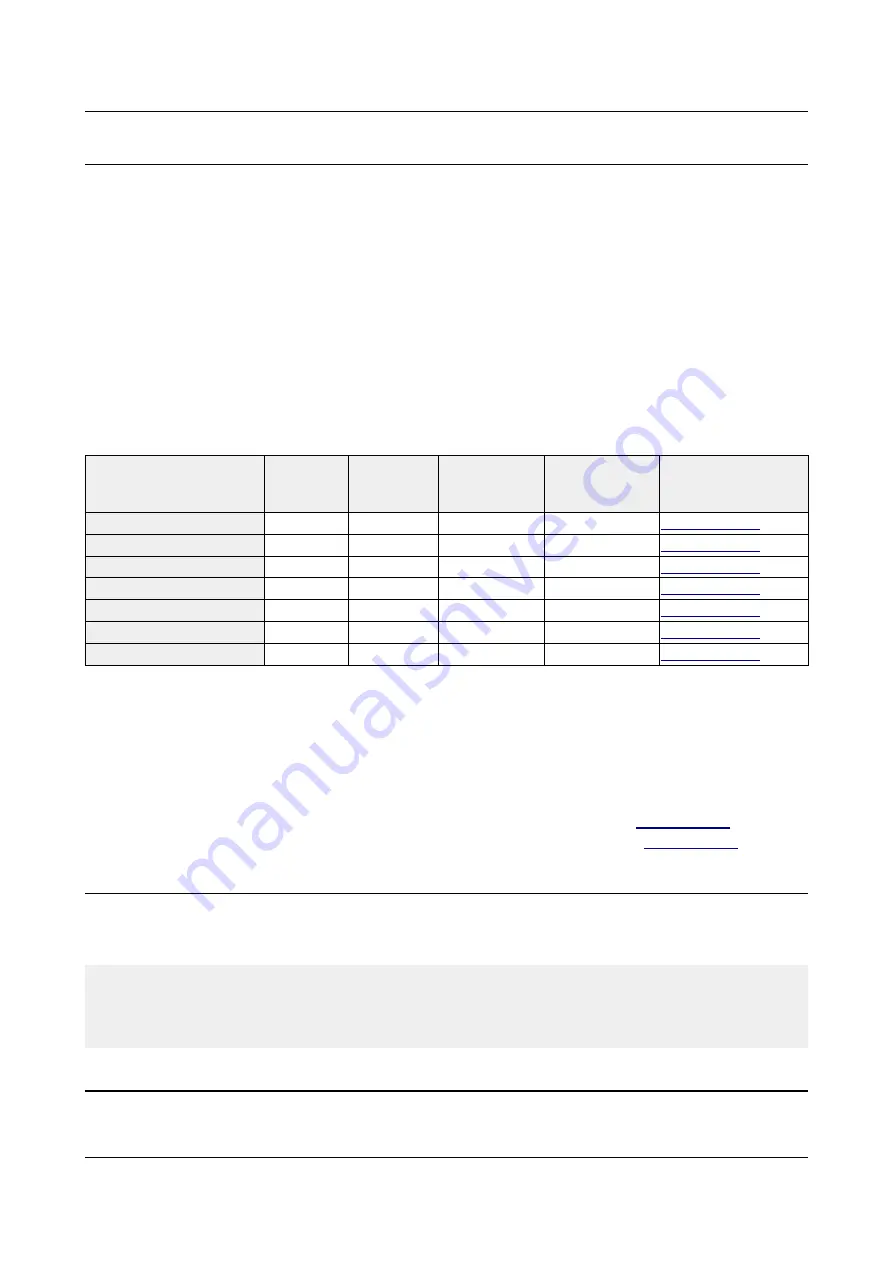
The displays recommended for the board at the moment of writing might be found in the table
below:
Display name
Size of
display
in inches
Native
resolution
in pixels
Official
Debian image
support
Official
Android image
support
Link to product
page
LCD-OlinuXino-4.3TS
4.3
480×272
Yes
No
LCD-OLinuXino-7
7
800×480
Yes
Yes
LCD-OLinuXino-7TS
7
800×480
Yes
Yes
LCD-OLinuXino-10
10.1
1024×600
Yes
Yes
LCD-OLinuXino-10TS
10.1
1024×600
Yes
Yes
LCD-OLinuXino-15.6
15.6
1366×768
Yes
No
LCD-OlinuXino-15.6FHD
15.6
1920×1080 Yes
No
The displays whose names contain “TS” - include a resistive touch screen component.
The cable used for connection depends on the specific board you are using and more specifically it
depends on the pitch of the LCD connector of the board. We have two cables – both 40-pins ones
but one for the bigger pitch (0.1'') and the other for the smaller one (0.05''). Each of the displays
listed in the table above has two connectors suitable for both cables:
CABLE-IDC40-15cm – 15cm long cable suitable for 0.1'' step connectors –
CABLE-40-40-10CM – 10cm long cable suitable for 0.05'' step connectors –
2.8.1 Android toucshcreen calibration
Calibrating a touchscreen component under Android is pretty straightforward from the Android
application.
Important: initially the boards are calibrated for a specific display and resolution. If you re-write the
image (no matter whether the SD card or the NAND memory) you might need to use a mouse to
calibrate the display initially. It might be impossible to calibrate it only by using the touch
component over the display.
2.8.2 Debian touchscreen calibration
Navigate to the system menu and then select "Preferences" -> "Calibrate Touchscreen". Follow the
on-screen prompts and remember to save the settings in the xorg.conf.d folder as suggested.
Page 16 of 56


