background image

5

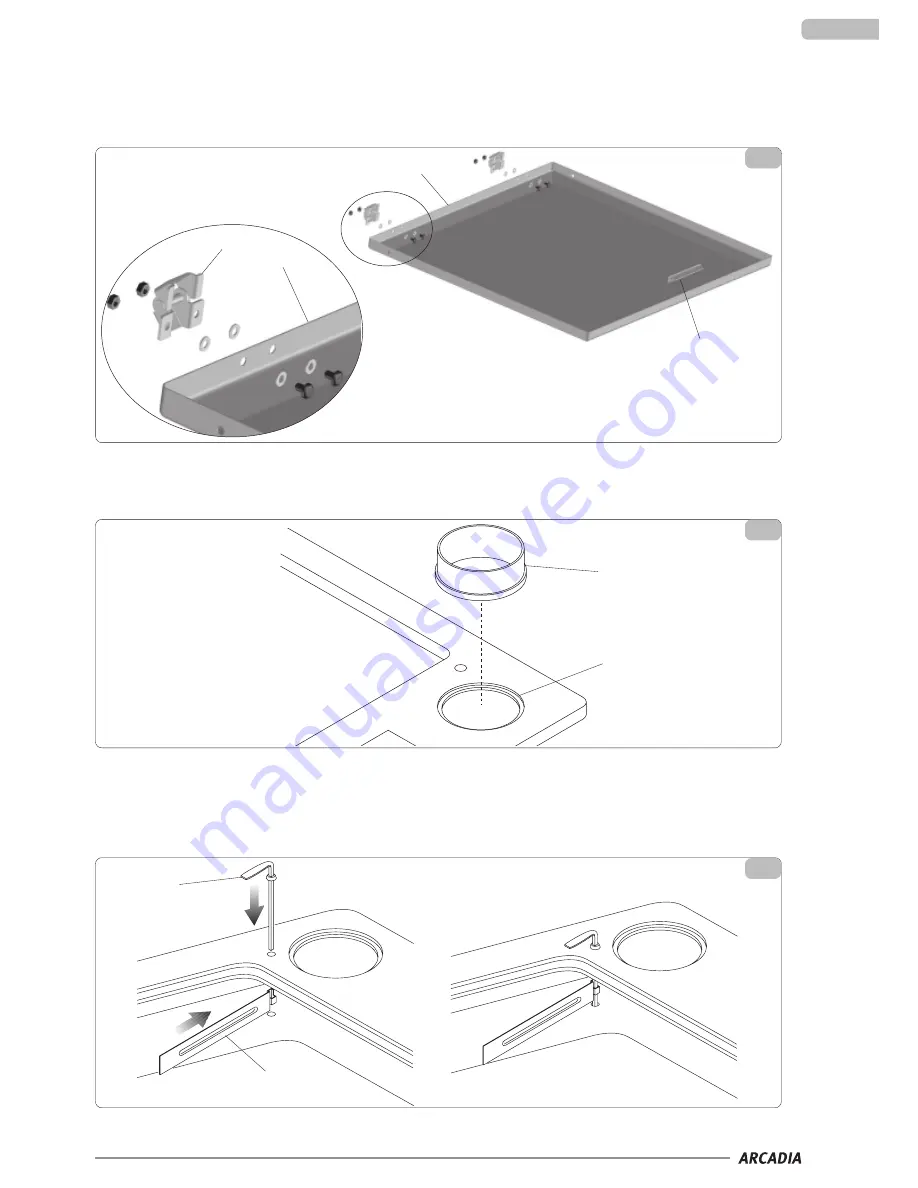
MOUNTING THE COVER

The cooker is supplied with the cover dismounted; to mount it, proceed as follows:
· Fix the two hinges (fig. 3 ref. A) onto the cover (fig. 3 ref. B).
· Insert the ends of the hinges in the special supports already mounted on the plate (no screws needed for the fixing).
· Insert the handle (fig. 3 ref. C) on the cover (in the centre of the front part) pressing it downwards.

MOUNTING THE SMOKE DISCHARGE COLLAR

Take the smoke discharge collar (fig. 4 ref. A), located in the oven compartment and rest it on the relative seat on the plate (fig. 4 ref. B).

MOUNTING THE SMOKE VALVE

- Remove the rings and the plate inners.
- Take the valve (fig. 5 ref. A) and the pin (fig. 5 ref. B) from the storage box and position them as illustrated in figure 5.
- Insert the pin in the special seat of the valve, and continue until it is centred in the hole below.

1.8

1.9

1.10

3

A

B

C

B

1

5

B

A

4

A

B

Summary of Contents for Arcadia PANORAMICA

Page 1: ...INSTRUCTIONS FOR INSTALLATION USE AND MAINTENANCE GB...

Page 2: ...ONFIREWOOD 2 4 STARTINGUP 2 5 LOADINGTHEFUEL 2 6 LIGHTINGANDUSE 2 7 LIGHTINGUP 2 8 LOADINGANDRE LIGHTINGWITHEMBERS 2 9 SHAKINGTHEFIREBOXGRATE 2 10 ASH BOX 2 11 FOOD WARMING BOX 2 12 FIREWOODBOX 2 13 P...

Page 3: ...n force PRELIMINARY OPERATIONS Carefully remove the packing The packing material must be recycled by disposing in the special containers or in the local municipal waste disposal site Before installati...

Page 4: ...ing appliances in this case wood fired cookers by law must have a chimney flue built in compliance with regulations on force for the evacuation of exhaust fumes The points described below are norms of...

Page 5: ...re of the front part pressing it downwards MOUNTING THE SMOKE DISCHARGE COLLAR Take the smoke discharge collar fig 4 ref A located in the oven compartment and rest it on the relative seat on the plate...

Page 6: ...n the appliance being used and the chimney flue must receive exhaust fumes from one heat source only An appliance can consist of a fireplace and cooking oven with a single exhaust point to the chimney...

Page 7: ...ned that they cannot be obstructed The airflow can also be obtained from an adjacent room to that of the installation as long as this flow happens freely through permanent outlets communicating with t...

Page 8: ...is corrected Do not block the openings or aspiration and heat dispersion slats All repairs or replacements of worn components must only be carried out by a qualified service centre Only use original...

Page 9: ...mic glass so you can see the flame and the food being cooked inside the oven The basic versions have the smoke outlet on the right while in left hand versions have the positions of the firebox and the...

Page 10: ...completely alight Return the primary air control to the normal use position as indicated in the ADJUSTMENTS chapter SHAKINGTHEFIREBOXGRATE Insert the end of the poker in the hole on the grate shaker...

Page 11: ...OVEN The cooker is equipped with an oven in enamelled steel for cooking food The oven has internal glass and a thermometer to simplify temperature checks The temperature shown by the thermometer is in...

Page 12: ...e presence of hot ash clean the holes slots in the base of the grate Cleaning the outside This must be done with the appliance cold Steel cast iron parts use a cloth soaked in a substance suited for t...

Page 13: ...m the following operations Cleaning of the exhaust gas ducts Check the gaskets and replace if necessary Check the flue It is advisable to arrange an annual maintenance contract with an OLIMPIA SPLENDI...

Page 14: ...ke outlet pipe duct is not blocked Modify the flue chimney too high or terminal hood not suitable or improve insulation Check the indications in the Adjustments and Fuel to be used chapters Reduce the...

Page 15: ...15...

Page 16: ...16...

Reviews: