ENGLISH
EN - 16
3.9 - NIGHT OPERATION
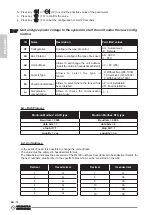
From board the machine
a
. To select this mode, press key
“
”
(T2) several times until the indicator (A1) activates.
b
. The function deactivates automatically when the fan speed is changed by means of the key
“
”
(T2).
From remote controller
a.
To select this mode, press key “
B11
” until the indicator (7) activates.
b.
To be able to change ventilation speed, it is necessary to disable the function by pressing key “
B11
” first.
When this function is enabled, the internal fan is forced at minimum speed and the set ambient temper-
ature changed automatically as follows:
• decreased by 1°C after one hour and by another degree after 2 hours in heating function;
• increased by 1°C after one hour and by another degree after 2 hours in cooling function.
If the unit has been configured as radiant (J1 in ON position), night ventilation speed selection
inhibits the rotation of the fan.
3.10 - MEANING OF BLINKING AND OPERATION OF THE LED
- The blinking LED (A5) indicates that the request for water (hot or cold) has not been met and causes the
stop of the fan as long as water temperature does not reach an appropriate value which can meet the
request.
- The alternate switching on of the red and blue LEDs (A5) indicates that the automatic cooling/heating
mode is active.
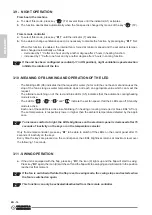
- The 4 LEDs
“
”, “
”, “
”
and
“
”
indicate the set fan speed. If all the 4 LEDs are off, Stand-by
mode is active.
Each one of these LEDs is active in soft-blinking if in heating or cooling mode (red or blue LEDs “A5”on).
The set temperature is respectively lower or higher than the ambient temperature detected by the appli-
ance.
To increase comfort at night, the LEDs brightness on the electronic panel is decreased after 15
seconds of inactivity on the keys or on the temperature selector.
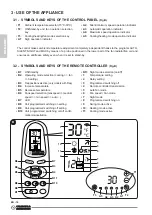
Only from remote controller, press key “
B7
” to be able to switch off the LEDs on the control panel after 15
seconds of inactivity on the keys.
Every time the keys are pressed on the control panel, the LEDs brightness returns at maximum level over
the following 15 seconds.
3.11 - SWING OPERATION
a
. If the unit is equipped with the flap, press key “
B3
”, the icon (9) lights up and the flap will start to swing.
Press key “
B3
” again, the icon (9) switches off and the flap will stop swinging and will remain in the position
reached at that moment.
If the fan is switched off while the flap is set to swing mode, the swing stops and restarts when
the fan is switched on again.
This function can only be activated/deactivated from the remote controller.
Summary of Contents for B0872
Page 2: ......
Page 7: ......
Page 9: ...3 3 3a 3 3a 3b 4 4 3 5 6 6 5 y x 6 3a 3 3b 3a 3b...
Page 10: ...180 7 7a 7b 7b 7b 7 8...
Page 166: ...EL 2 3 13 TIMER 18 3 13 a timer 18 3 13 b timer 18 3 14 18 3 15 LED 19 3 16 20 4 20 5 21...
Page 167: ...KIT B0872 EL 3 0 0 1 0 2 0 2 a...
Page 168: ...EL 4 0 3 1 OLIMPIA SPLENDID 2 3 4 5 6...
Page 169: ...KIT B0872 EL 5 7 8 9 OLIMPIA SPLENDID 10 11 12 13 A 14 15 16 17 18 19...
Page 179: ...KIT B0872 EL 15 3 8 3 2 LED LED LED LED T2 B2 10 11 B6 3 8 a T2 A4 B6 6 3 8 b T2 A3 B6 5...
Page 185: ...KIT B0872 EL 21 5 60 2 3 silent 220 V...
Page 186: ...EL 22 FI E2 E3 E4 E5 stand by 5 T2 T3...
Page 187: ......
Page 188: ...263995A...


