Bi2 Air AR
S
1
1b
1a
1a
1
4
3
3
1
2
2
4
2
3
ENGLISH
EN - 5
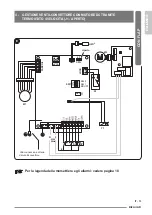
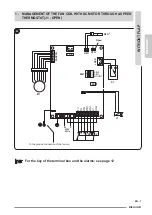
0.6 - KIT INSTALLATION ON THE FAN COIL
a
. Undo the screws (1a) and remove the cover (1b)
of the box (1) (fig.1).
b
. Wedge in the locks (2) in the specific slots (3)
located on the side of the appliance (fig.2).
c
. Secure the box (1) to the appliance by means of
the two screws (4) (fig.2).
d
. Connect the ground cable to the appliance struc-
ture using the supplied screw (minimum force for
screwing is 4 N) (fig.3).
e
. Connect the water probe connector (S) on the
appliance and check that the water probe (S) is
correctly inserted in the cockpit located on the
battery (fig.3).
Summary of Contents for B0873
Page 2: ......
Page 130: ...EL 2 0 0 1 0 1 1...
Page 131: ...Bi2 Air AR EL 3 0 2 1 OLIMPIA SPLENDID 2 3 4 5 6 7 8 9 10 11...
Page 133: ...Bi2 Air AR S 1 1b 1a 1a 1 4 3 3 1 2 2 4 2 3 EL 5 0 6 1 1 1 1 2 3 2 1 4 2 4 N 3 S S 3...
Page 134: ...1b 1 1 1a 1a 1b 5 7 4 EL 6 3 7 4 1 1 1 5...
Page 137: ...Bi2 Air AR EL 9 _2 B Led Off CV On CV 1 H2O 20 C H2O 30 C 2 3 4 5 1400 rpm 6 100 rpm 30 C 20 C...
Page 147: ......
Page 148: ...263198A...

