background image

GB

I

16

piastra. Avvitare i dadi ad alette al sup-

porto a U e fissarli in modo adeguato.

  Nota: si consiglia di non stringere 

eccessivamente i dadi per evitare di 

danneggiare la flangia del radiatore.

5. Per montare le rotelle anteriori, ripetere 

i passaggi 2, 3 e 4 sulla parte anteriore 

del radiatore.

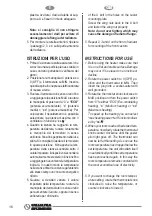
ISTRUZIONI PER L’USO

1. Prima di azionare la stufa assicurarsi che 

si trovi su una superficie piana e stabile,in 

caso contrario potrebbero verificarsi dei 

danni.

2. Posizionare la manopola di potenza su 

0 (OFF) e il termostato su MIN. Inserire 

quindi la spina in una presa elettrica dotata 

di messa a terra.

3. Ruotare il termostato in senso orario fino 

a raggiungere la posizione MAX e ruotare 

la manopola di potenza da “0” a 

“ECO”


(potenza eco-modulante), “●” (potenza 

media) o “●●” (potenza massima). Per 

velocizzare il riscaldamento è possibile 

selezionare la potenza massima con il 

ventilatore in funzione “●● ”.

4. Quando la stanza ha raggiunto la tem-

peratura desiderata, ruotare lentamente 

la manopola del termostato in senso 

antiorario fino allo spegnimento della luce 

pilota. Si consiglia di lasciare il termostato 

in questa posizione.  Non appena la tem-

peratura della stanza scenderà sotto il 

valore impostato, il dispositivo si accenderà 

automaticamente e resterà in funzione fino 

a raggiungere nuovamente la temperatura 

indicata. In questo modo la temperatura 

nella stanza rimarrà costante garantendo 

allo stesso tempo un consumo energetico 

ridotto.

5. Qualora si desideri variare il valore 

impostato della temperatura, ruotare la 

manopola del termostato in senso orario 

per aumentare il valore, oppure in senso 

antiorario per diminuirlo.

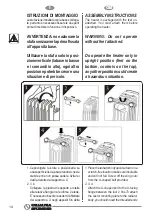
of the U bolt in the holes on the castor 

mounting plate.

  Screw the wing nuts back to the U bolt 

and fasten the wing nut properly.

  Note: do not over tighten, which may 

cause the damage of radiator flange.

5. Repeat 2, 3 and 4 on the front of radiator 

for mounting of the front castors.

INSTRUCTIONS FOR USE

1. Before using the heater make sure that 

it is on a flat and stable surface.Damage 

may occur if it is placed on an incline or 

decline.

2. Rotate the power switch to 0 (OFF) po-

sition and the thermostat to MIN. Then 

insert the plug into a socket-outlet with 

well grounded.

3. Rotate the thermostat knob clockwise to 

MAX position and turn the power switch 

from “0” to either “ECO” (Eco-modulating 

heating),  “●”  (Medium  heating)  or  “●●” 

(Maximum heating).

  To speed up the heating you can select 

“max heating power+fan” function indicat-

ed by “●● ”.

4. When your room reaches the desired tem-

perature, now slowly rotate the thermostat 

knob counter clockwise until the power 

pilot light goes off. The thermostat can 

now be left at this setting. As soon as the 

room temperature has dropped below the 

set temperature, the unit will switch itself 

on automatically until the set temperature 

has been reached again. In this way the 

room temperature remains constant with 

the most economical use of electricity.

5. If you want to change the room temper-

ature setting, rotate the thermostat knob 

clockwise to raise the temperature, or 

counter clockwise to lower it.

Summary of Contents for CALDORAD 9 turbo timer

Page 1: ...TING INSTRUCTIONS THIS PRODUCT IS ONLY SUITABLE FOR WELL INSULATED SPACES OR OCCASIONAL USE MANUEL D UTILISATION CE PRODUIT NE PEUT TRE UTILIS QUE DANS DES LOCAUX BIEN ISOL S OU DE MANI RE OCCASIONNEL...

Page 2: ...onare il selettore di po tenza su OFF e scollegare la stufa dall impianto elettrico 5 E vietato l uso dell apparec chio ai bambini e alle persone inabili non assistite IMPORTANT SAFEGUARDS Whenusingan...

Page 3: ...l est interdit de permettre l utilisation de l appareil aux enfants et aux personnes incapables sans assistance INFORMACI N IMPORTANTE SOBRE LA SEGURIDAD Alutilizarundispositivoel ctrico es necesario...

Page 4: ...l usodiunaprolunga in quantopotrebbeprovocareun surriscaldamento e causare un rischio di incendio 12 Utilizzare la stufa in un area benareata Noninserirealcun oggetto nei fori di ventilazione 6 Extrem...

Page 5: ...risque d incendie 12 Utiliser le po le dans une zone bien a r e N ins rer aucun objet dans les orifices de ven 6 Es necesaria extrema aten ci n cuando se utiliza una es tufa cerca de ni os personas in...

Page 6: ...inanze di una vasca una doccia o una piscina Non posizionare mai la stufa in modo tale che possa cadere all interno di una vasca o di un altrocontenitored acqua Fare tilationorexhaustopening To preven...

Page 7: ...douche ou d une piscine Ne jamais placer le po le de telle sorte qu ilpuissetomber l int rieur de la baignoire ou d un autre ventilaci n y escape Para pre venirelriesgodeincendios evi te cualquier ob...

Page 8: ...i vita del dispositivo rispettare le normative che regolano lo smaltimento dell olio 21 Lastufanondeveessereutiliz zata in stanze il cui pavimento abbia un area inferiore a 5 m2 wherechildrenandvulner...

Page 9: ...21 Le po le ne doit pas tre utilis dans des pi ces dont le sol pr sente une surface Preste particular atenci n en presenciadeni osopersonas vulnerables 16 Cuando la estufa est en funcionamiento su su...

Page 10: ...e sensorialiomen tali siano ridotte oppure con mancanza di esperienza o di conoscenza amenocheesse abbiano potuto beneficiare 22 It is forbidden to dispose of or leave in the reach of children thepack...

Page 11: ...s physiques sen sorielles ou mentales sont r duites ou bien manquant d exp rience ou de connais sance moins qu elles aient 22 Est prohibido abandonar y dejar el material de embalaje al alcance de los...

Page 12: ...ERVARE LE PRESENTI ISTRUZIONI COMPONENTI pliance by a person in charge of their safety Children must be supervised to ensure they donotplaywiththeappliance FORHOUSEHOLDUSEONLY SAVETHESEINSTRUCTIONS ST...

Page 13: ...NTS una persona responsable de suseguridad Losni osdeben ser vigilados para controlar quenojueguenconelaparato EXCLUSIVAMENTE PARA USO DOM STICO CONSER VE ESTAS INSTRUCCIONES COMPONENTES A Ailettes ra...

Page 14: ...r only in upright position feet on the bottom controls on the top anyotherpositioncouldcreate a hazardous situation 1 Capovolgere la stufa e posizionarla su unasuperficieliscia assicurandosichesia sta...

Page 15: ...estufa sin haberla fijado a la base correspondiente Utilicelaestufasoloenposici n vertical labasehaciaabajoylos mandoshaciaarriba cualquier otra posici n podr a generar una situaci n de peligro 1 Reto...

Page 16: ...to 5 Qualora si desideri variare il valore impostato della temperatura ruotare la manopola del termostato in senso orario per aumentare il valore oppure in senso antiorario per diminuirlo of the U bol...

Page 17: ...a temp rature tourner la molette du thermostat dans le sens des aiguilles d une montre pour augmenter la valeur ou bien dans le sens inverse des aiguilles d une montre pour la diminuer los orificios c...

Page 18: ...ttended or is not in use FAN ONLY FUNCTION Toenablethisfunction rotatethepowerswitch to fan symbol TIMER A Orologio B Freccia riferimento orario corrente C Interruttore timer D Segmenti NOTE Questo un...

Page 19: ...de ventilaci n poniendo el mando de potencia en TEMPORIZADOR A Horloge B Fl che de r f rence heure actuelle C Interrupteur temporisateur D Segments NOTES Il y a un temporisateur 24 heures in tervalle...

Page 20: ...inizia a lavorare in modalit continua escludendo un qual siasi intervento del timer Se l interruttore viene regolato nella posizione 0 l appa recchio si spegne in modalit continua escludendo un qualsi...

Page 21: ...en excluant toute intervention du temporisateur Si l interrupteur est r gl dans la position 0 l appareil s teint en mode continu excluant toute intervention du tempori sateur NOTES Le param trage du t...

Page 22: ...on bagnato AVVERTENZA Non immergere la stufa in ac qua Non usare detergenti o abrasivi chimici Onde evitare possibili pericoli non bagnare le parti interne OVERHEAT PROTECTION This heater is protected...

Page 23: ...as utiliser de produits de nettoyages ou d abrasifs chimiques De fa on viter des dangers possibles ne pas mouiller les parties internes PROTECCI N CONTRA EL RECALENTAMIENTO Este aparato cuenta con una...

Page 24: ...nformazioni pi dettagliate sul riciclag gio di questo prodotto contattare l ufficio comunale il servizio locale di smaltimento rifiuti o il negozio in cui stato acquistato il prodotto Questa disposizi...

Page 25: ...d chets ou le magasin o le produit a t achet Cette disposition est valable uniquement dans les pays membres de l UE 3 Para guardar la estufa enrolle el cable en su alojamiento y conserve el aparato en...

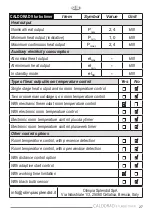
Page 26: ...te Con controllo della temperatura ambiente tramite termostato meccanico Con controlo elettronico della temperatura ambiente Con controllo elettronico della temperatura ambiente e temporizzatore giorn...

Page 27: ...or more manual stages no room temperature control With mechanic thermostat room temperature control With electronic room temperature control Electronic room temperature control plus day timer Electro...

Page 28: ...ieurs paliers manuels pas de contr le de la temp rature de la pi ce Contr le de la temp rature de la pi ce avec thermostat m canique Contr le lectronique de la emp rature de la pi ce Contr le lectroni...

Page 29: ...sin control de temperatura interior Con control de temperatura interior mediante termostato mec nico Con control electr nico de temperatura interior Control electr nico de temperatura interior y temp...

Page 30: ......

Page 31: ......

Page 32: ...270041D...

Reviews: