
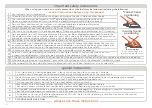


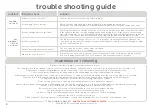


problem
things to check
solution
Iron does
not heat
Is fabric selector set to off?
Is iron plugged in correctly?
Turn the fabric selector knob to a fabric setting.
Check to make sure the plug is fully plugged into a working power outlet.
Also make sure that there are not other appliances which could overload the power outlet.
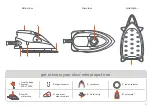
Iron
produces
little or
no steam
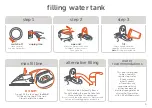
Is there enough water in the tank?
Check “sight window” on the side of the iron to see if there is water in the tank. If you don’t see water
in the tank you can also check by unplugging the iron & letting it cool. Place the iron on the resting
side of the solemate™ on a secure surface. Carefully open the lid on the top fill water tank to check the
water level. Top off the water level as needed, not going over the max fill on the plastic housing.
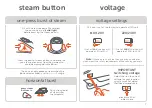
Is iron hot enough?
Are you pressing the steam buttons?
Did you let your iron rest?
The fabric selector must be set to (•• or •••) to produce steam. Wait until the lights on the
“one-press steam control” activate to let you know that the soleplate is warm enough to make
a good solid steam burst.
The iron can only produce steam when the fabric
selector knob is set to (••, •••) range.
If your iron has been on a long time (excess of half hour) without steam use, please let your
iron rest (unplugged) for about 5 to 10 minutes. This will allow steam to produce.
trouble shooting guide
10
maint cleaning
Always clean the soleplate of a steam iron when it Is cool.
The soleplate should be cleaned if starch or other residue builds up. When the iron is cool, wipe the soleplate with a soft, damp cloth.
Or purchase commercially available soleplate cleaner and follow the instructions according to the manufacturer.
Do not use abrasive cleaners or scouring pads as this will damage the iron’s soleplate and its coating.
Mineral deposits from tap water can occur in the soleplate vents. To clean, fill the water tank and heat the iron to the highest (•••) setting.
Once the iron is fully heated, unplug the iron and hold over a sink. Press the steam button repeatedly until water begins
to drip out of the soleplate. Be careful, as this creates large amounts of steam.
Do not use any heavy duty cleaning or descaling products, such as abrasive sponges.
Never hold iron under a running tap while plugged into the wall. Be sure the iron is cold before filling and if you spill water by overfilling,
be sure to dry off iron with a cloth before plugging the iron back into the outlet.
Be sure to rest iron on soft surface that will not burn, such as our solemate™, during
use and storage. Be careful of the iron's hot surface until it cools.
It is best to empty the water tank after you finish ironing. Let water cool before emptying.
Make sure the iron is cool before storing it.
Clean solemate™ by using water & soft dish soap. Let dry before installing onto iron. Solemate™ is dishwasher safe.
If any problem persists,
contact our customer service
1-800-899-5157 or customerservice@oliso.com