11
Setting / Changing Knives
WARNING!
Knives are extremely sharp. Be very careful
when handling knives. Failure to comply
may cause serious injury!
The Oliver 20” planer was designed to accept
22-1/8” x 1” x 1/8”) knives. Installing straight
knives accurately is an important step to achieve
a smooth finish. End to end, and knife to knife
adjustment must be accurate within .001". Use
a dial indicator if available to check results and
fine tune. Remove and replace the knife in one
slot before changing the next knife. Any knife
sharpening, or replacement should be done to
all four knives at the same time.
1.
Disconnect machine from power source.
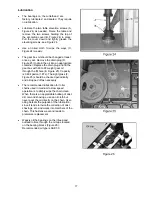
2. Open the hood, loosen eight locking bolts
(A, Figure 8) on the clamping block and
remove the knife. Remove and clean the
clamping block, and springs (B, Figure 9).
Also clean cutterhead knife slot before re-
installing the sharpened, or new knife.
3. Re-install the springs, knife and clamping
block, and just snug the eight locking bolts
(A, Figure 8).
Note:
You should still be able
to raise and lower the knife.
4. Notice that the knife does not rest at the
bottom of the knife slot. Instead, the knife
rests on three jack screws (C, Figure 8), and
two springs. These jack screws are used to
support and raise the knife.
5. Place the knife setting gauge (D, Figure 10)
on to the cutterhead as shown. Use the
jackscrew to raise the knife so that the point
just touches the raised portion of the gauge.
6. Once knife is set to the proper height,
tighten two center locking bolts and, work
your way towards the ends until all bolts are
tight.
7. Re-check knife with the knife setting gauge
after tightening all of the locking bolts.
8. Repeat for the remaining three knives.
Summary of Contents for 4455
Page 19: ......


