4.2.3.20 Main motor/ Solenoid
(1) Remove the scanner. (See Subsection 4.2.1)
(2) Remove the left side cover. (See Subsection 4.2.3.1)
(3) Remove the right side cover. (See Subsection 4.2.3.2)
(4) Remove the rear cover. (See Subsection 4.2.3.3)
(5) Remove the front cover (See Subsection 4.2.3.4)
(6) Remove the plate shield front. (See Subsection 4.2.3.16)
(7) Remove the top cover assembly. (See Subsection 4.2.3.5)
(8) Remove the control panel assembly. (See Subsection 4.2.3.9)
(9) Remove the feeder unit assembly. (See Subsection4.2.3.11)
(10) Remove the guide eject assembly. (See Subsection4.2.3.14)
(11) Remove the color registration assembly. (See Subsection 4.2.3.17)
(12) Remove the plate shield rear. (See Subsection 4.2.3.18)
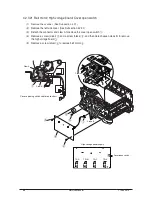
(13) Take out two screws (silver) to remove the part A and the side plate R assembly .
(14) Remove a screw (silver) to remove the plate lockout ID .
(15) Remove five screws (silver) to remove the part B and the bracket inner .
(16) Remove two screws (silver) to remove the Fuser- motor .
(17) Remove two screws (silver) to remove the DC motor .
(18) Remove two screws (silver) to remove the ID lift up motor .
(19) Remove two screws (black) to remove the hopping motor .
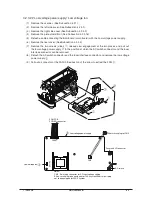
(20) Remove two screws (black) to remove a claw C and the Gear-HP-assembly .
(Tool No. 1)
(21) Remove a spring , a screw and solenoid .
(22) Remove a spring , a claw D of the hoppingroller , claw E of the gear , bushing ,
hopping roller and frame hopping .
(23) Remove the lever end .
86
Service Manual
Y108500-4


