2KL/2KK
1-5-23
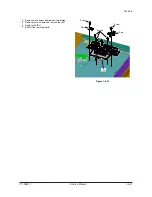
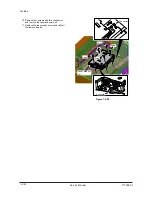
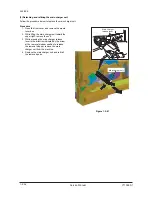
4. Remove the stop ring and bush from the
front of the machine.
5. Remove the scanner wire drum shaft from
the scanner unit.
Figure 1-5-40
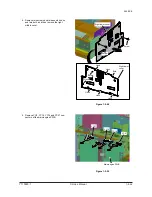
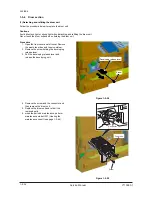
6. Insert the locating ball on each of the scan-
ner wires into the hole in the respective
scanner wire drum and wind the scanner
wire three turns inward and four turns out-
ward.
With the locating ball as the reference point,
wind the shorter end of each of the wires
outward.
7. Secure the scanner wires using the scanner
wire stoppers.
Figure 1-5-41
Scanner wire drum shaft
Bush
Stop ring
Three turns
inward
Three turns
inward
Four turns
outward
Four turns
outward
Locating ball
Scanner wire
drum
Scanner wire
stopper
Scanner wire
stopper
Y110980-1 Service Manual
Summary of Contents for d-Copia 1800
Page 1: ...d Copia 1800 d Copia 2200 Digital Copier SERVICE MANUAL Code Y110980 1...
Page 4: ...This page is intentionally left blank...
Page 10: ...This page is intentionally left blank...
Page 14: ...2KL 2KK This page is intentionally left blank...
Page 20: ...2KL 2KK 1 1 6 This page is intentionally left blank Service Manual Y110980 1...
Page 38: ...2KL 2KK 1 2 18 This page is intentionally left blank Service Manual Y110980 1...
Page 108: ...2KL 2KK 1 3 70 This page is intentionally left blank Service Manual Y110980 1...
Page 142: ...2KL 2KK 1 4 34 This page is intentionally left blank Service Manual Y110980 1...
Page 198: ...2KL 2KK 1 5 56 This page is intentionally left blank Service Manual Y110980 1...
Page 224: ...2KL 2KK 2 2 6 This page is intentionally left blank Service Manual Y110980 1...
Page 240: ...2KL 2KK 2 3 16 This page is intentionally left blank Service Manual Y110980 1...
Page 271: ...INSTALLATION GUIDE FOR PAPER FEEDER...
Page 285: ...INSTALLATION GUIDE FOR DUPLEX UNIT...
Page 294: ...INSTALLATION GUIDE FOR Printing System Z...
Page 297: ...UPDATING STATUS DATE UPDATED PAGES PAGES CODE 09 2009 1ST EDITION 297 Y110980 1...


