2KL/2KK
1-6-1
1-6 Requirements on PWB Replacement
1-6-1 Upgrading the firmware
Follow the procedure below to upgrade the firmware of main, engine and MMI.
Firmware upgrading requires the following tools:
Flash DIMM
Procedure
1. Perform maintenance item U000 (mainte-
nance report output) and check U019 ROM
version.
2. Turn the main power switch off and unplug
the power cable from the wall outlet.
3. Remove five screws and remove the rear
cover.
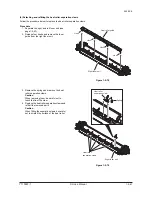
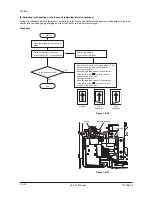
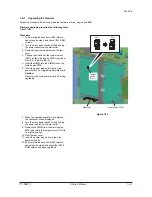
4. Change the position of the jumper switch
(SW1) on the main/engine PWB from upper
side (3-2) to lower side (2-1).
5. Insert the DIMM into the DIMM slot on the
main/engine PWB.
6. Insert the power plug and turn the main
power switch on. Upgrading firmware starts.
Caution:
Never turn the main power switch off during
upgrading.
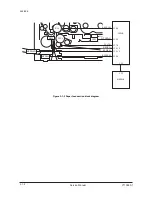
Figure 1-6-1
7. When the upgrade operation is complete,
the checksum will be displayed.
8. Turn the main power switch off and unplug
the power cable from the wall outlet.
9. Remove the DIMM from the main/engine
PWB, and return the jumper switch (SW1) to
its original position.
10. Refit the rear cover.
11. Insert the power plug and turn the main
power switch on.
12. Perform maintenance item U000 (mainte-
nance report output) and check that U019
ROM version has been upgraded.
3
2
1
3
2
1
SW1
SW1
Main/engine PWB
DIMM slot
Jumper
switch
(SW1)
Y110980-1 Service Manual
Summary of Contents for d-Copia 1800
Page 1: ...d Copia 1800 d Copia 2200 Digital Copier SERVICE MANUAL Code Y110980 1...
Page 4: ...This page is intentionally left blank...
Page 10: ...This page is intentionally left blank...
Page 14: ...2KL 2KK This page is intentionally left blank...
Page 20: ...2KL 2KK 1 1 6 This page is intentionally left blank Service Manual Y110980 1...
Page 38: ...2KL 2KK 1 2 18 This page is intentionally left blank Service Manual Y110980 1...
Page 108: ...2KL 2KK 1 3 70 This page is intentionally left blank Service Manual Y110980 1...
Page 142: ...2KL 2KK 1 4 34 This page is intentionally left blank Service Manual Y110980 1...
Page 198: ...2KL 2KK 1 5 56 This page is intentionally left blank Service Manual Y110980 1...
Page 224: ...2KL 2KK 2 2 6 This page is intentionally left blank Service Manual Y110980 1...
Page 240: ...2KL 2KK 2 3 16 This page is intentionally left blank Service Manual Y110980 1...
Page 271: ...INSTALLATION GUIDE FOR PAPER FEEDER...
Page 285: ...INSTALLATION GUIDE FOR DUPLEX UNIT...
Page 294: ...INSTALLATION GUIDE FOR Printing System Z...
Page 297: ...UPDATING STATUS DATE UPDATED PAGES PAGES CODE 09 2009 1ST EDITION 297 Y110980 1...

