7
19
19
18
18
A
15
16
16
17
ᧄߩࠞ࠶࠻ࠍᒁ߈ߒޔ
೨ࠞࡃࠍ㐿
ߊޕ
ࡆࠬ ᧄ߅ࠃ߮ࡈ࠶ࠢ ▎ᚲࠍᄖ
ߒޔ
ࠞࡃ ࠍขࠅᄖߔޕ
ᦨਅᲑએᄖߩࠞ࠶࠻ # ߩࠞ࠶࠻ࠍᒁ
߈ߔޕ
㧔 Ბએⵝ⌕ᤨߩߺ㧕
ࡈ࠶ࠢ ▎ᚲࠍᄖߒޔ
ࠞࡃ ࠍขࠅ
ᄖߔޕ
㧔 Ბએⵝ⌕ᤨߩߺ㧕
ࠞࡃ ߪޔ
⍫ශᣇะ
Ԙ
ࠃࠅߒ⍫ශᣇะ
ԙ
ߦ߹ࠊߔࠃ߁ߦᄖߔޕ
ฦࠞ࠶࠻ࠍࡆࠬ / $ ᧄߢ࿕ቯߔ
ࠆޕ
ขࠅᄖߒߚㇱຠࠍరㅢࠅߦขࠅઃߌࠆޕ
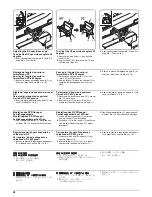
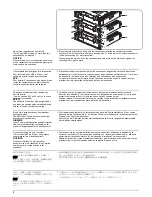
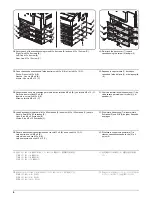
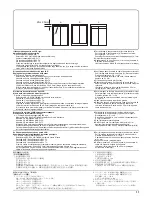
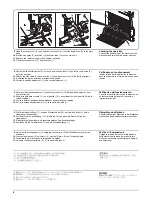
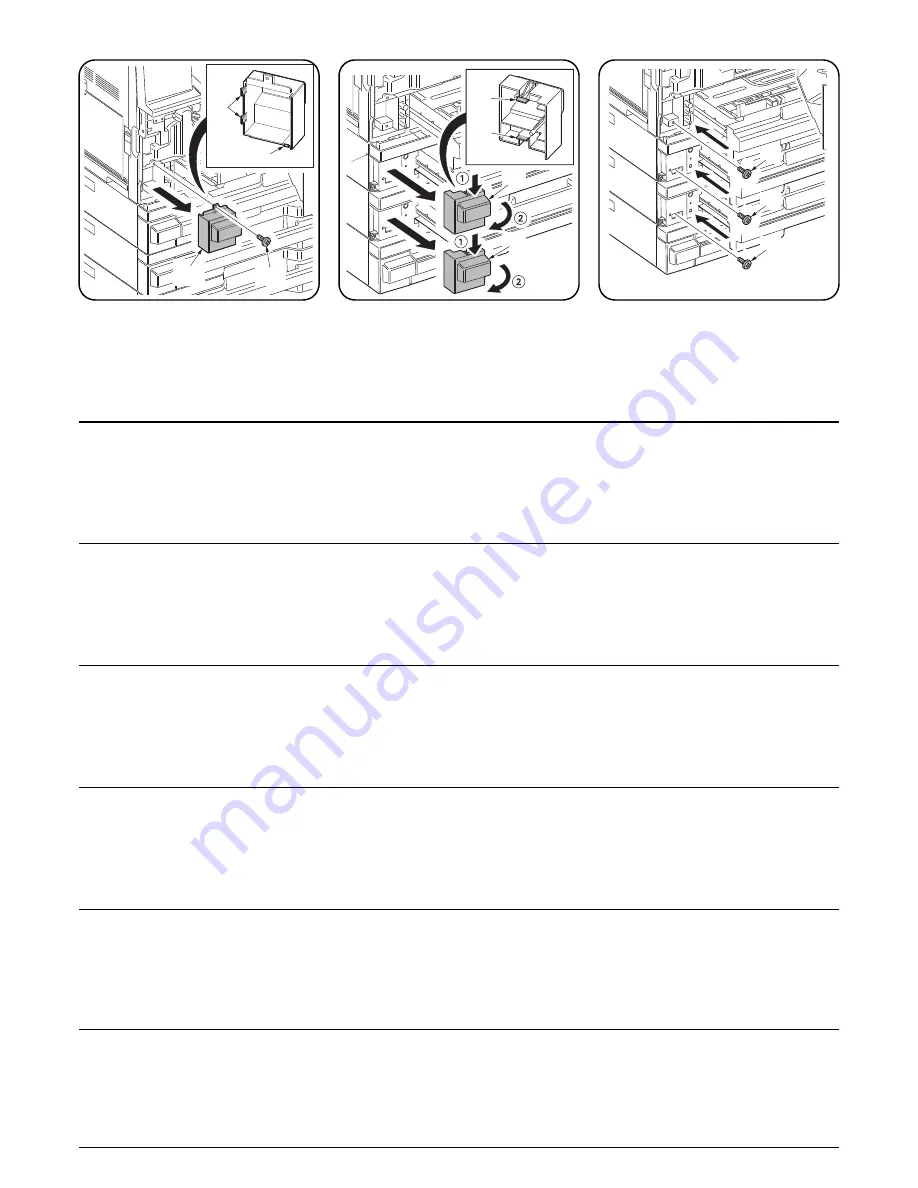
12.
Pull the cassette out of the main body and
open the front cover.
13.
Remove the screw (15) and disengage the 3
hooks (16). Then remove the cover (17).
14.
Pull out the cassettes other than the lowest
cassette (A).(only when stacking 2 or more
cassettes)
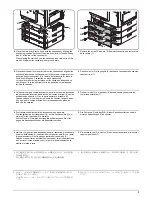
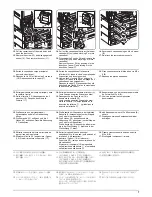
15.
Disengage the 2 hooks (18) and remove the
cover (19). (only when stacking 2 or more
cassettes)
Remove the cover (19) by pushing it in the
direction of arrow
Ԙ
and turning it in the
direction of arrow
ԙ
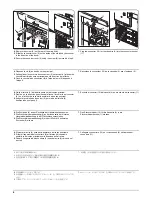
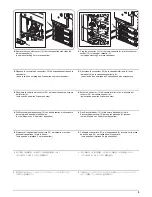
16.
Secure each cassette using an M3 x 8 screw
(B).
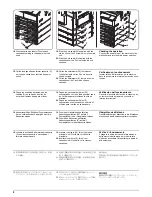
17.
Re-attach the removed components.
12.
Sortez la cassette du corps principal et
ouvrez le capot avant.
13.
Déposez la vis (15) et libérez les 3 crochets
(16). Déposez ensuite le capot (17).
14.
Sortez les cassettes sauf la cassette
inférieure (A). (dans le cas d'un empilage de
2 cassettes ou plus uniquement)
15.
Libérez les 2 crochets (18) et enlevez la
capot (19). (dans le cas d'un empilage de 2
cassettes ou plus uniquement)
Déposez le capot (19) en poussant dans la
direction de la flèche
Ԙ
et en tournant dans
la direction de la flche
ԙ
.
16.
Fixez chaque cassette à l'aide d'une vis M3 x
8 (B).
17.
Reposez les pièces déposées.
12.
Extraiga el casete del cuerpo principal y abra
la cubierta frontal.
13.
Quite el tornillo (15) y desenganche los 3
ganchos (16). Después, desmonte la
cubierta (17).
14.
Extraiga los casetes, excepto el inferior (A).
(solo cuando se apilan 2 casetes o más)
15.
Desenganche los 2 ganchos (18) y
desmonte la cubierta (19).
(solo cuando se apilan 2 casetes o más)
Quite la cubierta (19) empujándola en la
dirección de la flecha
Ԙ
y girndola en la
direccin de la flecha
ԙ
.
16.
Asegure cada uno de los casetes por medio
de un tornillo M3 x 8 (B).
17.
Vuelva a instalar los componentes
desmontados.
12.
Die Kassette aus der Haupteinheit
herausziehen und die Frontabdeckung
öffnen.
13.
Die Schraube (15) entfernen und die 3
Haken (16) aushaken. Dann die Abdeckung
(17) abnehmen.
14.
Die Kassetten mit Ausnahme der untersten
Kassette (A) herausziehen.(nur bei Stapeln
von 2 oder mehr Kassetten)
15.
Die 2 Haken (18) aushaken und die
Abdeckung (19) abnehmen.(nur bei Stapeln
von 2 oder mehr Kassetten)
Die Abdeckung (19) abnehmen, indem man
sie in der Pfeilrichtung
Ԙ
drckt und in der
Pfeilrichtung
ԙ
dreht.
16.
ede Kassette mit einer M3 x 8 Schraube (B)
sichern.
17.
Die abgenommenen Komponenten wieder
anbringen.
12.
Estrarre il cassetto dal corpo principale ed
aprire il coperchio anteriore.
13.
Rimuovere la vite (15) e sganciare i 3 ganci
(16). Quindi rimuovere il coperchio (17).
14.
Estrarre i cassetti tranne quello del
cassettone (A) più in basso. (solo quando si
impilano 2 o più cassettoni)
15.
ganciare i 2 ganci (18) e rimuovere il
coperchio (19). (solo quando si impilano 2 o
più cassettoni)
Rimuovere il coperchio (19) spingendolo
nella direzione della freccia
Ԙ
e ruotandolo
nella direzione della freccia
ԙ
.
16.
Fissare ciascun cassetto usando una vite
M3 x 8 (B).
17.
Ricollegare i componenti rimossi.
ҢЏᴎЁᢝߎ㒌Ⲧˈ✊ৢᠧᓔࠡⲪᵓDŽ
পϟ㶎ϱ˄˅ˈᵒᓔϾवᠷ˄˅DŽ✊ৢ
পϟⲪᵓ˄˅DŽ
ᢝߎ䰸ᑩ䚼㒌Ⲧ˄$˅Пⱘ㒌ⲦDŽ
˄ҙᔧේϾϾҹϞⱘ㒌Ⲧᯊ˅
ᵒᓔϾवᠷ˄˅ˈ✊ৢপϟⲪᵓ˄˅DŽ
˄ҙᔧේϾϾҹϞⱘ㒌Ⲧᯊ˅
পϟⲪᵓ˄˅ᯊˈ⊓ㆁ༈
Ԙ
ᮍⲪᵓ✊ৢ
⊓ㆁ༈
ԙ
ᮍ䕀ࡼⲪᵓDŽ
Փ⫼0h 㶎ϱ˄%˅㋻᠔᳝ⱘ㒌ⲦDŽ
䞡ᮄᅝ㺙পϟⱘ䚼ӊDŽ
B
B
B
Summary of Contents for d-Copia 1800
Page 1: ...d Copia 1800 d Copia 2200 Digital Copier SERVICE MANUAL Code Y110980 1...
Page 4: ...This page is intentionally left blank...
Page 10: ...This page is intentionally left blank...
Page 14: ...2KL 2KK This page is intentionally left blank...
Page 20: ...2KL 2KK 1 1 6 This page is intentionally left blank Service Manual Y110980 1...
Page 38: ...2KL 2KK 1 2 18 This page is intentionally left blank Service Manual Y110980 1...
Page 108: ...2KL 2KK 1 3 70 This page is intentionally left blank Service Manual Y110980 1...
Page 142: ...2KL 2KK 1 4 34 This page is intentionally left blank Service Manual Y110980 1...
Page 198: ...2KL 2KK 1 5 56 This page is intentionally left blank Service Manual Y110980 1...
Page 224: ...2KL 2KK 2 2 6 This page is intentionally left blank Service Manual Y110980 1...
Page 240: ...2KL 2KK 2 3 16 This page is intentionally left blank Service Manual Y110980 1...
Page 271: ...INSTALLATION GUIDE FOR PAPER FEEDER...
Page 285: ...INSTALLATION GUIDE FOR DUPLEX UNIT...
Page 294: ...INSTALLATION GUIDE FOR Printing System Z...
Page 297: ...UPDATING STATUS DATE UPDATED PAGES PAGES CODE 09 2009 1ST EDITION 297 Y110980 1...

