background image

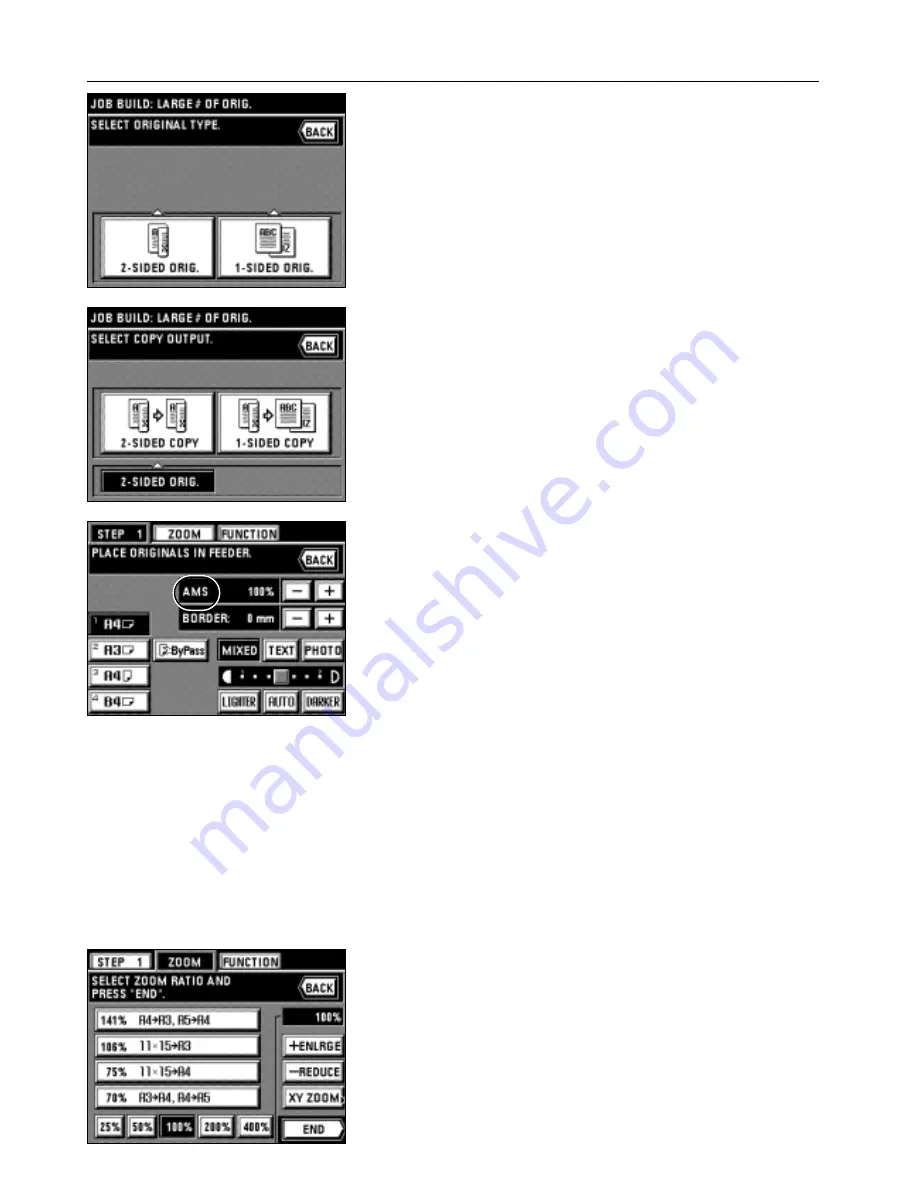
4. Select the type of originals by touching the "2-SIDED ORIG." key or "1-SIDED ORIG."

key.

53

APPLICABLE COPY MODES

5. Select the finishing of copy by touching the "2-SIDED COPY" key or "1-SIDED COPY"

key.

6. The read-in starting screen will appear.

* Select the size of paper to be copied.

* The auto magnification selection mode has been set for the initial mode. When setting

the custom paper size or the custom zoom ratio, touch the manual key until "1:1" is
displayed on the zoom ratio display. 

* When changing the zoom ratio, touch the "+" key or "-" key on the right side of the

zoom ratio display. When setting the zoom mode, such as standard zoom or XY zoom,
touch the "ZOOM" key and follow the instruction on page 19 and after.

* The setting of the zoom mode can be changed by each job.

Summary of Contents for d-Copia 52

Page 1: ...42 52 COPIER OPERATION MANUAL Cod 506509D...

Page 2: ...minutes in the areas corresponding to the Swiss Energy 2000 Program area Your attention is drawn to the following actions which could compromise the conformity attested to above as well as the charac...

Page 3: ...Please read the instruction handbook before using the copier Keep it close to the copier for easy reference COPIER OPERATION MANUAL d Copia 52 d Copia 42...

Page 4: ...attention to or incorrect compliance with the related points Symbols The symbol indicates that the related section includes safety warnings Specific points of attention are indicated inside the symbo...

Page 5: ...n 52 Large quantity of originals 52 Auto size 52 Choose size 52 2 Duplex copies from one sided and duplex mixed originals 55 Finishing like originals Print as original 55 Duplex copies from all origin...

Page 6: ...erature inside Do not touch parts in this area because there is a danger of getting burned Label 3 High temperature inside Do not touch parts in this area because there is a danger of getting burned L...

Page 7: ...onditioned room recommended room temperature around 20 C humidity around 65 RH and avoid the following locations when selecting a site for the copier Avoid locations near a window or with exposure to...

Page 8: ...YS remove the power plug from the outlet when performing cleaning operations If dust accumulates within the copier there is a danger of fire or other trouble It is therefore recommended that you consu...

Page 9: ...andard zoom mode page 20 Enlarging reducing length and width separately XY zoom mode page 20 Making clear reproductions of photographs Copy quality selection page 21 Copying to front and back of the p...

Page 10: ...nvert copy page 43 Making mirror image copies Mirror image copy page 44 Memorizing frequently used settings Program mode page 45 Copying various originals at a time Job build function page 52 Managing...

Page 11: ...7 NAMES OF PARTS...

Page 12: ...sertion guide Set to match the size of the original when setting in the DF Original table Set the DF original on this table DF opening closing lever Hold when opening and closing the DF Original eject...

Page 13: ...n one drawer runs out during copying this function switches to feeding paper from the other drawer The automatic drawer switching function can be disabled See page 78 2 AUTOMATIC DRAWER SWITCHING 2 Op...

Page 14: ...copy setting screen will appear Page 22 0 JOB BUILD key Touch to use the job build function The setting screen will appear Page 52 Copy quality mode selection keys Touch to select the MIXED TEXT and...

Page 15: ...drawer out toward you as far as it will go Not to pull more than one drawer out at the same time 2 Turn the width adjustment lever to align the width guide with the paper s width 3 Turn the length ad...

Page 16: ...loading paper into the deck make sure the copy side is facing downward The copy side is the side facing upward when the package is opened 3 Gently push the deck back in When the copier is out of use f...

Page 17: ...vertical or larger size paper pull out the support guide 2 Adjust the insert guides to fit the size of the paper to be loaded 3 Insert the paper all the way in along the guides as far as it will go Wh...

Page 18: ...the opening part of the envelop in the right side and insert them until stop aligning with the insert guide Incorrect setting may cause paper misfeed printing in the different direction or printing o...

Page 19: ...h as vinyl Originals which are not rectangular wet originals sheets with adhesive tape or glue Original with clips or staples To use such originals remove clips or staples and straighten the crumpled...

Page 20: ...an be used How to set auto selection mode Press the auto selection key on the operation panel to light the auto selection indicator 2 Setting original s on the platen For original s that cannot be set...

Page 21: ...s displayed on the touch panel the manual exposure mode is set Exposure will be adjusted with the exposure adjustment key DARKER key or LIGHTER key By moving the cursor on the exposure indicator to th...

Page 22: ...ected faced up and faced down depending on the copy mode Up to 250 sheets can be loaded 9 18 CAUTION If the copier will not be used for a short period of time overnight etc turn the main switch OFF O...

Page 23: ...ustration displays the finishing of the copies when originals are set in the DF When setting originals on the platen copying will be performed based on the left rear position 1 Set the original s 2 To...

Page 24: ...en will appear 3 Set the size of original If the original size is not displayed touch the key to display 4 Set the paper size If the paper size is not displayed touch the key to display If the paper s...

Page 25: ...ng three types of copy quality can be selected 1 Text For originals consisting primarily of text 2 Photo For originals consisting primarily of photos and other half tone images 3 Mixed For originals w...

Page 26: ...o A5R Duplex copying from duplex originals Duplex back and front original is copied on both sides in the same manner Duplex copying from a book original Two page originals of a magazine or a book are...

Page 27: ...riginal s 2 Touch the DUPLEX key The duplex copy setting screen will appear Also same screen will appear by touching DUPLEX key on the function selection screen 3 Select the type of originals If DUPLE...

Page 28: ...and margin width can be selected separately for the front and back sides A binding margin space is made on each copy between 1 mm and 18 mm in 1 mm increments When the front back page margin is set O...

Page 29: ...basic screen The previous figure is set as initial value for the front back page margin Change it as needed 7 Select the margin width on the front side by touching the key or key under the margin wid...

Page 30: ...not displayed touch the key or key to be displayed The page print number setting screen will appear 4 Change the page from which the print is started by touching the key or the key The starting page t...

Page 31: ...ize of originals is limited to A3 A4 vertical or A5 vertical and paper size is limited to A4 The paper size can be changed to make zoom copy to its size The binding direction of the originals can be s...

Page 32: ...ges of copies made from sheet originals a is the width of erasing border Erasing blemishes from edges and middle of copies made from books Book Use to make neat copies from thick books a is the width...

Page 33: ...istered in advance page 74 CUSTOM SIZE FOR BORDER ERASE 5 Select the type of originals by touching the SHEET key BOOK key or CUSTOM key The touch panel will return to the basic screen 9 Making covers...

Page 34: ...e used page 75 DRAWER FOR INSERT SHEETS Settings which can be selected are different depending on the settings of original and finishing of copying paper A circle indicates that the setting is possibl...

Page 35: ...ied pages are copied onto the front only even if original page number specified is even 2 Combination of modes The combination of the modes can be differentiated depending on the type of copying one s...

Page 36: ...en will appear 2 Touch the INSERT key If it is not displayed touch or key to be displayed The copy mode setting screen will appear 4 Specify the type of original by touching the DUPLEX BOOK or 1 SIDED...

Page 37: ...mode setting screen Set each mode in accordance with the following procedure Each mode on the display can be combined page 31 2 Combinations of modes Cover mode settings 8 Touch the COVER key 9 Selec...

Page 38: ...to a specified number of sheets of standard paper Split copy of book original can be used in combination indicates transparency Insert sheets Chapter page specification Check each of the settings The...

Page 39: ...splayed touch or key to be displayed The presentation mode setting screen will appear 5 Touch the COPIED key to copy onto backing sheet and touch the BLANK key not to copy 6 Specify the finishing of c...

Page 40: ...iple copies are possible Transparencies must be fed via the stack bypass tray When the transparency backing mode is used the copies are ejected faced up If originals are set in the DF copying will be...

Page 41: ...e of overlaid image can be adjusted 1 Touch the FUNCTION key The function selection screen will appear 2 Touch the OVERLAY key If it is not displayed touch the key or key to be displayed The overlay m...

Page 42: ...nto one sheet Can be used in conjunction with a duplex copy mode to copy four originals onto one sheet When setting an original on the platen execute steps 1 and 2 in this order 4 IN 1 Use this mode t...

Page 43: ...n all originals are read completely touch the TO PRINT key Copying will begin When the copying is completed the touch panel will return to the basic screen 14 Booklet from book originals Booklet cover...

Page 44: ...riginals have been read touch the TO PRINT key Copying will begin After finishing copying the touch panel will return to the basic screen 15 Weekly magazine from duplex one sided originals Booklet cop...

Page 45: ...If setting originals on the platen go to next step 7 Set the original and touch the CONTINUE key after it has been read Repeat this operation for all the originals 8 After all originals have been rea...

Page 46: ...originals is copied onto the page that follows the cover and the second page is copied onto the page that follows the sheet of the first page Then copies are made so that the copies can be read seque...

Page 47: ...t page 10 Press the Start key When using the DF scanning of originals will be carried out one at a time and then copying and stitching will be carried out When using the platen go to the next step 11...

Page 48: ...election screen will appear 3 Touch the MIRROR key If it is not displayed touch or key to be displayed The touch panel will return to the basic screen 19 Sorting automatically Sort copy Since copying...

Page 49: ...h the TO PRINT key Copying will be performed one by one 20 Memorizing frequency used settings Program mode Up to seven combinations of copy modes and functions displays on the operation panel can be r...

Page 50: ...the COPY key for the program in the management mode setting screen Go to next step 2 Touch the number 1 to 7 of the program to be used Registered copy functions will appear on the screen Program numb...

Page 51: ...of copies If an optional finisher has been installed the staple sort mode and the punch mode can also be adjusted When using a booklet stitcher the staple sort mode can be adjusted 1 Touch the PAUSE k...

Page 52: ...n automatically can be set to trigger after no copying has been done for a certain period page 79 7 AUTO PREHEAT TIME 25 Auto shut off function This function automatically turns the main switch OFF O...

Page 53: ...egin in the order of reservation when the copying of previously reserved job is completed Introduction of the add job screen 1 Job number key The serial number is assigned until 99 in the order of reg...

Page 54: ...nged 3 Touch the MODIFY key 4 When changing the number of copies touch the key or key for setting Change the setting of finishing Press the SORT key to select the mode If an optional finisher has been...

Page 55: ...step 2 5 Touch the DELETE key To cancel DELETE touch the CANCEL key 6 Touch the END key The touch panel will return to the basic screen 4 Changing the add job order Although job will be copied in the...

Page 56: ...ory copy from DF and platen Large quantity of originals Large quantity of originals exceeding capacity of setting in the DF at a time can be stored in memory by using this function The originals can b...

Page 57: ...auto magnification selection mode has been set for the initial mode When setting the custom paper size or the custom zoom ratio touch the manual key until 1 1 is displayed on the zoom ratio display W...

Page 58: ...ollow step 4 and after on page 26 7 Set the original s 8 Press the Start key 9 When continuing to read originals touch the CONTINUE key to repeat from step 7 When all originals has been read completel...

Page 59: ...x copies from all originals Duplex all originals One sided originals and duplex originals are set and read by each and all originals are finished as duplex copies without making blank pages Copying de...

Page 60: ...side of the display of the width of erasing border to set the width of erasing border The width can be selected from 6 12 and 18 mm The border erase mode in this setting is effective only for the shee...

Page 61: ...en installed the staple sort mode setting can be adjusted in the similar way to the sorter mode 11 Set the number of copies by touching the key or key This number can also be entered with numeric keys...

Page 62: ...n touched go to step 6 If the SHEET ORIGINALS has been touched go to step 7 5 Select the type of originals to be read by touching the SHEET ORIGINAL key or BOOK ORIGINAL key If the SHEET ORIGINAL key...

Page 63: ...unctions can be set Margin mode Touch the MARGIN key and follow step 4 and after on page 25 Merge copy Touch the MERGE COPY key and follow step 3 and after on page 38 Page number printing Touch the PA...

Page 64: ...ttings of staple sort mode and punch mode can be set in the same manner as with sorter mode setting If an optional booklet stitcher has been installed the staple sort mode setting can be adjusted in t...

Page 65: ...f 1 000 sheets up to a maximum of 250 000 Entering 0 enables unlimited copying When a department reaches its limit the copier will not make any more copies for it 62 Deleting ID codes Use this to dele...

Page 66: ...make settings The 4 digit management code can be changed page 79 9 CHANGE MANAGEMENT CODE WITH KEYS 3 How to make the various settings Registering new ID codes 1 Set the copy management mode page 61 2...

Page 67: ...l return to the screen in step 3 9 Touch the END key The display will return to the copy management mode setting screen 10 Touch the END key The touch panel will return to the basic screen Deleting ID...

Page 68: ...maximum of 250 000 Entering 0 enables unlimiting copying 6 Touch the REGISTER key The display will return to the screen in step 4 To alter the copy limit s of an other department s repeat steps 4 to 6...

Page 69: ...RENCE key Total number of copies and total number of copies of each paper size will be displayed 3 To view numbers of copies made by individual departments touch the ID CODE key If the ID code is not...

Page 70: ...o needed in the personal computer For the setting method see the online manual for the printer To turn it off touch the OFF key 3 Touch the END key The touch panel will return to the basic screen 4 Ma...

Page 71: ...etting the time Set the day of the week and the present time Unless set correctly the timer will not triggered operations at the expected time 68 Programming the week timer Set the times at which the...

Page 72: ...TH KEYS 3 How to make settings for the various functions Setting the time 1 Set the timer mode page 67 2 Touch the TIMER SET key 3 Set the day of the week the hour and the minutes by touching the key...

Page 73: ...turn to the week timer mode setting screen 9 Touch the END key The touch panel will return to the basic screen Cancelling the timer function 1 Set the timer mode page 67 2 Touch the CANCEL key 3 Touch...

Page 74: ...er indicator will blink Warm up has begun Wait a while Another way to start warm up is to turn the main switch OFF O then ON again 2 When warm up is over make copies with the usual procedure 3 When co...

Page 75: ...ut setting an original etc the specified drawer can be selected The stack bypass tray can not be set as a default drawer 74 ZOOM MODE The size zoom mode page 19 or the standard zoom mode page 20 can b...

Page 76: ...ECONOMY MODE 1 Touch the CHANGE key for the TONER ECONOMY MODE 2 Touch the ON key or the OFF key for the TONER ECO MODE 3 Touch the ON key or the OFF key for the ECONOMY DEFAULT 4 Touch the END key W...

Page 77: ...he exposure setting in each mode touch the END key 6 QUALITY 1 Touch the MIXED key TEXT key or PHOTO key for the QUALITY When setting other modes continuously see the setting of each mode When finishi...

Page 78: ...nter the number of copies to be changed using the numeric keys 3 Touch the CHANGE key CUSTOM SIZE FOR BORDER ERASE 1 Touch the CHANGE key for the CUSTOM SIZE FOR BORDER ERASE 2 Touch the upper key or...

Page 79: ...E SHORTCUT 1 or CREATE SHORTCUT 2 2 Touch the key of the function to be shortcut The display will return to the copy default setting screen When setting other modes continuously see the setting of eac...

Page 80: ...e AUTO SHUT OFF ON or OFF which automatically turns off main switch if copying is not performed for a certain period of time can be set If auto shut off interferes with your copying operations turn th...

Page 81: ...YPASS When setting other modes continuously see the setting of each mode When finishing the setting finish the machine default setting in accordance with the How to finish the machine default setting...

Page 82: ...per to be loaded to the drawer The display will return to the machine default setting screen To set new paper size for another drawer repeat from steps 2 When setting other modes continuously see the...

Page 83: ...PREHEAT TIME 1 Touch the key or key for the AUTO PREHEAT TIME to change the displayed time 8 AUTO SHUT OFF TIME 1 Touch the key or key for the AUTO SHUT OFF TIME to change the displayed time 9 CHANGE...

Page 84: ...the END key for the machine default setting screen The display will return to the management mode selection screen 2 Touch the BASIC key The touch panel will return to the basic screen 4 LANGUAGE OF...

Page 85: ...cies or other special paper Selecting the staple mode Select the stapling position by touching the staple mode key Three different positions can be stapled Setting the punch mode Touch the punch mode...

Page 86: ...copies cannot be made unless the key counter is inserted into the copier If the key counter is not securely inserted into its opening the message INSERT KEY COUNTER will appear 3 I F kit The copier c...

Page 87: ...___ RESET ALL ORIGINALS IN FEEDER AND PRESS PRINT KEY RESET ORIGINALS IN INITIAL ORDER An original is misfed inside of the DF Remove the misfed original following the procedure remaining the main swit...

Page 88: ...H FINISHER Unfinished copies were ejected into the tray of finisher optional due to the problem happened during copying Check and remove those copies ___ CHECK PAPER IN FINISHER INCOMPLETE COPIES INSI...

Page 89: ...new cartridge horizontally and shake it up and down 3 5 times turning it over each time 4 Similarly shake the new cartridge from side to side 5 7 times turning it over each time 5 Fit the new cartrid...

Page 90: ...torn during removal be sure to remove any loose scraps from inside the copier or they could cause further misfeeds later After removal of misfed paper warm up will begin the misfeed message will disa...

Page 91: ...drawer indicated in the misfeed location indicator 2 Remove the misfed paper without tearing it If the paper does tear remove any scraps of torn paper from inside the copier 3 Push the drawer back in...

Page 92: ...to the stack bypass tray Paper misfeed in desk right cover If PAPER MISFEED OPEN RIGHT COVER and the misfeed location indicator shown in the illustration appear misfeed has occurred in the desk right...

Page 93: ...ion appear misfeed has occurred in the right deck cover It is displayed only when using the deck type paper desk 1 Open the right deck cover 2 Remove the misfed paper without tearing it If the paper d...

Page 94: ...transfer section release button to pull out the transfer section Caution The drum green is highly sensitive to light and dirt Be careful not to expose it to strong light such as room lighting or not t...

Page 95: ...s occurred in the fixing unit ejection section 1 Open the front cover 2 Turn the fixing knob in the direction of the arrow to eject the misfed paper The paper will be ejected to the ejection section R...

Page 96: ...position 10 Close the front cover 4 Misfeed in duplex unit If PAPER JAM IN DUPLEX UNIT OPEN DUPLEX UNIT DRAWER appears misfeed has occurred in the duplex unit If this message appears carry out the pro...

Page 97: ...ed paper without tearing it Close the reversing cover and fix it with the 2 reversing cover screws If the paper does tear remove any scraps of torn paper from inside the copier 8 Push the duplex unit...

Page 98: ...nal to the position where it can be easily removed and remove the misfed originals 7 Close the transfer cover f as it was if the misfed originals can be removed 8 Close the DF original reversing cover...

Page 99: ...e with it 83 Copies come out blank Are the originals set correctly Set originals face up in the DF and set them correctly When originals are set on the platen face them down and align them with origin...

Page 100: ...ss and or the original cover 97 Copy image is askew Are the originals set correctly When originals are set in the DF align them with the original insertion guide securely When originals are set on the...

Page 101: ...the platen and the slit glass 1 Lift open the DF Wipe the platen and the slit glass c with a soft cloth dampen with alcohol or mild detergent Do not use thinner or other organic solvents for this pur...

Page 102: ...Stack bypass tray standard paper 60 160 g m2 or special paper tracing paper colored paper transparencies letterheads etc envelop only when using the printer function COM 10 Monarch DL and C5 Continuo...

Page 103: ...DF original reversing cover Open when paper misfeeds in DF section Original set indicator The original condition is displayed Green lights The original is set Copying will begin by pressing the Start...

Page 104: ...elease lever Operate when paper misfeed occurs in the paper transfer section Paper feed section knob Operate to remove paper misfed in paper feed section Duplex unit Re feeding section Open when paper...

Page 105: ...ting procedure on page 79 Opening closing the front cover The shape of the front cover is different on 52 ppm copier therefore how to open and close the front cover is different To open close the fron...

Page 106: ...per has not been removed in steps 1 to 5 it will be under the reversing cover Carry out next steps 7 Unscrew the two reversing cover screws d located on the left side of the duplex unit The reversing...

Page 107: ...er 60 160 g m2 or special paper tracing paper colored paper transparencies letterheads etc envelop only when using the printer function COM 10 Monarch DL and C5 Continuous copying 1 999 sheets Exposur...

Page 108: ...ser no radiation can leak from the machine This machine is classified as Class 1 laser product under IEC 825 CAUTION Performance of procedures other than those specified in this manual may result in h...

Page 109: ...nly functional switches and are not suitable for isolating the equipment from the power source VORSICHT Der Netzstecker ist die Hauptisoliervorrichtung Die anderen Schalter auf dem Ger t sind nur Funk...

Page 110: ......

Reviews: