background image

16

ANTI-INTERFERENCE AND SAFETY CODES

CE, IMQ, FCC/B, cULus

This equipment has been tested and found to comply with the limits for a Class B digital
device pursuant to Part 15 of the FCC Rules.

These limits are designed to provide reasonable protection against harmful interference
in a residential installation.

This  equipment  generates,  uses  and  can  radiate  radio  frequency  energy  and  if  not
installed and used in accordance with the instructions, may cause harmful interference
to radio communications.

If this equipment does cause harmful interference to radio or television reception, which
can be determined by turning the equipment off and on, the user is encouraged to try to
correct the interference by one or more of the following measures:

- Reorient or relocate the receiving antenna.

- Increase the separation between the equipment and receiver.

- Connect  the  equipment  into  an  outlet  of  a  circuit  different  from  that  to  which  the

receiver is connected.

-  Consult the dealer or an experienced radio/TV technician for assistance.

Changes  or  modification  not  expressly  approved  by  the  party  responsible  for
compliance could void the user's authority to operate the equipment.

EMI REQUIREMENTS FOR CANADIAN MARKET:

This  digital  apparatus  does  not  exceed  the  CLASS  B  limits  for  radio  noise  emissions
from digital apparatus as set out in the interference-causing equipment standard entitled
"Digital Apparatus", ICES-003 of the Industry Canada.

SPECIFICATIONS EMI POUR LE MARCHÉ CANADIEN:

Cet  appareil  numérique  respecte  les  limites  de  bruits  radioélectriques  applicables  aux
appareils numériques de Classe B  prescrites  dans  la  norme  sur  le  matériel  brouilleur:
"Appareils Numériques", NMB-003 édictée par le ministre des Communications.

USER SAFETY

To  avoid  injury  to  the  user  and  damage  to  the  machine,  the  following  rules  must  be
respected:

I


The machine must be connected to a nearby and easily accessible outlet.

I


The  on/off  key 

DOES  NOT  control  the  power  supply  to  the  typewriter!

  Before

accessing the internal part of the machine or cleaning it, deactivate it completely by
unplugging  it  from  the  mains  (unless  you  are  instructed  to  do  otherwise  in  the
manual).

I


Users may only have access to the printer area and only to replace accessories.

I


Do not obstruct the air vents situated on the base of the typewriter.

I


Do not use the machine on or near sources of heat (e.g. radiators) or water (e.g.
swimming pools or showers).

I


To clean the typewriter, first unplug it from the mains and then use a damp cloth.
Do not use corrosive liquids.

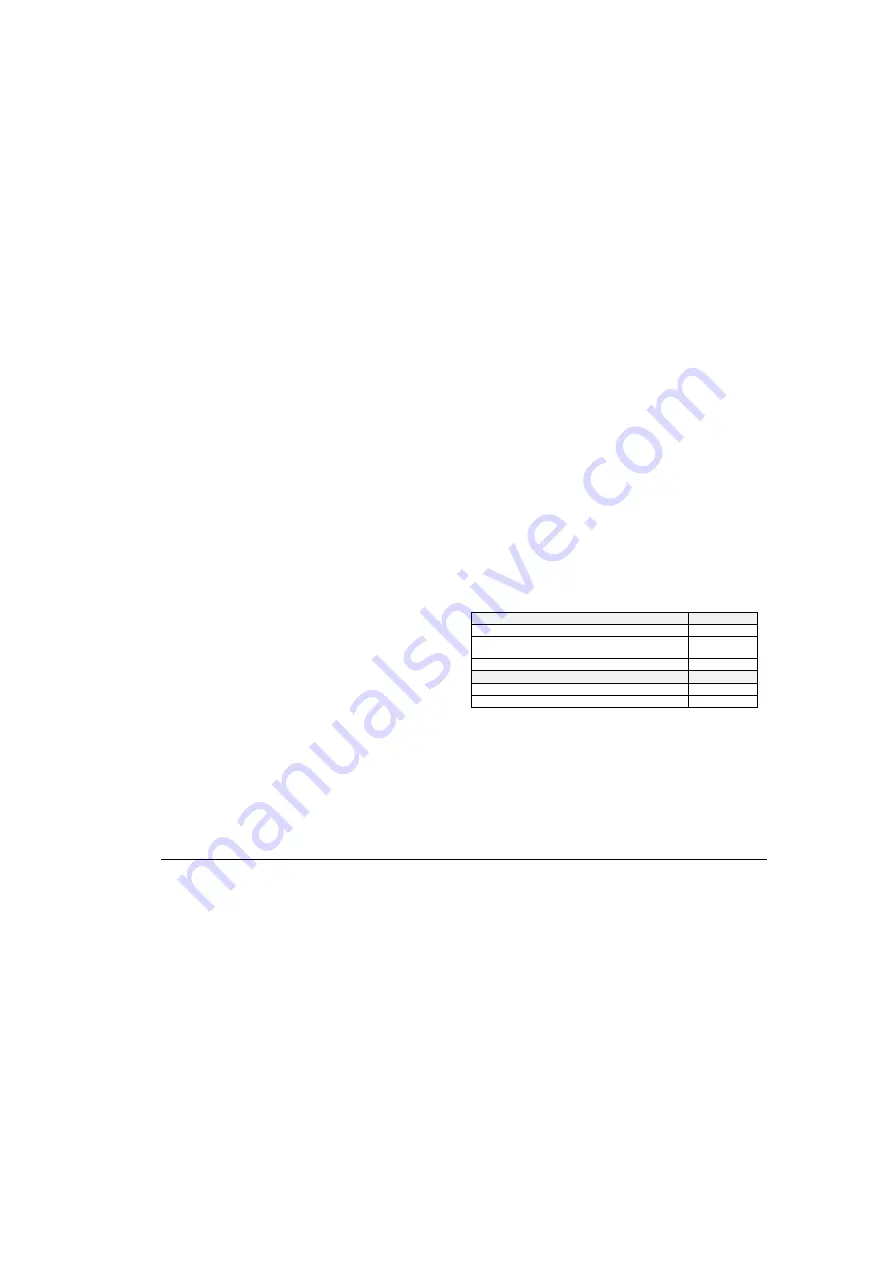
Accessory Codes

(approximate capacity in characters and with a pitch value of 12)

Ribbon cartridges

ONDACART CORRECTABLE (polyethylene) 50.000 char.

Code 82025E

ONDACART  POLY  (non-correctable  polyethylene)  40.000
char.

Code 82028V

ONDACART NYLON (non-correctable fabric) 300.000 char.

Code 82029X

Correcting tapes

LIFT OFF (for CORRECTABLE cartridge) 1.200 char.

Code 82329N

COVER UP (for POLY and NYLON cartridges) 1.200 char.

Code 82330Y

WARNING

The manufacturers decline all responsibility due to improper use, improper installation,
connection  to  unauthorized  devices,  use  of  non-original  accessories,  tampering  by
unauthorized persons, and access to unauthorized parts of the typewriter.

The  present  manual  contains  the  most  up-to-date  documentation  on  the  product
available at the time of publication.

The Manufacturers reserve the right to make changes to the product described in
this manual at any time and with no prior warning.

All manuals and user guides at all-guides.com

Summary of Contents for ETP 630

Page 1: ...PORTABLE TYPEWRITERS Instructions ETP 630 All manuals and user guides at all guides com a l l g u i d e s c o m...

Page 2: ...All manuals and user guides at all guides com...

Page 3: ...1 10 11 3 4 12 13 15 7 1 1 2 xxxxxx xxxxxx xxxxxx xxxxxx xxxxx xxxxx xxxxx xxxxx xxxxx 6 9 16 8 14 5 2 All manuals and user guides at all guides com...

Page 4: ...UPERSCRIPT 6 UNDERLINE AND BOLD FACE 6 TYPING IN CAPITALS WITH THE FULL STOP COMMA AND NUMBERS ACTIVE 7 THE LINE FORMAT 7 ARRANGING WORDS OR NUMBERS INTO COLUMNS 8 CREATING AND PRINTING TABLES 8 THE P...

Page 5: ...16 characters It shows the text as it is typed and the messages that will make the typewriter easy for you to use and has the following structure I the work area 13 characters which contains the chara...

Page 6: ...message CHECK BATTERIES appears this means that the battery that powers the permanent memory is flat or is not present in the machine Press the key and see the Replacing the Battery section FIG 4 The...

Page 7: ...t to change the line format see the corresponding section of this manual 1 Type the text until you hear the end of line signal The service area of the display indicates the capacity of the line To exe...

Page 8: ...ACKSPACE 2 Press and type the incorrect character The character will be erased 3 Repeat steps 1 and 2 for each other character to be erased 4 Type the correct characters if appropriate IF the characte...

Page 9: ...printer unit must be situated on the line immediately before the one that is to be indented 1 Press The printer unit moves to the indent on the next line 2 Type the text The next time you execute a c...

Page 10: ...line format is defined by the left and right margins any tab stops present the print pitch and line feed values Each time you switch on the typewriter the line format presented is the one defined in...

Page 11: ...s and the counter indicates the number of integers digits still available 2 Type the number to be put in the column with decimal numbers once the decimal point has been entered the counter indicates t...

Page 12: ...ed in the memory as if you were working in normal typewriter mode You can therefore change the line format parameter settings and use functions such as centring correction tabulation and so on The cha...

Page 13: ...straight to a point in the text by searching for a word or symbol This procedure is defined a Search key Searching for words The search key may consist of a maximum of 20 characters The underline and...

Page 14: ...int by pressing MODE MEM MODE MEM or MODE SEARCH KEY press MODE STOP CODE to insert a new stop code The display shows the symbol to remove a stop code with its symbol at the work point 4 Repeat step 3...

Page 15: ...ged and set in the correct position 7 FIG 12 Reinsert the ribbon cartridge in its housing and press until it clicks into place 8 Close the printer unit cover and the transparent cover Press The printe...

Page 16: ...harge it When it runs low the machine displays the message CHECK BATTERIES To replace the battery proceed as follows 1 Switch off the machine and unplug the power cable from the mains socket 2 FIG 7 O...

Page 17: ...entring RIGHTFLUSH Right alignment SUB Half a line feed down base SUPER Half a line feed up exponent BACKSPACE Half a step back IMPACT Stroke impact DISPLAY Display brightness ADDRESS Defines start en...

Page 18: ...presence of an incorrect command executed during the text editing phase MANUAL CORRECTION Appears while making manual corrections of characters that have already been printed RTJ PRINT Y or N During...

Page 19: ...illeur Appareils Num riques NMB 003 dict e par le ministre des Communications USER SAFETY To avoid injury to the user and damage to the machine the following rules must be respected I The machine must...

Reviews: