background image

Transportation Precautions 1 - 5

Introducing the Notebook PC

1

Transportation Precautions

To prepare the Notebook PC for transport, you should turn it OFF and disconnect all external peripherals to prevent
damage to the connectors. The hard disk drive’s head retracts when the power is turned OFF to prevent scratching of the
hard disk surface during transport. Therefore, you should not transport the Notebook PC while the power is still ON. Close
the display panel and check that it is latched securely in the closed position to protect the keyboard and display panel.

  IMPORTANT! The Notebook PC’s surface is easily dulled if not properly cared for. Be careful not to rub or

        scrape the Notebook PC surfaces.

Cover Your Notebook PC

Purchase a carrying bag to protect the Notebook PC from dirt, water, shock, and scratches.

Charge Your Batteries

If you intend to use battery power, be sure to fully charge your battery pack and any optional battery packs before going
on long trips. Remember that the power adapter charges the battery pack as long as it is plugged into the computer and
an AC power source. Be aware that it takes much longer to charge the battery pack when the Notebook PC is in use.

Airplane Precautions

Contact your airline if you want to use the Notebook PC on the airplane. Most airlines will have restrictions for using
electronic devices. Most airlines will allow electronic use only between and not during takeoffs and landings.

  IMPORTANT! There are three main types of airport security devices: X-ray machines (used on items placed

       on conveyor belts), magnetic detectors (used on people walking through security checks), and magnetic
       wands (hand-held devices used on people or individual items). You can send your Notebook PC and
       diskettes through airport X-ray machines. However, it is recommended that you do not send your
       Notebook PC or diskettes through airport magnetic detectors or expose them to magnetic wands.

Summary of Contents for OLIBOOK S1500

Page 1: ...USER GUIDE...

Page 2: ...an introduced by theUnited States Environmental Protection Agency in response to environmental issues and for the purpose of advancing the development and utilization of more energy efficient office e...

Page 3: ...s Factory Default Settings 3 4 Power System 3 6 Using AC Power 3 6 Using Battery Power 3 8 Battery Care 3 9 Powering ON the Notebook PC 3 10 The Power On Self Test POST 3 11 Checking Battery Power 3 1...

Page 4: ...uchpad Disabling 4 6 Storage Devices 4 8 Hard Disk Drive 4 8 Memory RAM 4 8 Optical Drive 4 9 Optical Drive Cont 4 10 Optical Drive Cont 4 11 Flash Memory Card Reader 4 13 Express Card 4 15 Connection...

Page 5: ...oducing the Notebook PC General Overview Safety Precautions Transportation Precautions Preparing your Notebook PC NOTE Photos and icons in this document are used for artistic purposes only and do not...

Page 6: ...k PC Gives you information on using the Notebook PC s components Notes For The User A few notes and warnings in bold are used throughout this document that you should be aware of in order to complete...

Page 7: ...asing has been damaged DO NOT place or drop objects on top and do not shove any foreign objects into the Notebook PC DO NOT press or touch the display panel Do not place together with small items that...

Page 8: ...ck local regulations for disposal of electronic products DO NOT carry or cover a Notebook PC that is powered ON with any materials that will reduce air circulation such as a carrying bag CAUTION Dange...

Page 9: ...ttery power be sure to fully charge your battery pack and any optional battery packs before going on long trips Remember that the power adapter charges the battery pack as long as it is plugged into t...

Page 10: ...PC Read the later pages for detailed information on using your Notebook PC IMPORTANT Selected models may feature display panels that do not fully open to a 180 degree angle with such models do not at...

Page 11: ...not force the display panel down to the table or else the hinges may break Never lift the Notebook PC by the display panel The power switch turns the Notebook PC ON and OFF or puts the Notebook PC int...

Page 12: ...1 8 Preparing your Notebook PC Introducing the Notebook PC 1 Page left intentionally blank...

Page 13: ...e Parts 2 Chapter 2 Knowing the Parts Top Side Right Side Left Side Bottom Side NOTE Photos and icons in this document are used for artistic purposes only and do not show what is actually used in the...

Page 14: ...n this side of the Notebook PC NOTE The keyboard will be different for each territory IMPORTANT Selected models may feature display panels that do not fully open to a 180 degree angle with such models...

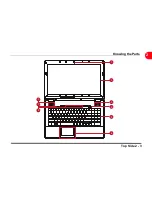
Page 15: ...Top Side 2 3 Knowing the Parts 2 1 6 1 2 3 4 5 6 8 7 3...

Page 16: ...eakers Audio features are software controlled Power Switch The power switch turns the Notebook PC ON and OFF or puts the Notebook PC into sleep or hibernation modes Actual behavior of the power switch...

Page 17: ...o recordings USB Ports 2 0 1 1 The USB Universal Serial Bus ports are compatible with USB 2 0 or USB 1 1 devices such as keyboards pointing devices cameras hard disk drives printers and scanners conne...

Page 18: ...es power to the Notebook PC and charges the internal battery pack To prevent damage to the Notebook PC and battery pack always use the supplied power adapter Kensington Lock Port The Kensington lock p...

Page 19: ...d disk drives printers and scanners connected in a series up to 12Mbits sec USB 1 1 and 480Mbits sec USB 2 0 USB allows many devices to run simultaneously on a single computer with some peripherals ac...

Page 20: ...y using a serial bus supporting USB 2 0 and PCI Express instead of the slower parallel bus used in the PC card slot Not compatible with previous PCMCIA cards Flash Memory Card Reader This Notebook PC...

Page 21: ...ry pack is automatically charged when the Notebook PC is connected to an AC power source and maintains power to the Notebook PC when AC power is not connected This allows use when moving temporarily b...

Page 22: ...k platters Visit an authorized service center or retailer for more information on the hard disk drive of your Notebook PC Memory RAM Compartment The memory compartment contains pre installed RAM RAM R...

Page 23: ...ing System for the First Time Restoring the Computer s Factory Default Settings Power System Special Keyboard Functions Switches and Status Indicators NOTE Photos and icons in this document are used f...

Page 24: ...er a brief initial screen startup phase the Set Up Windows screen is displayed allowing you to select in which language you wish to use the operating system 2 Click Next Select Country Time Currency a...

Page 25: ...k you to accept the license agreement Accept the Licenze Agreement 7 Click Next to continue Set Help protect your computer and improve Windows automatically to end the Windows configuration procedure...

Page 26: ...ber to attach the power cord to the computer and to the electrical outlet before starting so as to ensure that the battery remains charged during the entire reinstallation process 1 Shortly after havi...

Page 27: ...f necessary its associated Password and then click OK You can now select the type of recovery to perform 5 Select Startup Repair and then select Shut Down You are now prompted to confirm the selected...

Page 28: ...will provide universal outlets to support different power cords as well as voltages It is always best to ask an experienced traveler about AC outlet voltages when bringing power adapters to another c...

Page 29: ...if you suspect a faulty AC DC adapter You may damage both your battery pack s and the Notebook PC with a faulty AC DC adapter NOTE This Notebook PC may come with either a two or three prong plug depe...

Page 30: ...the BIOS setup Additional battery packs are optional and can be purchased separately through a Notebook PC retailer Installing and Removing the Battery Pack Your Notebook PC may or may not have its ba...

Page 31: ...ween 5 C and 35 C 41 F and 95 F You must also take into account that the Notebook PC s internal temperature is higher than the outside temperature Any temperatures above or below this range will short...

Page 32: ...information such as the BIOS version can be seen Press ESC and you will be presented with a boot menu with selections to boot from your available drives NOTE Before bootup the display panel flashes w...

Page 33: ...eporting No operating system found if the hard disk was not preloaded with an operating system This indicates that the hard disk is correctly detected and ready for the installation of a new operating...

Page 34: ...of the display panel NOTE Screen captures shown here are examples only and may not reflect what you see in your system NOTE You will be warned when battery power is low If you continue to ignore the l...

Page 35: ...ery stops charging if the temperature is too high or the battery voltage is too high WARNING Do not leave the battery pack discharged The battery pack will discharge over time If not using a battery p...

Page 36: ...PC before turning it back ON Emergency Shutdown In case your operating system cannot properly turn OFF or restart there is a manual way to shutdown your Notebook PC IMPORTANT Do not use emergency shu...

Page 37: ...ents into a low power consumption mode as often as possible but also allow full operation on demand Sleep and Hibernate Power management settings can be found in the Windows Control Panel Power Option...

Page 38: ...to the lock icon to see this option Recover by pressing the power button NOTE The power indicator will be OFF in this mode The computer is shipped enabled for power management and the default settings...

Page 39: ...e to RAM or Save to Disk depending on sleep button setting in power management setup Signal Icon F2 Wireless Models Only Toggles the internal wireless LAN ON or OFF with an on screen display When enab...

Page 40: ...1 Toggles the internal bluetooth ON or OFF with an on screen display Windows software settings are necessary to connect to bluetooth devices on selected models only Camera Icon F12 Toggles the built i...

Page 41: ...s cont Play Pause Icon Plays or pauses media in the media player Stop Icon Stops a media player during playback Rewind Icon Rewinds or moves the media a step backwards during playback Fast forward Ico...

Page 42: ...or example Fn 8 for up Fn K for down Fn U for left and Fn O for right With Number Lock ON use Shift and one of the cursor keys shown below For example Shift 8 for up Shift K for down Shift U for left...

Page 43: ...nued on the next page Wireless Switch Wireless Models Only Toggles the internal wireless LAN or Bluetooth on selected models ON or OFF with an on screen display When enabled the corresponding wireless...

Page 44: ...e g a b c Bluetooth Indicator This is only applicable on models with internal Bluetooth BT This indicator will light to show that the Notebook PC s built in Blue tooth BT function is activated Drive...

Page 45: ...ws ON The Notebook PC s battery is charging when AC power is connected OFF The Notebook PC s battery is charged or completely drained Blinking Battery power is less than 10 and the AC power is not con...

Page 46: ...3 24 Switches and Status Indicators cont Getting Started 3 Page left intentionally blank...

Page 47: ...ook PC 4 Chapter 4 Using the Notebook PC Pointing Device Storage Devices Connections NOTE Photos and icons in this document are used for artistic purposes only and do not show what is actually used in...

Page 48: ...e touchpad s surface Using the Touchpad Light pressure with the tip of your finger is all that is required to operate the touchpad Because the touchpad is electrostatic sensitive objects cannot be use...

Page 49: ...o allow easy Windows or web navigation Touchpad Usage Illustrations Clicking Tapping With the cursor over an item press the left button or use your fingertip to touch the touchpad lightly keeping your...

Page 50: ...2 examples produce the same results Press the left button twice and release Lightly but rapidly strike the touchpad twice Dragging Dragging means to pick up an item and place it anywhere on the screen...

Page 51: ...act with dirt liquids or grease Do not touch the touchpad if your fingers are dirty or wet Do not rest heavy objects on the touchpad or the touchpad buttons Do not scratch the touchpad with your finge...

Page 52: ...e Notebook PC s touchpad when an external USB mouse is attached This feature is normally OFF to turn ON this feature select the option in Windows Control Panel Mouse Properties Device Settings or USB...

Page 53: ...Using the Notebook PC Pointing Device 4 7 4 Control Panel Classic View Models with ALPS touchpad Select this option to enable this feature...

Page 54: ...orting Technology to detect hard disk errors or failures before they happen IMPORTANT Poor handling of the Notebook PC may damage the hard disk drive Handle the Notebook PC gently and keep it away fro...

Page 55: ...k PC s power is ON press the drive s eject button and the tray will eject out partially 2 Gently pull on the drive s front panel and slide the tray completely out Be care ful not to touch the drive le...

Page 56: ...until the disc snaps onto the hub The hub should be higher than the disc when correctly mounted 4 Slowly push the drive s tray back in The drive will begin reading the table of con tents TOC on the di...

Page 57: ...move the disc from the hub Emergency eject The emergency eject is located in a hole on the optical drive and is used to eject the optical drive tray in case the electronic eject does not work Do not u...

Page 58: ...of the presence of a disc in the drive After the disc is properly inserted data can be accessed just like with hard disk drives except that nothing can be written to or changed on the disc Using the...

Page 59: ...r that can use many flash memory cards as shown in the example below The built in memory card reader is not only convenient but also faster than most other forms of memory card readers because it util...

Page 60: ...ith SD adapter Memory stick MS PRO MagicGate Select Memory Stick Duo Duo Pro MagicGate with MS adapater Memory Stick Micro with MS adapter IMPORTANT Never remove cards while or immediately after readi...

Page 61: ...I Express instead of the slower parallel bus used in the PC card slot Not compatible with previous PCMCIA cards Inserting an ExpressCard 1 If there is an ExpressCard socket protec tor remove it using...

Page 62: ...st and label side up Standard Ex pressCards will be flush with the Notebook PC when fully inserted Removing an ExpressCard The ExpressCard slot does not have an eject button Press the ExpressCard inwa...

Page 63: ...00 Mbps Full Duplex is supported on this Notebook PC but requires connection to a network switching hub with duplex enabled The software default is to use the fastest setting so no user intervention i...

Page 64: ...tions Using the Notebook PC 4 Example of the Notebook PC connected to a Network Hub or Switch for use with the built in Ethernet controller Network Hub or Switch Network cable with RJ 45 connectors LA...

Page 65: ...dards The optional built in wireless LAN is a client adapter that supports Infrastructure and Ad hoc modes giving you flexibility on your existing or future wireless network configurations for distanc...

Page 66: ...and other wireless devices to join a wireless network created by an Access Point AP sold separately that provides a central link for wireless clients to communicate with each other or with a wired net...

Page 67: ...tion Connecting to a network 1 Switch ON the Wireless function if necessary for your model see switches and or special keyboard functions in Section 3 2 You should see the Connections are available ne...

Page 68: ...C 4 4 Select the wireless network you want to connect to 5 Right click on the network icon and select Connect to a network 6 When connecting you may have to enter a password 7 After connection has bee...

Page 69: ...A 1 Appendix A A Appendix A Declarations and Safety Statements NOTE Photos and icons in this document are used for artistic purposes only and do not show what is actually used in the product itself...

Page 70: ...sign rules imposed on CSS licensors are many one rule that is most relevant is playback restrictions on regionalized content In order to facilitate geographically staggered movie releases DVD video ti...

Page 71: ...Nor way Poland Portugal Saudi Arabia Scotland South Africa Spain Sweden Switzerland Syria Turkey UK Greece Former Yugoslav Republics Slovakia Region 3 Burma Indonesia South Korea Malaysia Philippines...

Page 72: ...glossary at the end of this user s manual WARNING Making adjustments or performing procedures other than those specified in the user s manual may result in hazardous laser exposure Do not attempt to...

Page 73: ...ications NOTE The specifications listed in this Appendix are correct at the time of going to press Certain items particularly processor types speeds may be changed delayed or updated due to the manufa...

Page 74: ...Realtek ALC269 Two 2 x 2W audio speakers Pointing Device Incorportated TouchPad integrated scrolling key functionality Keyboard Digital key keyboard with embedded numeric keypad Interfaces Four USB 2...

Page 75: ...ge AC DC adapter AC input 100 240 V 50 60 HzDC DC DC output 19V 3 42A 65 Watts Battery 11 1V 4800mAh 54Wh Lithium ion battery pack Environmental Specs Temperature Operating 5 C 35 C Non operating 20 C...

Page 76: ...B 4 Technical specifications Appendix B B Page left intentionally blank...

Page 77: ...aken to the equipped waste collection centres and is to be handled separately from urban waste Olivetti guarantees the activation of the treatment collection recycling and disposal procedures in accor...

Page 78: ...Code 538918 V...

Reviews: