background image

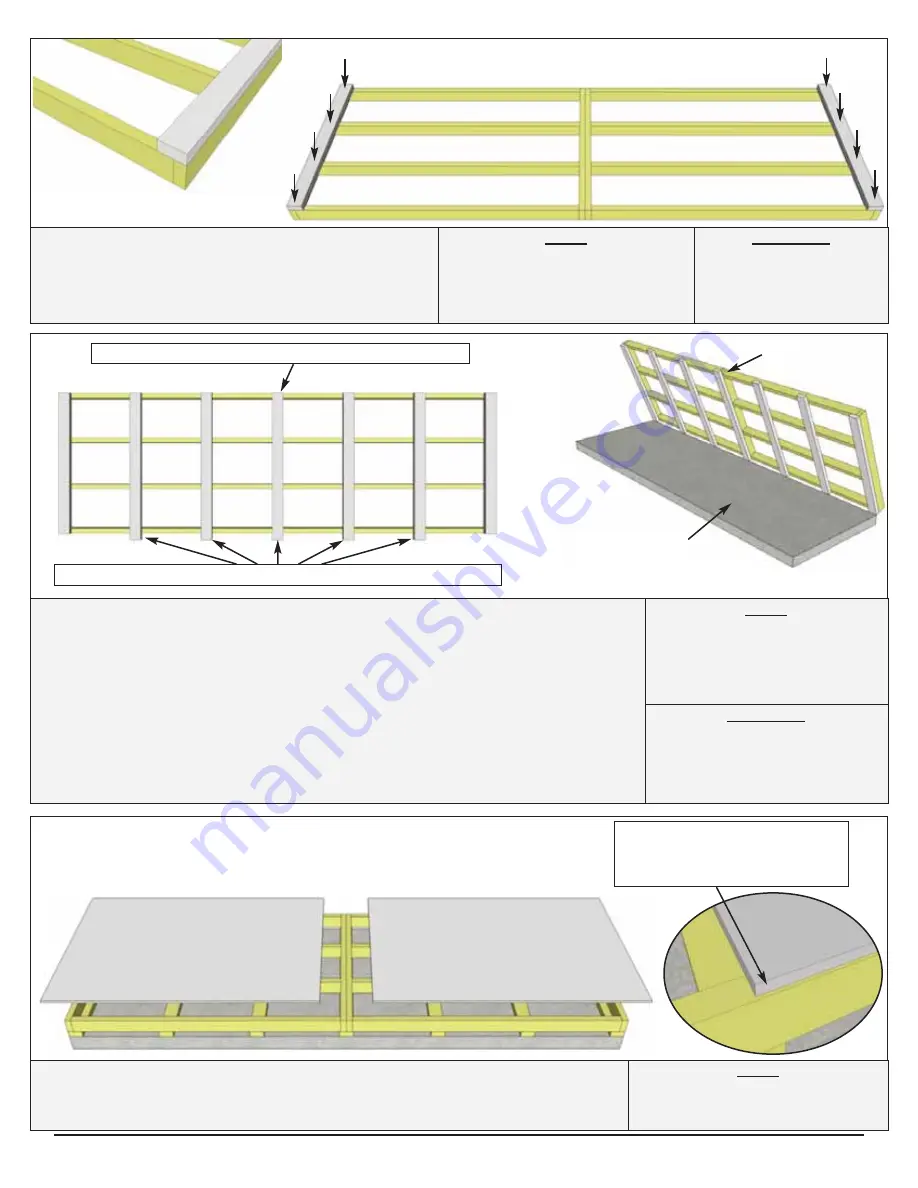
3.


Position 

1C


- Floor Runners - Short

 on each 

side of the completed floor frame. Runners should 
be flush with corners but not overhanging. Attach 
with 

4 - 2 1/2”


Screws

 per Runner.

Parts


1C - Floor Runners - Short 

(1 1/2” x 3 1/2” x 45 1/2”) 

x 2

Hardware 

S1


- 2 1/2” Screws


x 8 total

4.


Align 

1CC - Floor Runners - Long

 evenly spaced as shown above and 

flush with the back of the Floor Frame. On the front, Runners will extend 2” 
past the Floor Frame to provide support for the Sliding Door Track later in 
the Assembly. Attach with 

4 - 2 1/2”


Screws

 per Runner. 

With Floor Runners attached, carefully flip the floor over and place on your 
foundation. 

Caution - 

Be careful when laying floor down not to bend or twist 

floor. 

Note:

 Having a level foundation is critical. Choosing a foundation will 

vary between regions. Typical foundations can be concrete pads or patio 
stones positioned underneath the floor runners.

5. 

Position

 1D - Plywood Floor

 on top of completed floor frames. 

Plywood will sit slightly inset from outside of floor frame.

Parts


1D -


Plywood Floor 

(5/8” x 45 3/8” x 70 5/8”) 

x 2


Note:

 Plywood is cut slightly 

smaller than floor framing. 
Keep plywood seams tight.

Parts


1CC - Floor Runners - Long 

(1 1/2” x 3 1/2” x 47 1/2”) 

x 5

Hardware 

S1


- 2 1/2” Screws


x 20 total

Long Floor Runners overhanging Floor Frame on front.

Floor Runners flush with Floor Frame on back.

Concrete Slab 
Foundation

Front

  Toll Free 1-888-658-1658              www.outdoorlivingtoday.com        sales@outdoorlivingtoday.com

Page 9

Summary of Contents for GS124-SLIDER-PLY-FJ

Page 1: ...ke the time to identify all the parts prior to assembly Safety Points and Other Considerations Our products are built for use based on proper installation on level ground and normal residential use Pl...

Page 2: ...on the type of foundation you will be using Concrete slab or 4 6 inches of crushed gravel with paver stones or 4x4 stringers You can nd the footprint for your shed on Page 3 of your Assembly Manual I...

Page 3: ...of floor frame Saves money on materials easy to level and work with Gravel with Patio Paver Stones Excavate at least 6 deep and 6 wider than floor frame on each side 1 2 Cubic Yards of gravel required...

Page 4: ...Wall Extenders 2I 3 1 1 2 x 2 1 2 x 42 3 8 Wall Extender Cleats Wall Cleats 2J 1 x 3 x 84 Horizontal Wall Cleat Long 2K 2 x 3 x 26 Horizontal Wall Cleats Short 3 Rafter and Roof Section Rafters 3A 9 1...

Page 5: ...s 4M 2 x 2 x 88 Side Front Corner Trims 4N 2 x 5 x 78 Rear Corner Trims 4O 2 x 2 x 80 Side Rear Corner Trims 4P 2 x 2 x 78 Rear Middle Trims 4Q 2 x 2 x 7 Front Middle Trims Facia 4R 2 x 5 x 54 1 8 Sid...

Page 6: ...evel Pliers Tools Required Not Provided 1 8 Drill Bit Wood Clamp Utility Knife 12X4 GardenSaver Shed with Sliding Double Doors and Plywood Roof HARDWARE PACKAGE Y35 Roller Assembly x 4 Safety Glasses...

Page 7: ...off dirt from walls Brush off snow from roof regularly Routinely remove needles and leaves from roof Painting Staining Your cedar shed if left untreated will weather to a silvery grey colour Painting...

Page 8: ...Frame and two 1B Floor Joists as illustrated above Position the center of each Joist 15 from the outer edge of Floor Frame When correctly positioned attach each Joist with 4 2 1 2 Screws 2 per end You...

Page 9: ...aution Be careful when laying floor down not to bend or twist floor Note Having a level foundation is critical Choosing a foundation will vary between regions Typical foundations can be concrete pads...

Page 10: ...ry to complete the Wall Section Identify all parts prior to starting Angled Wall Extenders 2pcs Part 2G Side Rear Wall Panels 5pcs Part 2AA Bottom Wall Plates 5pcs Part 2AB Front Wall Panels 2pcs Part...

Page 11: ...f panel is facing up or down Recently attached Bottom Plate is on bottom of panel Outside 2x3 framing of wall panel should be positioned flush with the outside of floor framing when properly aligned 9...

Page 12: ...joists Wall siding should overhang floor by approximately 3 4 When positioned correctly attach both side wall panel studs together as per Step 10 10 Position rear solid wall into place on plywood floo...

Page 13: ...Place Front Walls so wall framing is flush with floor frame and siding overhangs Attach with 3 2 1 2 Screws per panel as per Steps 10 12 12 Complete remaining side wall attachment as per Steps 10 11...

Page 14: ...top Align flush outside with wall siding 15 Attach 2C Door Header Short to other side Position and attach 2D Door Header Long between short door headers The Long Door Header has an aluminum strip atta...

Page 15: ...ep 36 Side Wall Panel 16 Position 2F Top Triangular Siding Piece onto 2G Angle Wall Extender and align as shown above Attach with 3 1 1 2 Finishing Nails to top frame of extender wall There are left r...

Page 16: ...nder Walls 2H 45 1 2 wide x 3 Hardware S1 2 1 2 Screws x 12 total 19 Complete opposite Angled Wall Extender positioning and attachment as per Step 18 Cleat protects overhanging siding on upper walls f...

Page 17: ...h 3 1 1 4 Screws per short cleat and 6 1 1 4 Screws on the long cleat Parts 2J Horizontal Wall Cleat Long 3 4 x 3 1 2 x 84 x 1 2K Horizontal Wall Cleats Short 3 4 x 3 1 2 x 26 1 4 x 2 Hardware S2 1 1...

Page 18: ...f measurements are not within 1 4 your walls are not square 23 Attach 2E Interior Door Header as shown above Align with top framing of front walls Attach with 4 2 1 2 Screws Hardware S1 2 1 2 Screws x...

Page 19: ...ates should sit flush with floor Hardware S1 2 1 2 Screws x 28 total Bottom Wall Optional Caulking seams will help prevent moisture from entering at seam Caulking not included in kit Rear Soffits L R...

Page 20: ...r Front 141 1 2 Parts 3A Rafters 1 1 2 x 2 1 2 x 54 x 9 3B Front Soffits Sides 1 2 x 3 1 2 x 48 x 2 3C Front Soffit Center 1 2 x 3 1 2 x 45 1 2 x 1 3D Rear Soffits Sides 1 2 x 3 1 2 x 48 x 2 3E Rear S...

Page 21: ...y 40 1 2 40 1 2 Check inside to inside measurements of wall studs This should be consistent along the length of the shed approximately 40 1 2 26 Carefully flip completed Rafter Section over so Front S...

Page 22: ...f shed and from inside of Rear Wall top framing at rear of shed behind Horizontal Wall Cleats Hardware S1 2 1 2 Screws x 14 total 31 Locate all 4 different plywood roof panel sizes required to com ple...

Page 23: ...33 Position a Small Outside Plywood Roof Panel tight against the previous piece Position with same overhang past rafter as per Step 32 Attach to rafters with 6 1 1 4 screws 34 Locate Center and remain...

Page 24: ...rews per piece evenly spaced The Facia Nailing Strip provides for a greater nailing surface later when you attach Side Facia Complete both sides Parts 3J Facia Nailing Strips 3 4 x 3 4 x 51 x 2 Hardwa...

Page 25: ...ia L R Part 4S Front Facia Part 4T Interior Door Flange Part 4J Front Corner Filler Trim Part 4C Rear Corner Filler Trim Part 4D Lower Door Track Cover Parts 4HA Lower Door Track Part 4G Sliding Doors...

Page 26: ...Hardware N1 1 1 2 Finishing Nails x 12 total Skirting meets flush 37 Attach 4A Side Rear Bottom Skirting around the base of the shed Skirting will hide floor framing Start with side skirting pieces fi...

Page 27: ...ey serve as nailing strips for the Corner Trims which will be attached later Parts 4C Front Corner Filler Trim 1 2 x 2 1 2 x 42 x 4 Hardware N1 1 1 2 Finishing Nails x 16 total Gap will be covered 40...

Page 28: ...Track Position second Track the same and attach with 3 1 1 2 Torx Screws per bracket Complete remaining Torx Screws on brackets of first Track Hardware ST1 1 1 2 Torx Screws x 12 total 33 1 4 Attach...

Page 29: ...s meet in the middle Left Side Door Parts 4F Sliding Doors 36 x 73 x 2 Right Side Door Twist Roller Cart onto bolt After doors are hung you may need to adjust this until doors hang straight up and dow...

Page 30: ...ld be flush with each other Secure Door Tracks to shed with 6 3 screws per piece Secure Door Stops with 2 3 screws per piece Parts 4G Lower Door Track 1 1 2 x 1 1 2 x 61 1 8 x 2 4IA Door Track Stops 1...

Page 31: ...so doors can not slide out of the track Secure each piece of Track Cover with 4 2 1 2 screws Parts 4HA Lower Door Track Cover 3 4 x 3 x 44 1 4 x 3 Hardware S1 2 1 2 Screws x 12 total Door Stop and Tra...

Page 32: ...door frame and attach with 5 1 1 4 Screws Parts 4J Interior Door Flange 3 4 x 3 1 2 x 71 1 2 x 1 Hardware S2 1 1 4 Screws x 5 total Left Side Door Left Side Door Right Side Door Door Flange attaches...

Page 33: ...s x 6 total N1 1 1 2 Finishing Nails x 24 total 49 Position both of 4KB Track Overlay Front onto the edge of the Overlay Top so they meet at the center Ends of the Overlay Front will protrude 1 2 past...

Page 34: ...88 3 4 x 2 4M Side Front Corner Trims 1 2 x 2 1 2 x 88 3 4 x 2 Hardware N1 1 1 2 Finishing Nails x 32 total 5 1 2 tight underneath soffit 50 Position 4KD Track Overlay Sill pieces evenly on top of Tr...

Page 35: ...1 2 x 78 1 2 x 2 Hardware N1 1 1 2 Finishing Nails x 16 total 52 To complete trimming out rear corners locate 4N 4O Rear Corner Trims Align and attach as per Step 51 Parts 4N Rear Corner Trims 1 2 x 5...

Page 36: ...e Cut Ends 1 2 x 5 1 2 x 54 1 8 x 2 4S Front Rear Facia L R 1 2 x 5 1 2 x 50 1 2 x 4 4T Front Rear Facia Center 1 2 x 5 1 2 x 45 1 2 x 2 Hardware Steps 55 58 N1 1 1 2 Finishing Nails x 46 total 54 Att...

Page 37: ...s 56 57 Small gaps may occur between the Center and Left Right Facia these will be covered by Facia Detail Plates in Step 59 Rear Facia will cap the side Facia Attach Rear Facia to rafter ends with 2...

Page 38: ...dab caulk in siding channel on both sides of window opening This will prevent water from getting in behind window Position window in cavity and secure with 8 1 1 4 Screws Caulk gap between siding and...

Page 39: ...arts 4X Window Trim Kit x 2 Top pc 24 1 16 x 1 Angle Ends Side Bottom pcs 23 x 3 Hardware N1 1 1 2 Finishing Nails x 32 total 62 Attach Y3 Door Handles and Y11 Black Hasp Handles and Hasp are position...

Page 40: ...mer Service 2 On Time Shipping 3 Motor Freight Delivery 4 Quality of Materials 5 Assembly Manual 6 Overall Satisfaction Toll Line 1 888 658 1658 Fax 1 604 462 5333 sales outdoorlivingtoday com The mat...

Reviews: