background image

14

RECOMMENdEd MAINTENANCE PROCEdURES

ROUTINE INSPECTION

It is recommended that you periodically inspect your 

DELTA

®

 Dual Drum Sander as a precautionary action. 

During this time, check all hardware such as bolts, 

nuts and screws to ensure they are properly tightened. 

Also verify that the sanding belts and drive belts are 

mounted properly and have not become loose or torn.
Also take this opportunity to inspect for dust and/or 

wood particles that may have accumulated on or in the 

machine.

LUBRICATION  

The table height adjustment screw shafts, located at 

either end of the machine must be well lubricated with 

grease at all times. In order to access, inspect and 

lubricate the screw shafts, it is necessary to remove 

the two side guards located on either end of the 

machine. 

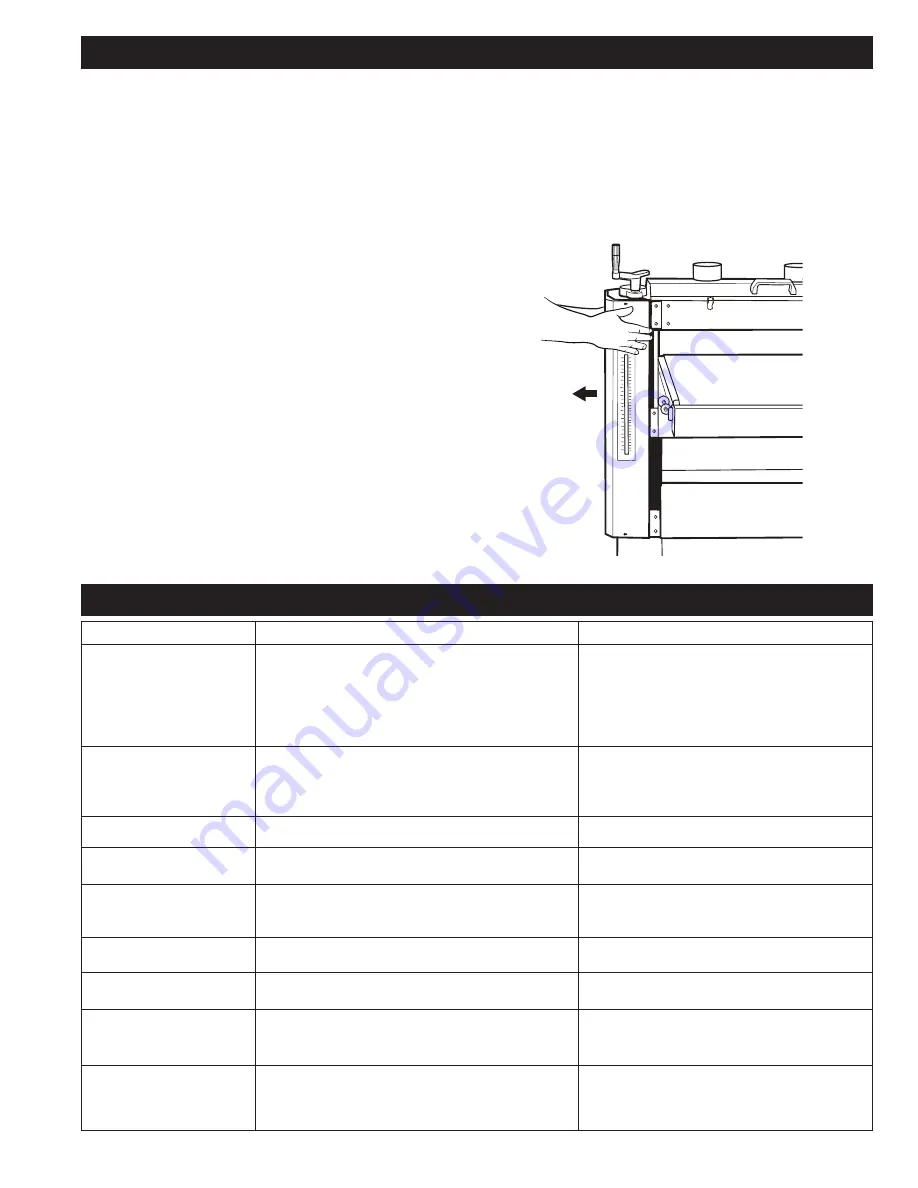
To remove the side guards:

1.  Remove the elevation cursor by unscrewing the 

retaining screw.

2.  Remove the eight Phillips head bolts and washers 

securing the left and right side guards to the 

machine and remove the guards. See Fig. 14.

3.  Re-attach side guards and elevation cursor. 

CLEANINg ThE SANdINg BELTS 

Regularly clean the sanding belts on the drums with 

commercially available cleaning sticks, following the 

manufacturer’s directions. When cleaning, also brush 

the stick crumbs from the sanding drum while it is still 

rotating.

FIg. 14

TROUBLEShOOTINg gUIdE

PROBLEM

POTENTIAL CAUSE    

SOLUTION

Sanding surface clogs too 

quickly.

Sanding grit too fine.

Too much material being removed at once.

Dirty board surface.

Insufficient dust collection.

Board contains too much moisture.

Worn sanding belt.

Change to a coarser grit.

Adjust table height.

Ensure board is free of debris prior to sanding.

Inspect dust collection system.

Properly dry stock before sanding.

Replace sanding belt (Page 8)

Sanding belt tears.

Drums not parallel to feed table.

Sandpaper edges overlapped.

Tape is slipping.

Too much material is removed at once.

Re-align drums (Page 10)

Re-install sanding belt.

Rewind the loose belt on the drum.

Lower the table height.

Rounding on the edges.

Too much material is removed at once.

Lower the table height.

Uneven thickness on right 

and left side of the board.

Drums are not parallel to feed table.

Uneven wear of sanding paper.

Re-align drums (Page 10)

Replace sanding belt.

Stock slips on the feed 

belt.

Too much material is removed at once.

Too much dust on the feed belt surface.

Worn feed belt.

Lower the table height.

Clean surface with air hose.

Replace feed belt (Page 8)

Shiny spots on sanded 

surface.

Sanding paper too old.

Drums too high.

Replace sanding belt (Page 8)

Lower table height. 

Marks on sanded surface

Partial damage to sanding paper.

Paper overlapped on edges.

Replace sanding belt (Page 8)

Re-align sanding belt on drum

Feed belt does not 

run smoothly or stops 

completely.

Feed belt tension is incorrect.

Belt tracking is incorrect.

Adjust feed belt tension (Page 8)

Adjust feed tracking (Page 8)

Consistently noticeable 

“snipe”

No out-feed support.

Pressure roller spring tension incorrect.

Drum height incorrect in relation to pressure rollers.

Use supplementary support in rear of 

machine.

Check and adjust.

Adjust pressure rollers (Page 11)

Summary of Contents for DRS2602

Page 1: ...Operating Instructions and Parts Manual Manual de instrucciones 26 IN Dual Drum SaNDer OPERATION MANUAL DRS2602 W0602...

Page 2: ...WARNINGS AND OPERATING INSTRUCTIONS BEFORE USING THIS EQUIPMENT Failure to follow all instructions listed below may result in electric shock fire and or serious personal injury or property damage Wood...

Page 3: ...esigned and intended for use by properly trained and experienced personnel only If you are not familiar with the proper and safe operation of a drum sander do not use until proper training and knowled...

Page 4: ...rom the work area Keep children away 12 Make your workshop child proof with padlocks master switches or by removing starter keys 13 Give your work undivided attention Looking around carrying on a conv...

Page 5: ...5 KEY FEATURES AND COMPONENTS Fig 1 1 Variable speed feed belt 2 3HP continuous duty motor 3 Dual 26 drums 4 Sanding elevation cursor 5 Elevation crank handle 6 Switch assembly...

Page 6: ...Elevation Handle 1 Drum Motor Specifications Type Induction Ball bearing Continuous Duty Horsepower 3HP Amps 16A Voltage 230V Phase Single Hertz 60Hz RPM 3 450 Belt Feed Motor Specifications Type Uni...

Page 7: ...equired None Parts Table Elevation Crank Table Elevation Handle Hardware Needed None 1 Install the table elevation crank C by aligning the groove in the bottom of the crank with the pin located on the...

Page 8: ...o achieve coarse and fine sanding in a single pass Therefore the coarser sanding belt should always be installed on the front roller with the finer belt on the rear roller 8 Squeeze the locking clamp...

Page 9: ...ur hex cap bolts and washers securing the bottom guard B to the machine See Fig 7 4 Raise the telescoping panels C high enough to expose the motor mount D See Fig 7 Prop up using a scrap block of wood...

Page 10: ...her side of the front of the feed table See Fig 9 4 Remove the front guard D by sliding it forward 5 Locate and remove the four 6mm hex head screws E securing the feed table to the base See Fig 10 6 W...

Page 11: ...ust be identical Fig 11 TO ADJUST ROLLER PRESSURE The pressure rollers maintain tension upon the workpiece as it passes through the machine If the stock refuses to pass through the machine or the fini...

Page 12: ...et table height 2 Start drums 3 Start feed belt and select proper feed rate 4 Ensure dust collection system is running 5 Feed stock through machine OPERATING TIPS DETERMINING DEPTH OF WOOD REMOVAL Giv...

Page 13: ...e feed belt The abrasive material you choose will have a substantial effect on the performance of your sander Variations in paper type weight coating and durability all contribute to achieving your de...

Page 14: ...d at once Dirty board surface Insufficient dust collection Board contains too much moisture Worn sanding belt Change to a coarser grit Adjust table height Ensure board is free of debris prior to sandi...

Page 15: ...auditiva pueden reducir la posibilidad de lesiones Pero incluso el mejor protector no compensar el mal criterio el descuido ni la falta de atenci n Siempre aplique el sentido com n y act e con cautel...

Page 16: ...o de calzado y franjas de piso antideslizantes No use guantes 7 Use protectores auditivos tapones u orejeras durante per odos de operaci n extensos 8 Parte del polvo creado por el lijado el aserrado e...

Page 17: ...rza excesiva para realizar cualquiera de las operaciones de la m quina 15 Utilice la herramienta correcta a la velocidad y tasa de alimentaci n adecuadas No fuerce una herramienta o acoplamiento para...

Page 18: ...PORTANTES ET COMPOSANTES Fig 1 1 Cinta de alimentaci n de velocidad variable 2 Motor de servicio continuo de 3HP 3 Tambores dobles de 26 4 Cursor de elevaci n de lijado 5 Manivela de elevaci n 6 Ensam...

Page 19: ...de 8 10 mm 1 Manija de elevaci n 1 ESPECIFICACIONES DEL MOTOR DEL TAMBOR Tipo Rodamiento por inducci n Servicio Caballos de fuerza 3HP Amperes 16A Voltaje 230V Fase Simple Hercios 60Hz RPM 3 450 SP C...

Page 20: ...la mesa Manija de elevaci n de la mesa Elementos de ferreter a necesarios Ninguno 1 Instale la manivela de elevaci n de la mesa C alineando la ranura de la parte inferior de la manivela con el perno...

Page 21: ...idadosamente bobine la correa de lijado en torno al tambor asegur ndose de mantenerla ajustada Los bordes de la correa deben juntarse sin superponerse 8 Apriete la abrazadera con cierre sobre el extre...

Page 22: ...las que est n sujetando el protector inferior B a la m quina Consulte la Fig 7 4 Eleve los paneles telesc picos C lo suficiente como para exponer el soporte del motor D Consulte la Fig 7 Apuntale usan...

Page 23: ...uite el protector frontal D desliz ndolo hacia adelante 5 Ubique y quite los cuatro tornillos con cabeza allen de 6 mm E que est n asegurando la mesa de alimentaci n a la base Consulte la Fig 10 6 Con...

Page 24: ...ARA AJUSTAR LA PRESI N DE LOS RODILLOS Los rodillos de presi n mantienen la tensi n sobre la pieza de trabajo a medida que pasa a trav s de la m quina Si el material no pasa a trav s de la m quina o l...

Page 25: ...ecuada 4 Asegurarse de que el sistema de recolecci n de polvo est funcionando 5 Alimente el material a trav s de la m quina CONSEJOS PARA LA OPERACI N DETERMINACI N DE LA PROFUNDIDAD DE EXTRACCI N DE...

Page 26: ...ntaci n El material abrasivo que elija tendr un efecto considerable sobre el desempe o de su lijadora La variaciones en el tipo el peso el revestimiento y la durabilidad del papel todas contribuyen a...

Page 27: ...o Ajuste la altura de la mesa Aseg rese de que la tabla est libre de suciedad antes del lijado Inspeccione el sistema de recolecci n de polvo Seque el material adecuadamente antes de lijarlo Reemplace...

Page 28: ...o r t e d b y J a c c r a I n d u s t r i e s P t y L t d 2 3 E x h i b i t i o n D r i v e Ma l a g a We s t e r n A u s t r a l i a S a l e s S u p p o r t w w w j a c c r a i n d u s t r i e s c o...

Reviews: