Page 3 from 4
923753000_09_001
INSTALLATION INSTRUCTIONS
2
1
3
6
5
N
N
L
L
External
switch
Link
Controled operation of the lamp
Permanent maintained operation
N
N
L
L
L1
L1
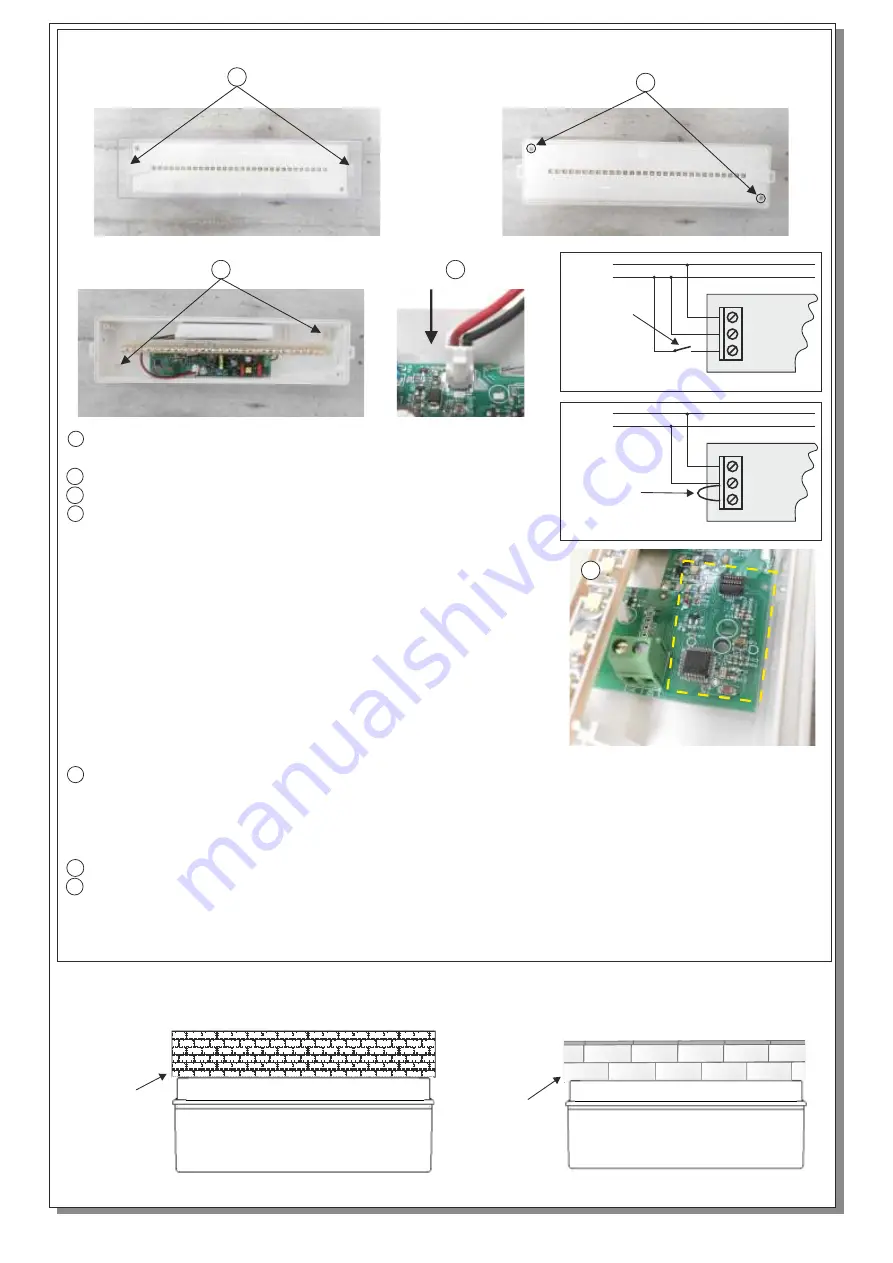
1 Place a flat blade screwdriver to the plastic hook and
pull up gently to release the diffusor.
2 Unfasten the 2 screws to remove the reflector.
3
Use the included mounting parts to mount the base plastic.
4
Always use in any case round mains cable, with a
diameter of 5-10mm (H05RN-F type 2x1mm² or any other
type, at least equal to it’s mechanical and electrical
properties). ATTENTION!! The cable must not be deformed
in any way (This requirement is important to ensure the ΙΡ
rating).
Install
the included gasket in to the cable entry holes
(verify that is not deformed)
. Make a hole in the center by
using a small screwdriver. Pass the round cable through the
gasket. Connect the mains cables to the respective terminal
block. Ν for neutral, L for live wire and L1 for the maintained
operation. The L1 wire can be connected to an external switch
to control the maintained or non maintained operation of the
luminary. For permanent maintained operation use two wires
to power the luminary, Ν for neutral and L for live wire, and link the L and L1.
5
terminals minding the correct polarity. Depending on the module that will
be used, the cables that will be used, have different names. In A, sL, C are also connected,
while signals -L, NC/NO in the terminal B.
6 Place the battery’s connector to the corresponding connector on the P.C.B.
7 Refit the reflector and the diffusor (mind the correct orientation) and the luminary is ready
to operate.
In case you use a module conncect it on P.C.B. If the module needs cabling follow drill a hole in
order to pass the 2 signal cables. Install the included gasket, pass the communication cables and
connect them on the A, B
Mounting methods
BAU Light luminaries can be surface mounted on walls or ceilings. For these mounted installations, special accessories are included.
NOTE!! After finishing the installation you must power the luminaire at least for 24 hours for battery charging to perform the named
autonomy.
Wall
bottom
view
Wall installation
Ceiling installation
Ceiling


