background image

Page 10 from 11

Installation procedure

Installation procedure

940821001_09_001

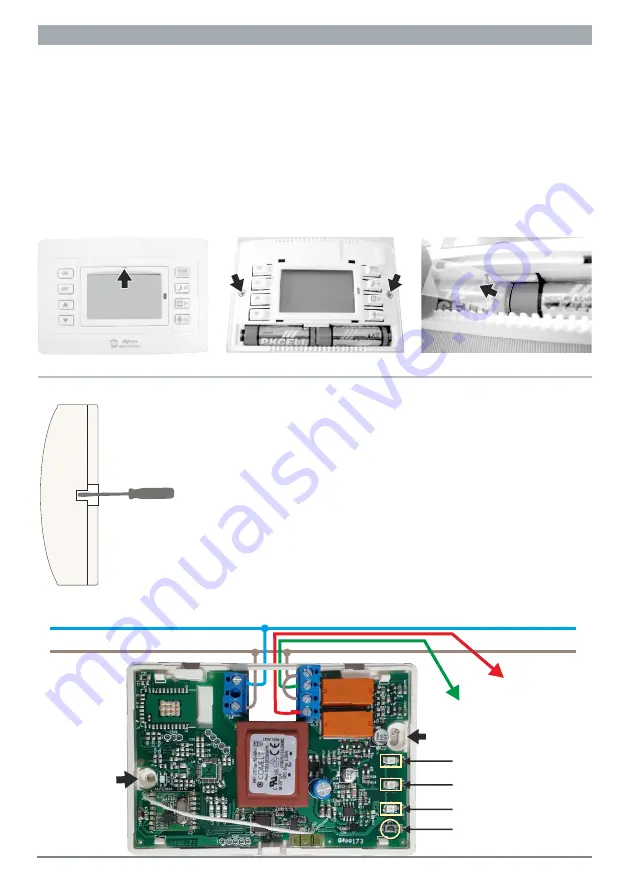
Fig. 1

Fig. 2

Fig. 3

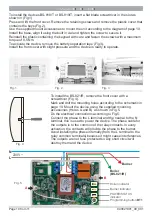
To install the devices BS-818/T or BS-819/T, insert a flat blade screwdriver in the slot as 
shown in (Fig.1). 
Press and lift the front cover. Remove the retaining screws and remove the plastic cover that 
contains the keys (Fig.2).
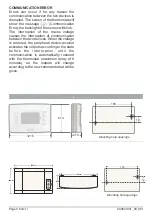
Use the supplied mount accessories to mount the unit according to the diagram of page 10.
Install the base, align it using the built in vial and tighten the screw to secure it.
Reinstall the plastic containing the keypad with care and fasten the screws with a maximum 
torque of 0,5 Nm. 
To activate the device, remove the battery separation tape (Fig.3).
Install the front cover with slight pressure and the device is ready to operate.

Fig. 4

POWER/STATUS
indicator

N

L

230V~

Boiler indicator

Programming button


ΒΤ1

Boiler
(BS-821/R)

Burner

Fig. 5

A

B

Burner indicator

To install the BS-821/R, remove the front cover with a 
screwdriver (Fig.4). 
Mark and drill the mounting holes according to the schematic in 
page 10. Mount the device using the supplied mounting 
accessories (Holes  A and B)  as shown in Fig.5.
Do the electrical connections according to Fig.5.
Connect the phase to the L terminal and the neutral to the N 
terminal, this is used to power the device. The phase cable for 
the outputs is to the common of the relay contacts. In every 
activation, the contacts will provide the phase to the burner. 
Avoid installing the phase internally (from the L terminal to the 
relay common terminals) because it might cause interferences.


The outputs are not fuse protected so any short circuit will 
destroy them and the device.

Summary of Contents for BS-821/KIT

Page 1: ...819 T BATTERYOPERATEDWIRELESSPROGRAMMABLECHRONO THERMOSTAT WITHCOOLINGANDHEATINGFUNCTION BOILEROUTPUT BATTERYOPERATEDWIRELESSPROGRAMMABLECHRONO THERMOSTAT WITHCOOLINGANDHEATINGFUNCTION BOILEROUTPUT Th...

Page 2: ...ily programming example page 7 Weekly programming example page 8 Wireless communication settings page 8 communication errors page 9 Hour and message display Temperature and message display Temperature...

Page 3: ...e pressed simultaneously for 3 first the key and then the the screen will show the message and the keypad is locked Page 3 from 11 GENERAL When the plastic battery separator is remove the unit is auto...

Page 4: ...since the end time is the start time of the next program For example if we require a temperature of 23 0 C from 14 00 to18 00 in program 1 we will set the start time 14 00 at 23 0 C and the start time...

Page 5: ...his setting we can turn off the screen illumination in order to conserve battery energy If is selected then the screen illumination will be activated every time a key is pressed If is selected then th...

Page 6: ...erate The battery life time has been design to be approximately 2 years Factors that influence the battery life are prolong use of the keyboard with the backlight active increased temperature and humi...

Page 7: ...e blinking 4 Press the key and the starts to blink With the keys and we select the operation mode Day daily program 5 Press the key and we return to the previous screen with the blinking 6 Press the k...

Page 8: ...the key The weekly program will start to execute as defined In order for the program to execute correctly make sure you have programmed the device clock with the correct time WIRELESS CONNECTION SETTI...

Page 9: ...blink The interruption of the mains voltage causes the interruption of communication between the two devices When the voltage is restored the peripheral device receiver activates the outputs according...

Page 10: ...sure and the device is ready to operate Fig 4 POWER STATUS indicator N L 230V Boiler indicator Programming button 1 Boiler BS 821 R Burner Fig 5 A B Burner indicator To install the BS 821 R remove the...

Page 11: ...returned goods and to or not charge the buyer depending on the reason of defection Olympia Electronics reserves the right to charge or not the buyer the transportation cost HEAD OFFICE 72nd km O N R T...

Reviews: