background image

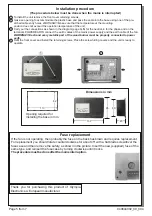
Installation procedure

(The procedure below must be done when the mains is interrupted

)

940844002_09_00

4

Page


5 from


7

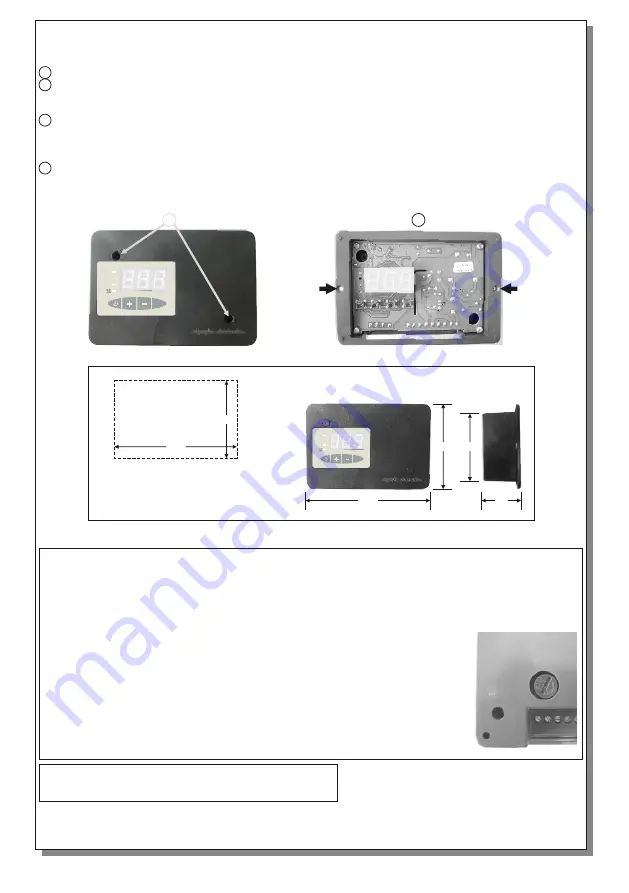
1   To install the unit remove the front cover retaining screws

.

2   

make an opening to accommodate the plastic base and pass the cable into the base using one of the pre-

     etched cable entry holes.


WARNING

!!! 

Make sure that the temperature at the mounting

     position does not exceed the operation temperature of the unit.

3   

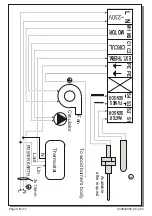
Carry out the connections as shown in the diagram (page 6)

Ν


for the neutral

L

 for the phase and on the 

     terminals POWER EARTH connect the earth cables of the mains power supply and the earth cable of the fan.


WARNING

!!! 

Each and every metallic part of the wood burner must be properly connected to power 


earth.

4   

Refit the front cover and install the retaining screws. Place the screw hiding covers and the unit is ready to 

     operate.

1

Θερμοστάτης ξυλολέβητα

MENU

POWER

CIRC.

2

If the fan is not operating, then probably the fuse on the back has blown and requires replacement.


For replacement you should rotate counterclockwise for about 45

º

 with a flat blade screwdriver the 

fuse case and then remove the safety, as shown in the picture. Insert the new (supplied) fuse of the 
same type, and reinsert the fuse case by turning clockwise until it locks. 

The procedure must be done after the mains interruption.

Fuse replacement

Dimensions in mm

137

95

80

45

Θερμοστάτης ξυλολέβητα

MENU

POWER

CIRC.

1

1

3

Opening required for 
installing the base in mm

.

82

Thank  you  for  purchasing  this  product  of  Olympia 
Electronics. A European manufacturer.

Summary of Contents for BS-844/2

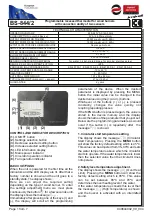
Page 1: ...ng on the type of wood burner To enter the settings adjustment menu we must press continuously the button for a few seconds until the display shows the message Immediately after pressing one of the keys and the display will scroll all the programming parameters of the device When the desired parameter is displayed by pressing the MENU button the initial value can be changed to the desired value us...

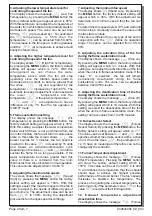
Page 2: ...eeds of different types of wood burners The adjustment value can be set from 1 to 100 During the adjustment process the fan changes speed accordingly 7 Adjusting the minimum fan speed The display shows Speed Low By pressing the MENU button the factory default setting will appear which is 30 With this adjustment we determine the minimum speed that the fan can turn To determine this speed select 10 ...

Page 3: ...y shows the first choice starting again the same cycle To complete the setup procedure and the integration of programming the button must be pressed again You will hear a beep from the thermostat s buzzer and the display with show indicating that the device is in standby mode If after this the button is pressed again the device enters normal operation mode FAN S MANUALOPERATION If in normal operat...

Page 4: ...04 Page 4 from 7 1 to 4 35 to 60ºC 45ºC Satting name Value Adjustment range Setting Explanations Locking the keyboard If during normal operation not in programming mode the MENU button is pressed continuously the display shows the message Lock and the keyboard will be locked This is used to prevent unwanted changes If any key is pressed the display will show the message and no command will be exec...

Page 5: ... of the wood burner must be properly connected to power earth 4 Refit the front cover and install the retaining screws Place the screw hiding covers and the unit is ready to operate 1 Θερμοστάτης ξυλολέβητα MENU POWER CIRC 2 If the fan is not operating then probably the fuse on the back has blown and requires replacement For replacement you should rotate counterclockwise for about 45º with a flat ...

Page 6: ...CIRCUL EXT THERM L N M2 M1 PE PE C2 C1 S3 S4 S1 S2 FUMES SENSOR WATER SENSOR N N L Lout Lin Fan Available after request To wood burner s body Circulator Thermostat 3x1 5mm POWER EARTH 940844002_09_004 Page 6 from 7 ...

Page 7: ...ne by a third party unless Olympia Electronics has fully agreed to them in writing Products that have been damaged can be returned to the premises of our company for repair or replacement as long as the warranty period is valid Olympia Electronics reserves the right to repair or to replace the returned goods and to or not charge the buyer depending on the reason of defection Olympia Electronics re...

Reviews: