background image


Cash Register CM 940-F / 941-F / 942-F


Olympia   2011 

Page 84 

Specifications subject to change without notice! 

6.18.3 

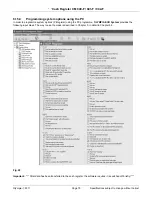
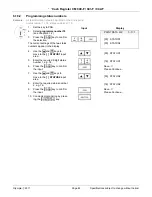
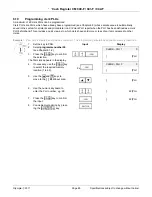
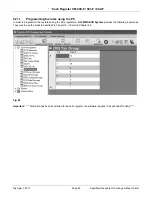
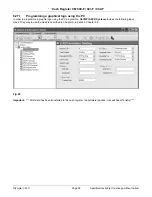
Programming the content of the report printout using the PC  

In order to programme content of the report printout using the PC programme, 

OLYMPIA ECR System

 provides the 

following input mask. They way to use the mask is described in Chapter 5, in detail in Chapter 5.5. 


Fig. 23 
 
Important:

  *** After data has been transferred to the cash register, the software requires it is switched off briefly! *** 

Note: 


You can alter all the system texts (see Fig. 23) in the PC programme using the options 

(24)

(25)

 and 

(26)

 in 

the 

System Setting

.  


Summary of Contents for CM 940-F

Page 1: ...CM 940 F 941 F 942 F Operating Instructions Programming Instructions O Y L MPIA Since 1903 www enetto eu ...

Page 2: ...ur ES Por medio de la presente el fabricante declara que este aparato está conforme a lo dispuesto en las directivas y normas vigentes NL De fabrikant verklaart hierbij dat het apparaat voldoet aan de bepalingen in de richtlijnen en normen PT Pelo presente o fabricante declaraque o dispositivo está de acordo com as determinações das directrizes e das normas SV Tillverkaren förklarar härmedatt appa...

Page 3: ...mming instructions to ensure you learn to use the cash register functions properly We hope you enjoy using your machine Kindest regards Olympia Business Systems Vertriebs GmbH Deutschland Enetto Euro Store Sweden www enetto eu This Operating Programming Instruction manual is purely for informational purposes Its content is not part of any contract for sale All the data specified relates to nominal...

Page 4: ... any future transportation of the cash register Transport Locks Before the cash register can be put into operation remove any transport locks installed and store them for future use Important transport note In the case of transport damage the unit must be returned together with the packaging operating programming instruction manual and accessories Connecting to the Power Supply Before connecting t...

Page 5: ...e keyboard 17 4 3 2 Functions not provided on the standard keyboard 20 5 Programming the Cash Register Via the PC 22 5 1 Installing the PC software 22 5 2 Starting the PC programme 23 5 3 Connecting the PC to the cash register 25 5 4 Using the PC programme 25 5 4 1 Using a basic programme supplied 26 5 4 2 Programming a completely new set of data 27 5 5 Selection window and programming operation 2...

Page 6: ... 5 1 5 Department assignment 43 6 5 1 6 PLU status 43 6 5 1 7 LINK PLUs 43 6 5 1 8 2 digit identity code for order type and printout on the kitchen printer 43 6 5 1 9 Inventory 47 6 5 2 Programming PLUs 48 6 5 3 Navigating in the PLUs 52 6 5 4 Deleting a PLU 52 6 5 5 Programming PLUs using the PC 53 6 6 Programming LINK PLUs 54 6 6 1 Programmable contents 54 6 6 1 1 LINK PLU number 54 6 6 1 2 LINK...

Page 7: ...e X Z reports 82 6 18 1 Status numbers 82 6 18 2 Programming status numbers 83 6 18 3 Programming the content of the report printout using the PC 84 6 19 Programming clerk PLUs 85 6 20 Programming the RS 232 port 86 6 20 1 Programmable contents and their status numbers 86 6 20 2 Programming the RS 232 port 87 6 21 Programming tax rates 88 6 21 1 Programming tax rates using the PC 89 6 22 Programmi...

Page 8: ...istering identical departments 118 7 2 6 Example receipt for DP registration 119 7 3 Registering PLUs 120 7 3 1 Registering a PLU once using fixed price 1 120 7 3 1 1 Items were previously registered using price 1 120 7 3 1 2 Items were previously registered using price 2 120 7 3 2 Registering a PLU once using fixed price 2 121 7 3 2 1 Items were previously registered using price 2 121 7 3 2 2 Ite...

Page 9: ...Transferring a table 137 8 7 Split payments for a table 138 8 8 Error corrections Voids within the table system 139 8 9 Order type system 139 8 10 Take away sales 140 9 Training Mode 141 9 1 Activating Training mode 141 9 2 Deactivating Training mode 142 10 Electronic Journal EJ 143 10 1 Printing the electronic journal EJ 143 10 1 1 Printing the EJ with all details 143 10 1 2 Printing the EJ with ...

Page 10: ...52 14 2 2 Loading data from the USB flash card 152 14 3 Bar code scanners 153 14 3 1 Suitable bar code scanners with a PS 2 plug 153 14 3 2 Setting up a bar code scanner 153 14 3 3 Using the barcode reader to programme PLUs in the cash register 153 14 4 Battery 154 14 4 1 Technical data 154 14 4 2 Installing the battery 154 14 5 Bank note verifier Euro 155 14 6 Dallas lock with 4 keys 155 ...

Page 11: ...mability Language German English French Dutch Usage versions Keyboard Dallas keys RS 232 port to connect a kitchen printer 65 system settings 11 setting options for the report printout Graphical logo Logo and AD messages Cash register number Passwords see below Clerks Date Time Date format Decimal places 0 to 3 Rounding methods also specially for payments in out and calculation of tax Tax rates De...

Page 12: ...8x64 Customer display Numeric display 10 digit LCD Printer Fujitsu FTP 628 MLC Printer type Thermal printer Paper width 57 5 0 5 mm Paper Thermal paper Interfaces 1 RJ 45 port for a cash drawer 1 PS 2 port for a barcode scanner 1 USB port for a PC or USB flash card 1 RS 232 serial port to connect a kitchen printer or scales 1 SD card slot for producing back up copies of programs Power supply 220 V...

Page 13: ...1 for Journal mode must be activated see Chapter 6 15 2 2 1 Inserting the paper reel 1 Open the printer lid 2 Remove the paper reel 3 Thread the end of the journal paper in the slit in the paper reel and fold back in the opposite direction Then wind on the paper a little by hand 4 Insert the paper reel in the reel guides provided for it Important The part of the reel which cannot be disassembled m...

Page 14: ... key can be turned to five different positions OFF REG X Z PRG The cash register is off Registration mode Print report without memory deletion Print report with memory deletion Programming mode 3 2 Keys Six different keys are available for use with the cash register Switch position Key identification No of keys OFF REG X Z PRG S 2 X X X Z 2 X X X X P 2 X X X X X ...

Page 15: ... different languages on the keys Keyboard sheets in various languages are enclosed with the cash register for this purpose 4 1 1 Raised keyboard labels in English 4 1 2 Raised keyboard labels in German 4 1 3 Changing the key labels Proceed as follows 1 Remove the transparent cap from the key If it is easier for you carefully remove the entire key beforehand 2 Replace the existing key label with a ...

Page 16: ...otection foil in the same way see Point 3 FEED Receipt ON OFF RA PO DP SHIFT NS DEPT 6 PLU 6 PLU 12 PLU 18 PLU 24 PLU 30 PLU 36 PLU 42 Print Size PLU Clerk X Split DEPT 5 PLU 5 PLU 11 PLU 17 PLU 23 PLU 29 PLU 35 PLU 41 Retour 7 8 9 Trans fer DEPT 4 PLU 4 PLU 10 PLU 16 PLU 22 PLU 28 PLU 34 PLU 40 Void 4 5 6 Change VAT Card DEPT 3 PLU 3 PLU 9 PLU 15 PLU 21 PLU 27 PLU 33 PLU 39 EC 1 2 3 Bill print Su...

Page 17: ... a percentage surcharge on a sale or on a subtotal The total amount registered by the key is recorded in the financial report Or if the cash register is not completing a transaction PO key to pay out amounts H F The CLR key is used to delete all the entries made using the numeric keyboard or by the X key before the entries have been finalised by pressing a department or function key The CLR is als...

Page 18: ...is used to switch between the three department levels When Programming mode is active press the key to skip to the same field in the next input position F This key is used separate the items on a table so that they can be calculated separately F This key is used to reassign items to another table number F Key for take away sales The key is used to alter the standard tax rate 1 to the reduced tax r...

Page 19: ...d fixed tender keys for frequently required amounts H The Receipt ON OFF key is used to switch printing of receipts on or off H F The and keys are used to scroll up and down in the display H The FC Foreign Currency key is used for converting amounts into a foreign currency H F The NS NS No Sale key is used for operations which do not need to be added It can be used to print a maximally 7 digit num...

Page 20: ...amounts surcharged or discounted from totals ADDITIONAL TEXT H F Only works in combination with the table function This key is used in order to add text to a PLU ADR H F Additional business receipt after pressing this key the preprint for the ADR is printed when the bill has been printed BILL PRINT H Print the subtotal or table review CHANGE VAT H This key is used to change the tax rate following ...

Page 21: ... enable free pricing during a PLU registration SPLIT H The key is used to separate items on one table TAX 1 H F The VAT for an item is calculated at value added tax rate 1 for the completion of a receipt TAX 2 H F The VAT for an item is calculated at value added tax rate 2 for the completion of a receipt TABLE H The key is used to open a table enter a table number then press this key and to conclu...

Page 22: ...earer overview of the programmed data because you can view it quickly simply and clearly on the monitor screen You can also save the programmed settings so that in the event of a system reset you have a backup copy available which you only need to transfer from the PC to the cash register Note Follow the instructions below in the sequence in which they are described 5 1 Installing the PC software ...

Page 23: ...the desktop The programme can then be started simply by double clicking on the relevant icon 5 2 Starting the PC programme 1 Open the EcrSystem programme Double click on the icon created on the PC desktop during installation or Select C Program Files EcrSystem and double click on EcrSystem exe The Login window appears Fig 5 2 Select the language required Language Select 3 Select the cash register ...

Page 24: ... Page 24 Specifications subject to change without notice Fig 6 Activate the USB interface 5 Select the System Setting S menu in the menu bar 6 Select the Setup Usb Driver menu option The following window opens see Fig 7 Fig 7 Continued on next page ...

Page 25: ... the wizard has activated the driver and confirmed it 5 Click on Finish 5 4 Using the PC programme You must now decide whether to open one of the pre programmed sample files as the basis file or whether you want to enter all the data as new The data CD supplied contains the following three pre programmed basic programmes two basic programmes to operate the cash register as a retail model one basic...

Page 26: ...ogrammes contained on the CD in the Applications folder appear for selection 3 Select which version you want to load 4 Click on the Open button The basic programme selected is opened Fig 8 Saving the basic programme supplied under a new name Firstly save the basic programme under a new name 1 Click on System Setting S 2 Select Database Backup 3 You can edit the data provided according to your need...

Page 27: ...he contents which are assigned to the general headings see Fig 9 The numbers in brackets correspond to the programme numbers in the operating manual regarding operating the keyboard see Chapter 6 1 1 Proceed as follows to programme one of the options 1 Click once with the left hand mouse button on the re quired option The corresponding input mask appears on the right hand side of the window 2 Comp...

Page 28: ...ng one of the basic programmes supplied as a basis Fig 10 In order to fill data in the fields 1 Move the cursor to the relevant field and click the left hand mouse button 2 Use the PC keyboard to enter the content required 3 Double click in a field to display the setting options and select one directly Note This is not available for all fields ...

Page 29: ... 12 Print preview 4 Data management 13 Import from Excel 5 Receive data from ECR 14 Export to Excel 6 Send data to ECR 15 Close the programme Note The significance of the buttons also appears in bubbles by positioning the mouse arrow over the buttons for a moment Use the Update To ECR F3 button 6 to transfer the current programme content from the PC programme computer to the cash register see Chap...

Page 30: ...u have completed all the programming input transfer all the data to the cash register 1 Click on the ECR Setting E menu 2 Select the Data Management option 3 Click on the Update To ECR button see Fig 12 Data transfer then begins A corresponding window on the screen indicates the current transfer status Fig 12 Important After data has been transferred to the cash register the software requires it i...

Page 31: ... software requires it is switched off briefly 5 8 Loading data from the cash register to the PC backup copy If you have completed programming directly on the cash register we recommend you transfer the data to the PC to create a backup copy because programming on the cash register is very time consuming 1 Click on the ECR Setting E menu 2 Select the Data Management option 3 Click on the Upload Fro...

Page 32: ...t 09 TASTE 09 KEY Programme amount related surcharges discounts 10 10 KEY Programme percentage surcharges discounts 11 PASSWORT 11 PASS CODE Programme pass code password 12 MASCHINE NUMMER 12 MACHINE NUMBER Programme machine number 13 SYSTEM EINSTELLUNG 13 P REGISTER Programme cash register settings system options 14 DATUM ZEIT 14 DATE TIME Programme date and time 16 FREMDWÄHRUNG 16 FC Programme f...

Page 33: ...ETRAG 53 ROUNDING AMOUNT Programme amount rounding 80 SPEICHER LÖSCHEN 80 MEMORY CLEAR Delete all data from memory 81 SD CARD 81 SD CARD BACKUP Produce data backup 82 USB STICK 82 USB STICK BACKUP Send and receive data via USB flash card Note The sequence of subsequent chapters on programming from Chapter 6 4 basically corresponds to the order in the above programming menu 6 1 2 Initiate programmi...

Page 34: ... the characters assigned to a key appear when the key is pressed 2 Digits letters and special characters are entered in the same way as for a mobile phone Example To enter an A press the 8 ABC key once To enter a B press the 8 ABC key twice To enter a C press the 8 ABC key three times etc Note Alternatively you can select the letter by scrolling to it with the and keys 3 Then confirm the letter se...

Page 35: ...r the text Bar Input Display Enter Yes ESC Exit 2x B ABC 1 18 A B C a b c 8 Ä Á Å Enter Yes ESC Exit 4x Ba ABC 2 18 A B C a b c 8 Ä Á Å Enter Yes ESC Exit 7x Bar ABC 3 18 P Q R S p q r s 1 ß 6 2 2 2 Deleting text entered Position the cursor in the input area for text and press the CLR key to delete any existing text ...

Page 36: ...ial characters Press to enter digits and special characters Press to enter a space Press to delete the last character entered Press to delete the entire input 6 2 4 Character map Key Characters available A B C a b c 8 Ä Á Å Æ Ą À Â Ć Ç ä á å æ ą à â c ć D E F d e f 9 Ð Ė È Ê ė e è é Ê ë G H I g h i 4 Ġ Í İ Î Ï g í ì J K L j k l 5 Ł ł M N O m n o 6 Ń Ñ Ö Ó Ø Ő Ō ό Ô ñ ń ö ó ø ő ō ό ô ò P Q R S p q ...

Page 37: ...ANGUAGE 1 1 Set the key to PRG 2 Select programme number 49 see Chapter 6 1 2 3 Press the CASH key to confirm the selection 1 4 Enter the status number of the required language via the numeric keys 0 for English 1 for German 2 for French or 3 for Dutch 0 5 Save the selection by pressing the CASH key Save Please Continue 6 End programming by pressing the SUB TOTAL key In order for the change of lan...

Page 38: ... To define the language using the PC programme OLYMPIA ECR System provides the following input mask It is used to programme various parameter settings They way to use the mask is described in Chapter 5 in detail in Chapter 5 5 Fig 13 Important After data has been transferred to the cash register the software requires it is switched off briefly ...

Page 39: ...ames are pre programmed 6 4 1 2 Department fixed prices A maximum of two department fixed prices can be programmed Department fixed price 1 is usually the standard price department fixed price 2 relates to a reduced price e g within the scope of a happy hour or products which are no longer fresh The entry of department fixed prices is optional If you do not enter fixed prices fixed price is 0 00 t...

Page 40: ...key to confirm the input The cash register automatically switches to the next programming step Programming department fixed price 2 option 11 Enter fixed price 2 including decimal places and decimal point 12 Press the CASH key to confirm the input The cash register automatically switches to the next programming step Assigning tax rates 13 Enter the tax rate group 14 Press the CASH key to confirm t...

Page 41: ...9 90 referred to as ABC and operate at the reduced tax rate 2 of 7 Input Display Initiate department programming DEPARTMENT 1 1 Dept01 0 00 PRICE 1 0 00 PRICE 2 1 TAX 00 STATUS Programming a department name Dept01 1x then A 2x then AB 3x then ABC ABC Programming a department fixed price 1 0 00 PRICE 1 14 90 PRICE 1 Programming a department fixed price 2 0 00 PRICE 2 9 90 PRICE 2 Assigning a tax ra...

Page 42: ...then press the CASH key several times to switch between the DP memory locations By pressing the DP SHIFT key you can access the same position in the next PLU 6 4 4 Programming departments using the PC In order to programme departments using the PC programme OLYMPIA ECR System provides the following input mask They way to use the mask is described in Chapter 5 in detail in Chapter 5 5 Fig 14 Import...

Page 43: ...whether it is a positive or negative PLU PLU type PLU status number Positive PLU 00 Negative PLU 01 6 5 1 7 LINK PLUs LINK PLUs are linked to a normal PLU When the normal PLU is then registered the LINK PLU is automatically registered too LINK PLUs are often used in the sale of drinks in deposit bottles for example The deposit bottle is then the LINK PLU A maximum of 3 LINK PLUs can be programmed ...

Page 44: ... 6 26 Note A kitchen printer must be activated via system option 9 status code 2 so that printing on a kitchen printer works There are eight different types of kitchen receipts which can combine order receipts and single receipts in the following ways Type of output receipt type Single receipt Types KD Order receipt According to same item Each item Type 1 1 X Type 2 2 X Type 3 3 X Type 4 4 X Type ...

Page 45: ... receipt is issued initially containing the entire order This is followed by the respective single receipts for identicle items TABLE 100 KD 1 1 STEAK 1 PIZZA 1 SCHNITZEL 02 01 2011 12 30 0433 Clerk 01 TABLE 001 KD 5 1 STEAK 2 PIZZA 02 01 2011 12 30 0433 Clerk 01 Section TABLE 001 KD 5 1 STEAK 02 01 2011 12 30 0434 Clerk 01 Section TABLE 001 KD 5 2 PIZZA 02 01 2011 12 30 0435 Clerk 01 Continued on...

Page 46: ...7 1 STEAK 2 PIZZA 02 01 2011 12 30 0433 Clerk 01 TABLE 001 KD 6 1 STEAK 02 01 2011 12 30 0434 Clerk 01 Section TABLE 001 KD 6 2 PIZZA 02 01 2011 12 30 0435 Clerk 01 Type 8 Only single receipts are printed for each item TABLE 001 KD 8 1 STEAK 02 01 2011 12 30 0434 Clerk 01 Section TABLE 001 KD 8 1 PIZZA 02 01 2011 12 30 0435 Clerk 01 Section TABLE 001 KD 8 1 PIZZA 02 01 2011 12 30 0436 Clerk 01 Not...

Page 47: ...t to change without notice 6 5 1 9 Inventory The inventory relates to the number of pieces of an item in stock Note Since the current inventory of a PLU can be printed in the reports system option 11 status code 1 for the PLU inventory counter must be activated see Chapter 6 15 ...

Page 48: ...er entry by pressing the CASH key 9 Press the CASH key to confirm the input Programming PLU fixed price 1 option 10 Use the and keys to move to the input area for PLU fixed price 1 11 Enter the fixed price 1 including decimal place and decimal point 12 Press the CASH key to confirm the input The cash register automatically switches to the next programming step Programming PLU fixed price 2 option ...

Page 49: ...y to confirm the input The cash register automatically switches to the next programming step Programming the code for order type and printing on kitchen printer option 27 Enter the two digit code for the order type and printing on the kitchen printer 28 Press the CASH key to confirm the input The cash register automatically switches to the next programming step Entering the PLU inventory option 29...

Page 50: ...nked with LINK PLU no 33 PLU no 22 should belong to order type 2 and kitchen receipts should be printed according to type 5 code for order type and printing on kitchen printer 25 100 pieces were in stock at the time of programming Input Display Initiate PLU programming PLU 1 1 1 No 1 0 00 PRICE1 0 00 PRICE2 0 TAX GROUP 1 LINK DEPT 00 STATUS 0 LINK PLU 1 0 LINK PLU 2 0 LINK PLU 3 00 ORDER KD 0 STOC...

Page 51: ...90 PRICE1 Programming PLU price 2 0 00 PRICE2 6 00 PRICE2 Assigning a tax rate 0 TAX GROUP 1 TAX GROUP Assigning a department 1 LINK DEPT 1 LINK DEPT Defining the PLU status 0 STATUS 00 STATUS Programming LINK PLU 1 00 LINK PLU 1 33 LINK PLU 1 Programming LINK PLU 2 00 LINK PLU 2 00 LINK PLU 2 Programming LINK PLU 3 00 LINK PLU 3 00 LINK PLU 3 Continued on next page ...

Page 52: ... the CASH key several times to switch between the PLU memory locations By pressing the DP SHIFT key you can access the same position in the next PLU 6 5 4 Deleting a PLU 1 Set the key to PRG 2 Select programme number 03 refer to Chapter 6 1 2 3 Press the CASH key to confirm the selection 4 Use the and keys to move to the input area for the PLU number 5 Enter the number of the PLU to be deleted 6 U...

Page 53: ... PLUs using the PC In order to programme PLUs items using the PC programme OLYMPIA ECR System provides the following input mask They way to use the mask is described in Chapter 5 in detail in Chapter 5 5 Fig 15 Important After data has been transferred to the cash register the software requires it is switched off briefly ...

Page 54: ...e factory general standard names are pre programmed 6 6 1 3 LINK PLU fixed prices Two PLU fixed prices can be programmed PLU fixed price 1 is usually the standard price PLU fixed price 2 is normally a reduced price e g within the scope of a happy hour or for products which are no longer fresh such as bread fruit vegetables etc The entry of a PLU fixed price is optional If you do not enter fixed pr...

Page 55: ...e and keys to move to the input area for LINK PLU fixed price 1 12 Enter the fixed price 1 including decimal place and decimal point 13 Press the CASH key to confirm the input The cash register automatically switches to the next programming step Programming LINK PLU fixed price 2 14 Enter the fixed price 2 including decimal place and decimal point 15 Press the CASH key to confirm the input The cas...

Page 56: ...rtment 9 Tax rate 1 applies There were 150 pieces in stock at the time of programming Input Initiate programming the LINK PLU linkPLU 1 1 0 FREE CODE 0 00 PRICE1 0 00 PRICE2 0 TAX GROUP 0 LINK DEPT 00 STATUS SAVE DELETE Entering the LINK PLU number 0 FREE CODE 5 FREE CODE Programming the LINK PLU name 12x then 12x then 12x then Programming LINK PLU price 1 0 00 PRICE1 3 30 PRICE1 Programming LINK ...

Page 57: ... the CASH key several times to switch between the LINK PLU memory locations Press the DP SHIFT key to access the same position in the next programmed LINK PLU 6 6 4 Deleting a LINK PLU 1 Set the key to PRG 2 Select programme number 04 see Chapter 6 1 2 3 Press the CASH key to confirm the selection 4 Use the and keys to move to the input area for the LINK PLU number 5 Enter the number of the LINK P...

Page 58: ...INK PLUs using the PC In order to programme LINK PLUs using the PC programme OLYMPIA ECR System provides the following input mask They way to use the mask is described in Chapter 5 in detail in Chapter 5 5 Fig 16 Important After data has been transferred to the cash register the software requires it is switched off briefly ...

Page 59: ...This programming step is optional On leaving the factory the clerk numbers 01 to 16 are programmed instead of individual clerk names 6 7 1 2 Clerk password pass code You can programme a 6 digit pass code for each clerk which the clerk must then use to log on to the cash register The clerk pass code may only comprise digits and be between 000001 and 999999 Note Programme 000000 if no clerk password...

Page 60: ... 7 Prohibit monthly Z report X X X X Access to all tables manager X X X X reserved X X X X reserved X X X X reserved X X X X reserved X X X X One clerk with this right has access to all operations he is a manager Status number 3 Status code 1 Status code 2 Clerk attributes 0 1 2 3 4 5 6 7 Clerk attributes 0 1 2 3 4 5 6 7 Training permitted X X X X Prohibit print other all clerks at Clerk report X ...

Page 61: ...rs in the display 01 PASS CODE 0 COMM RATE 0 COMM FACTOR 00 STATUS1 00 STATUS2 00 STATUS3 SAVE CLERK 2 1 4 Use the CASH key to switch to the required clerk memory loca tion 02 5 Use the and keys to move to the input area for the clerk name 6 Press the CASH key to confirm the selection 7 Delete the existing text 8 Enter the clerk name text input refer to Chapter 6 2 2x then E 6x then Ev 4x then Eva...

Page 62: ...MM RATE 17 Enter the commission rate with out decimal places 18 Press the CASH key to confirm the input 3 COMM RATE The cash register automatically switches to the COMM FACTOR input area 0 COMM FACTOR 19 Enter the code for the commis sion factor 20 Press the CASH key to confirm the input 1 COMM FACTOR The cash register automatically switches to the STATUS1 input area 00 STATUS1 21 Enter the 2 digi...

Page 63: ...deactivated using system option 3 status code 2 see Chapter 6 15 Input Display P REGISTER 1 1 1 Set the key to PRG 2 Select programme number 13 see Chapter 6 1 2 3 Press the CASH key to confirm the selection 32 STATUS NO Mx My 4 Use the digit keys to enter 3 P REGISTER 3 1 5 Use the and keys to access the input area 47 STATUS NO Mx My 6 Enter the status code 43 to acti vate the clerk system while ...

Page 64: ...he CLERK or CASH key to confirm the entry If a pass code has been programmed you are now requested to enter it Password 3 Enter the 6 digit clerk pass code 4 Press the CASH key to confirm the input Note When Registration mode is active the programmed clerk name appears in the display for a brief moment Eva Note System option 4 status code 2 can be used to define whether a clerk must log on to the ...

Page 65: ...g clerks using the PC In order to programme clerks using the PC programme OLYMPIA ECR System provides the following input mask They way to use the mask is described in Chapter 5 in detail in Chapter 5 5 Fig 17 Important After data has been transferred to the cash register the software requires it is switched off briefly ...

Page 66: ...er medium 4 CREDIT 2 should be renamed XYZ Input Display TENDER MEDIA 1 1 1 Set the key to PRG 2 Select programme number 08 see Chapter 6 1 2 3 Press the CASH key to confirm the selection CASH 00 STATUS TENDER MEDIA 4 1 4 Select the tender medium re quired Switch between the vari ous tender media by pressing the CASH key 4x CREDIT 2 5 Use the and keys to access the input area CREDIT 2 6 Press the ...

Page 67: ...fication using the PC In order to programme tender media identification using the PC programme OLYMPIA ECR System provides the following input mask They way to use the mask is described in Chapter 5 in detail in Chapter 5 5 Fig 18 Important After data has been transferred to the cash register the software requires it is switched off briefly ...

Page 68: ...election 0 00 ADD ON 0 00 DISCOUNT 4 Use the and keys to move to the ADD ON input area 0 00 ADD ON 5 Use the digit keys to enter the amount of the surcharge with decimal point and decimal places 6 00 ADD ON 6 Press the CASH key to confirm the selection Save Please Continue 7 Conclude programming by press ing the SUB TOTAL key 6 9 1 Programming an amount related surcharge using the PC In order to p...

Page 69: ...pter 6 28 Example A fixed discount of 1 must be programmed Input Display Key 1 1 Set the key to PRG 2 Select programme number 09 see Chapter 6 1 2 3 Press the CASH key to confirm the selection 0 00 ADD ON 0 00 DISCOUNT 4 Use the and keys to move to the DISCOUNT input area 0 00 DISCOUNT 5 Use the digit keys to enter the amount of the discount with decimal point and decimal places 1 00 DISCOUNT 6 Pr...

Page 70: ...input Save Please Continue 7 Conclude programming by press ing the SUB TOTAL key 6 11 1 Programming a percentage surcharge using the PC See Chapter 6 9 1 6 12 Programming a percentage discount This function programs a discount as a percentage value Example A percentage value of 5 must be programmed for the discount Input Display Key 1 1 Set the key to PRG 2 Select programme number 10 see Chapter 6...

Page 71: ...ect programme number 11 see Chapter 6 1 2 3 Press the CASH key to confirm the selection TRAINING CODE New CODE 4 Enter the existing code default setting 000000 in the TRAINING CODE input area Note Always enter the pass code as a 6 digit number 5 Press the CASH key to confirm the input TRAINING CODE 6 Enter a new 6 digit code in the NEW CODE input area digits only 7 Press the CASH key to confirm th...

Page 72: ... order to programme a Training pass code using the PC programme OLYMPIA ECR System provides the following input mask It is used to programme various parameter settings They way to use the mask is described in Chapter 5 in detail in Chapter 5 5 Fig 20 Important After data has been transferred to the cash register the software requires it is switched off briefly ...

Page 73: ...6 1 2 3 Press the CASH key to confirm the selection 0000 4 Enter the machine number using the numeric keys 5555 5 Press the CASH key to confirm the input Save Please Continue 6 Conclude programming by press ing the SUB TOTAL key 6 14 1 Programming the machine number using the PC In order to programme the machine number Machine s ID using the PC programme OLYMPIA ECR System provides the following i...

Page 74: ...are programmed even if you only want to change one feature Note Certain system options which are not assigned a feature are defined as reserved areas by the software 6 15 1 System options in detail Note The default settings appear in bold print Note Generally speaking the system options need not be changed when the cash register is used normally System option 1 Defining the content of receipts bil...

Page 75: ... Z reports X X X X 12 hr indication on receipt X X X X Print copy receipt is enabled X X X X Register clerk at each transaction X X X X calculated for DPT PLU after SUB TOTAL only X X X X calculated for DPT PLU items only SUB TOTAL no X X X X System option 5 Status code 1 Status code 2 Features 0 1 2 3 4 5 6 7 Features 0 1 2 3 4 5 6 7 Price level will stay after transaction X X X X Base currency E...

Page 76: ...rders receipt Single tickets for direct sales X X X X Electronic journal Deactivated X X X X reserved X X X X Returns do not reduce counter on paid tables X X X X System option 9 Status code 1 Status code 2 Features 0 1 2 3 4 5 6 7 Features 0 1 2 3 4 5 6 7 Open track in transaction X X X X Enable kitchen printer X X X X Print orders and ticket on internal printer X X X X reserved X X X X reserved ...

Page 77: ...0 1 2 3 4 5 6 7 Print quantity on X Z report X X X X Not print zero price PLU at invoice X X X X reserved X X X X reserved X X X X Kitchen printer active for direct sale X X X X Display Sleep mode not active X X X X System option 13 Status code 1 Status code 2 Features 0 1 2 3 4 5 6 7 Features 0 1 2 3 4 5 6 7 Add tax 1 and tax 3 X X X X Dallas keys active X X X X reserved X X X X reserved X X X X ...

Page 78: ...er the number of the system option to be programmed e g 13 P REGISTER 5 Use the and keys to move to the input area 10 STATUS NO Mx My 6 Enter the required 2 digit status number e g 51 to switch off the key tone 51 STATUS NO Mx My 7 Press the CASH key to confirm the input 8 Conclude programming by press ing the SUB TOTAL key 6 15 3 Printing the system options Input Display SETTINGS PRG 90 1 Set the...

Page 79: ...ions using the PC In order to programme system options P Register using the PC programme OLYMPIA ECR System provides the following input mask The way to use the mask is described in Chapter 5 in detail in Chapter 5 5 Fig 22 Important After data has been transferred to the cash register the software requires it is switched off briefly ...

Page 80: ... the month Date DD MM YYYY 17 06 2011 5 Enter the month The cash register automatically switches to the input area for the year Date DD MM YYYY 17 06 2011 6 Enter the year The cash register automatically switches to the input area for the hour Date DD MM YYYY 17 06 2011 7 Enter the hour The cash register automatically switches to the input area for the minute Time HH MM 13 00 8 Enter the minute Th...

Page 81: ... be programmed as the foreign currency in memory location 2 The exchange rate at the time of programming was 1 EUR 1 35 USD native local currency 1 EUR foreign currency 1 35 USD Input Display FC 1 1 1 Set the key to PRG 2 Select programme number 16 see Chapter 6 1 2 3 Press the CASH key to confirm the selection The first foreign currency memory location appears in the display FC01 Native 0 01 Fore...

Page 82: ...ween 0 and 7 according to the tables below 6 18 1 Status numbers Note The default settings appear in bold print Status number 1 Status code 1 Status code 2 Features 0 1 2 3 4 5 6 7 Features 0 1 2 3 4 5 6 7 Print Grand Total in financial report X X X X reserved X X X X Print Return on financial report X X X X Print tax rate X X X X Print Void on financial report X X X X Print GROSS SALE TL on repor...

Page 83: ...he CASH key to confirm the selection The current settings of the two status numbers appear in the display 00 STATUS1 00 STATUS2 4 Use the and keys to move to the STATUS1 input area 00 STATUS1 5 Enter the required 2 digit status number 1 e g 76 76 STATUS1 6 Press the CASH key to confirm the input Save Please Continue 7 Use the and keys to move to the STATUS2 input area 00 STATUS2 8 Enter the requir...

Page 84: ...report printout using the PC programme OLYMPIA ECR System provides the following input mask They way to use the mask is described in Chapter 5 in detail in Chapter 5 5 Fig 23 Important After data has been transferred to the cash register the software requires it is switched off briefly Note You can alter all the system texts see Fig 23 in the PC programme using the options 24 25 and 26 in the Syst...

Page 85: ...e sold more or less of an item compared to other clerks Example PLU no 22 should be defined as a clerk PLU This programming should be assigned to memory location 3 Input Display CLERK PLU 1 0 1 Set the key to PRG 2 Select programme number 20 see Chapter 6 1 2 3 Press the CASH key to confirm the selection The first clerk appears in the display PLU CLERK PLU 3 0 4 If necessary use the CASH key to se...

Page 86: ...he cash register serves to connect a kitchen printer or a set of scales 6 20 1 Programmable contents and their status numbers Status number 1 Device for connection Status code 1 Kitchen printer 58 mm Epson 1 Kitchen printer Olympia TH 200 80mm Epson 2 Scales 3 Status number 2 Baudrate Status code 1 Data length Status code 2 4800 0 7 bit 0 9600 1 8 bit 1 19200 2 38400 3 Status number 3 Parity Statu...

Page 87: ...ch between 5 different ports Only the RS 232 port assigned to the first slot can be programmed 4 Use the and keys to move to the CONNECTION input area 0 CONNECTION 5 Use the numeric keyboard to enter the 1 digit status number e g 2 2 CONNECTION 6 Press the CASH key to confirm the input Save Please Continue 7 Use the and keys to move to the BAUDR DATALEN input area 11 BAUDR DATALEN 8 Use the numeri...

Page 88: ... see Chapter 6 1 2 3 Press the CASH key to con firm the selection 19 00 RATE TAX GROUP 3 1 4 Change the tax rate memory location Press the CASH key until the required memory loca tion is displayed in the logo message line 2x 00 00 RATE 5 Use the and keys to move to the RATE input area 0 00 RATE 6 Use the digit keys to enter the tax rate with decimal point and decimal places 19 60 RATE 7 Press the ...

Page 89: ...x rates using the PC In order to programme the tax rates using the PC programme OLYMPIA ECR System provides the following input mask They way to use the mask is described in Chapter 5 in detail in Chapter 5 5 Fig 24 Important After data has been transferred to the cash register the software requires it is switched off briefly ...

Page 90: ...directly using the cash register All 8 logo message lines can be programmed using the PC programme Example A logo should be programmed containing the text WELCOME The remaining pre programmed lines should be deleted Input Display LOGO MESSAGE 1 OLYMPIA CM940 45525 Hattingen 1 Set the key to PRG 2 Select programme number 31 see Chapter 6 1 2 3 Press the CASH key to confirm the selection The program...

Page 91: ...ssages using the PC In order to programme logo message lines using the PC programme OLYMPIA ECR System provides the following input mask They way to use the mask is described in Chapter 5 in detail in Chapter 5 5 Fig 25 Important After data has been transferred to the cash register the software requires it is switched off briefly ...

Page 92: ... line feed in the text after 20 characters and displays the last 12 characters of the AD message in a second line Note Only 4 message lines can be programmed directly using the cash register All 8 message lines can be programmed using the PC programme Programming AD message lines is completed in the same way as for logo message lines see Chapter 6 22 The only difference is that program number 32 m...

Page 93: ... locations 11 to 13 Input Display cooking msg 00 10 1 1 Set the key to PRG 2 Select programme number 40 see Chapter 6 1 2 3 Press the CASH key to confirm the selection name cooking msg 00 10 1 4 Use the CASH key to change memory locations for the cooking message 10x name 5 Use the and keys to move to the Name input area name 6 Press the CASH key to confirm the input 7 Enter the cooking message Pro...

Page 94: ... messages using the PC In order to programme cooking messages using the PC programme OLYMPIA ECR System provides the following input mask They way to use the mask is described in Chapter 5 in detail in Chapter 5 5 Fig 26 Important After data has been transferred to the cash register the software requires it is switched off briefly ...

Page 95: ...ifferent order numbers are printed in succession Order message indicate the sections and appear at the top of the order messages Up to 9 order messages can be programmed each with a maximum of 18 characters Example The order message food should be programmed for memory location 5 Input Display ORDER MESSAGE 1 01 1 Set the key to PRG 2 Select programme number 41 see Chapter 6 1 2 3 Press the CASH k...

Page 96: ... messages using the PC In order to programme order messages using the PC programme OLYMPIA ECR System provides the following input mask They way to use the mask is described in Chapter 5 in detail in Chapter 5 5 Fig 27 Important After data has been transferred to the cash register the software requires it is switched off briefly ...

Page 97: ...itchen in which the food was prepared cold food hot food salads etc Up to 8 kitchen printer receipts can be programmed each with a maximum of 18 characters Example Salads should be programmed instead of KD 6 Input Display KITCHENPRINTER 1 1 1 Set the key to PRG 2 Select programme number 43 see Chapter 6 1 2 3 Press the CASH key to confirm the selection name COM PORT No KITCHENPRINTER 6 1 4 Use the...

Page 98: ... Fig 28 Input Display GRAPHIC LOGO 1 1 Set the key to PRG 2 Select programme number 44 see Chapter 6 1 2 3 Press the CASH key to con firm the selection 0 NO 4 Enter the number of the graphical logo you want to print in the No input area e g 17 17 NO 5 Press the CASH key to con firm the input Save Please Continue 6 Conclude programming by pressing the SUB TOTAL key Note In its default setting the i...

Page 99: ...hical logo using the PC In order to programme a graphic logo using the PC programme OLYMPIA ECR System provides the following input mask They way to use the mask is described in Chapter 5 in detail in Chapter 5 5 Fig 29 Important After data has been transferred to the cash register the software requires it is switched off briefly ...

Page 100: ...unction Code Meaning 001 30 DP SHIFT 50 Table to 32 Change VAT 51 Keyboard shift 999 PLU keys 1 to 999 34 Training 53 TRANSFER 10 0 300 54 Separate 11 00 Space to 55 Additional text 12 Delete 329 Cooking messages 1 to 30 56 Ticket on off 13 PLU 330 57 Additional business receipt 14 FC1 to 58 Up 15 FC2 345 Clerk 1 to 16 59 AB 16 45 Clerks 64 Print size 17 46 CASH 70 Card 18 VOID 47 SUB TOTAL 71 Cre...

Page 101: ...to toggle between the programming of function and PLU keys 5 Use the and keys to move to the VALUE CODE input area 0 VALUE CODE 6 Use the digit keys to enter the code number of the required function e g 34 Training 34 VALUE CODE 7 Press the CASH key to confirm the input The display switches to the next input area KEY BE ASSIGNED 0 KEY BE ASSIGNED 8 Press the CASH key Pls Input Redefine Key 9 Now p...

Page 102: ...Y FUNCTION 1 1 Set the key to PRG 2 Select programme number 45 see Chapter 6 1 2 3 Press the CASH key to con firm the selection 0 VALUE CODE 0 KEY BE ASSIGNED INIT DEFAULT KEYBD 4 Use the and keys to move to the INIT DEFAULT KEYBD field INIT DEFAULT KEYBD 5 Save the programmed data by pressing the CASH key Save Please Continue 6 Conclude programming by pressing the SUB TOTAL key ...

Page 103: ... 1 Programming a raised keyboard assignment using the PC In order to programme the raised keyboard using the PC programme OLYMPIA ECR System provides the following input mask They way to use the mask is described in Chapter 5 in detail in Chapter 5 5 Fig 30 Important After data has been transferred to the cash register the software requires it is switched off briefly ...

Page 104: ...board assignment using the PC In order to programme the flat keyboard using the PC programme OLYMPIA ECR System provides the following input mask They way to use the mask is described in Chapter 5 in detail in Chapter 5 5 Fig 31 Important After data has been transferred to the cash register the software requires it is switched off briefly ...

Page 105: ...key should be programmed for clerk no 2 Input Display DALLAS KEY 1 1 1 Set the key to PRG 2 Select programme number 46 see Chapter 6 1 2 3 Press the CASH key to con firm the selection 1 CLERK NO DALLASCODE FFFFFFFFFFFF DALLAS KEY 2 1 4 Press the CASH key to move to the Dallas key memory location 1 to 16 2 CLERK NO DALLASCODE FFFFFFFFFFFF 5 Use the and keys to move to the FFFFFFFFFFFF input area FF...

Page 106: ...n its restaurant version Input Display ECR TYPE 1 1 Set the key to PRG 2 Select programme number 47 see Chapter 6 1 2 3 Press the CASH key to confirm the selection 0 4 Enter the type number using the digit keys 2 5 Save the programmed data by pressing the CASH key Save Please Continue 6 Conclude programming by pressing the SUB TOTAL key 6 30 1 Programming the ECR type using the PC In order to prog...

Page 107: ...l places 1 0 1 0 1 1 00 2 1 000 3 Note The default setting is two decimal places Example The cash register should operate to three decimal places Input Display DECIMAL POINT 1 1 Set the key to PRG 2 Select programme number 48 see Chapter 6 1 2 3 Press the CASH key to confirm the selection 2 4 Enter the number of decimal places required using the digit keys 3 5 Save the programmed data by pressing ...

Page 108: ...r to programme the number of decimal places using the PC programme OLYMPIA ECR System provides the following input mask It is used to programme various parameter settings They way to use the mask is described in Chapter 5 in detail in Chapter 5 5 Fig 33 Important After data has been transferred to the cash register the software requires it is switched off briefly ...

Page 109: ...pplied If the first decimal place to be rounded is a 0 1 2 3 or 4 the number is rounded down If the first decimal place to be rounded is a 5 6 7 8 or 9 the number is rounded up 6 32 1 1 Programming rounding for receiving on account paid out Significance Rounding code A Always round down 0 Rounding according to rounding method selected 1 Always round up 2 Example An amount received on account or pa...

Page 110: ... 2 Note In its default setting rounding is always set for calculating the tax Example Amounts should always be rounded down following tax calculation Input Display ROUNDING TAX 1 1 Set the key to PRG 2 Select programme number 51 see Chapter 6 1 2 3 Press the CASH key to confirm the selection 1 4 Enter the rounding code using the digit keys 2 5 Save the programmed data by pressing the CASH key Save...

Page 111: ...5 4 rounding applies see Chapter 6 32 1 0 European rounding Switzerland 0 01 0 02 0 00 0 03 0 07 0 05 0 08 0 09 0 10 1 Rounding 0 10 2 Rounding 0 20 3 European rounding Sweden 0 00 0 24 0 00 0 25 0 74 0 50 0 75 0 99 1 00 4 European rounding Denmark 0 00 0 12 0 00 0 13 0 37 0 25 0 38 0 62 0 50 0 63 0 87 0 75 0 88 0 99 1 00 5 Example The Swedish European rounding should be used Input Display ROUNDIN...

Page 112: ...rder to programme the rounding using the PC programme OLYMPIA ECR System provides the following input mask It is used to programme various parameter settings They way to use the mask is described in Chapter 5 in detail in Chapter 5 5 Fig 34 Important After data has been transferred to the cash register the software requires it is switched off briefly ...

Page 113: ...he date is set to Month Day Year in its default state Note For programming the date format see Chapter 6 16 Example The date should be printed in the format Year Month Day Input Display DATE FORMAT 1 1 Set the key to PRG 2 Select programme number 52 see Chapter 6 1 2 3 Press the CASH key to confirm the selection 0 4 Enter the code for the date format using the numeric keys 2 5 Press the CASH key t...

Page 114: ... order to programme the date format using the PC programme OLYMPIA ECR System provides the following input mask It is used to programme various parameter settings They way to use the mask is described in Chapter 5 in detail in Chapter 5 5 Fig 35 Important After data has been transferred to the cash register the software requires it is switched off briefly ...

Page 115: ...for the following subsections the cash register is always programmed to 2 decimal places default setting and the input examples normally depict keys on a raised keyboard for corresponding keys on the flat keyboard see Chapter 4 3 7 1 Clearing error messages In the case of input errors or exceeding limit values the cash register indicates an error status An acoustic signal is issued and an E Error ...

Page 116: ...CE 1 and PRICE 2 keys to indicate a new assignment 7 2 1 Registering a DP once using fixed price 1 Important information A fixed price must have been programmed for price 1 refer to Chapter 6 4 If two fixed prices have been programmed refer to Chapter 6 4 the cash register always operates with fixed price 1 If you press the PRICE 2 key the cash register operates using fixed price 2 for the duratio...

Page 117: ...be registered with price 2 Input 1 Set the key to REG 2 Press the relevant department key 7 2 2 2 Items were previously registered using price 1 Example Department 1 should be registered with price 2 Input 1 Set the key to REG 2 Press the PRICE 2 key 3 Press the relevant department key PRICE 2 7 2 3 Registering a DP once without a fixed price Example 100 50 EUR should be registered to Department 1...

Page 118: ...old 1 x Department 1 at a price of 12 30 another identical item at the identical price 1 x Department 4 at fixed price 1 another identical item at the identical price 1 x Department 4 at fixed price 2 and another identical item at the identical price Set the key to REG Input Receipt Single DP registration with price entry Repeat DP registration Single DP registration with fixed price 1 PRICE 1 Rep...

Page 119: ... sold 15 pieces each at 100 50 from Department 2 2 6 pieces each at 20 50 from Department 3 1 piece from Department 4 at fixed price 1 35 and 1 piece from Department 4 at fixed price 2 30 Input Receipt Set the key to REG PRICE 1 PRICE 2 Dept02 15 100 50 1 507 50T2 Dept03 2 6 20 50 53 30T1 Dept04 35 00T2 Dept04 30 00T2 TAX1 19 8 51 TAX2 7 102 87 TOTAL 1 625 80 CASH 1 625 80 ...

Page 120: ...tion process until you press the PRICE 1 and PRICE 2 key to indicate a new assignment 7 3 1 Registering a PLU once using fixed price 1 Important information A fixed price must have been programmed for price 1 refer to Chapter 6 5 If two fixed prices have been programmed refer to Chapter 6 5 the cash register operates with fixed price 1 by default If you press the PRICE 2 key the cash register oper...

Page 121: ...gistered with price 2 Input 1 Set the key to REG 2 Enter the PLU number 3 Press the PLU key 7 3 2 2 Items were previously registered using price 1 Example PLU 3 should be registered with price 2 Input 1 Set the key to REG 2 Press the PRICE 2 key 3 Enter the PLU number 4 Press the PLU key PRICE 2 7 3 3 Registering a PLU once without a fixed price Note The PRICE NEW key must be programmed on the key...

Page 122: ... with PLU number 1 at fixed price 1 2 6 items with PLU number 2 at fixed price 1 and 15 items with PLU number 1 at fixed price 2 Input Receipt Set the key to REG PRICE 2 1 10 00T1 2 2 6 100 00 260 00T2 1 15 9 10 136 50T1 TAX1 19 23 39 TAX2 7 17 01 TOTAL 406 50 CASH 406 50 7 4 Mixed sales It is possible to register department and PLU sales on a receipt refer to Chapters 7 2 and 7 3 ...

Page 123: ...o simplify entering amounts received If you press one of these keys you need not enter the amount using the numeric keys Note If the customer pays exactly the right amount you need not enter the sum paid Continue with Step 6 6 Press the CASH key If the amount paid by the customer is higher than the actual amount due the cash register automati cally calculates the amount of change due after pressin...

Page 124: ...ustomer optional process Note If the customer pays exactly the right amount you need not enter the sum paid Continue with Step 6 6 Press the CREDIT 1 and or CREDIT 2 If the amount paid by the customer is higher than the actual amount due the cash register automati cally calculates the amount of change due after pressing the CREDIT 1 and or CREDIT 2 key and shows it in the display 7 5 5 Combining t...

Page 125: ... the example USD 50 00 4 The customer pays the exact amount due in the foreign cur rency 5 Press the FC key to conclude the registration process Dept01 37 04T1 Subtotal 37 04 TAX1 19 5 91 TOTAL 37 04 FC CASH 50 00 USD 50 00 FC CASH 37 04 7 6 2 Paying in a foreign currency with change Example A bill totalling 37 04 in department 1 is paid with 100 USD Input Receipt 1 Set the key to REG 2 Produce th...

Page 126: ...n currency FC CASH 74 07 The amount paid converted to the local currency CHANGE 37 03 The amount of change due in the foreign currency FC CASH 49 99 The amount of change due in the local currency Note Please note that rounding differences can occur during the conversions Note In the financial report the change in the local currency is deducted from the CASH amount in TOTAL DRAWER The total of the ...

Page 127: ...entered when registering surcharges and discounts If a value is entered however it overwrites the pre programmed value Note The and keys for registering amount related surcharges and discounts must first be set up on the keyboard see Chapters 4 and 6 28 Example An amount related discount of 2 is assigned to an item with PLU number 1 The subtotal is then produced to which an amount related surcharg...

Page 128: ...2 Register the goods to which a per centage surcharge or discount is to be granted 3 Enter the percentage surcharge or discount 4 Press the RA or PO key If you want to apply the amount related surcharge or discount to a subtotal press the SUB TOTAL key beforehand 1 10 00T1 DISCOUNT 10 0 1 00 Subtotal 9 00 ADD ON 25 00 2 25 Subtotal 11 25 TAX1 19 1 80 TOTAL 11 25 CASH 11 25 7 8 Deleting input error...

Page 129: ...ing the item to be cancelled Delete 1 10 00 1 10 00T1 Cancels 1 10 00 10 00 7 9 2 Void If an item has been registered by mistake but the receipt has not yet been concluded by pressing a tender media key the incorrect registration can be cancelled by means of a void The void process is used when other items were registered after the item to be cancelled Example Three items have been registered PLU ...

Page 130: ... key to REG 2 Register the PLUs 3 Press the VOID key 3 3 03 1 50 00 4 Press the CLR key 17 06 2011 0 00 1 10 00T1 2 100 00T2 3 50 00T2 Cancel Cancel Cancel Note The number and total sum of the corrections are recorded in the financial report 7 10 Refunds Refunds retours must be registered when a customer returns an item after it has been sold and the receipt concluded Example 10 is refunded from d...

Page 131: ...ived on account 1 Set the key to REG Input Receipt 2 Enter the amount paid in 3 Press the RA key RA 500 00 Note The number and total sum of received on account operations are recorded in the financial report 7 12 Paid out operations Example 60 are paid out 1 Set the key to REG Input Receipt 2 Enter the amount paid out 3 Press the PO key PO 60 00 Note The number and total sum of the paid out transa...

Page 132: ...21 should be printed on the receipt 1 Set the key to REG Input Receipt 2 Enter the number maximally 8 digits 3 Press the NS key Continue registering the items 87654321 7 14 Opening the cash drawer without a sale The cash drawer can be opened without making a sale in order to deposit or remove cash for example Note The number and total sum of no sale drawer opening operations are recorded in the fi...

Page 133: ...ture was switched off by means of the Receipt ON OFF key you can print this receipt later delayed receipt Note If you need a copy of the receipt for a registration recorded some time ago it may be possible to print one from the electronic journal as long as the data is still stored there ring journal see Chapter 10 7 16 1 Printing a copy receipt A copy receipt is a duplicate of the receipt just pr...

Page 134: ...le has been paid Note All the procedures described in the previous chapters are identical when operating the table system The only difference is that the first step is always to open the table and the final transaction to close the table 8 1 Opening a table Note A maximum of 70 tables can be opened 1 Set the key to REG Input Display 2 Enter the table number 3 Press the TABLE key table 1 Register i...

Page 135: ...of a bill Example PLU number 10 is registered for table 1 at 100 A table view should be printed 1 Set the key to REG Input Receipt 2 Enter the table number 3 Press the TABLE key 4 Press the BILL PRINT key TABLE 1 10 100 00T1 Subtotal 100 00 8 5 Preparing the bill for a table 8 5 1 Preparing the bill without an additional business receipt Example The bill should be prepared for table 1 without a bu...

Page 136: ...me the BUSINESS RECEIPT key on the keyboard refer to Chapter 6 28 Example The bill should be prepared for table 1 with a business receipt 1 Set the key to REG Input Receipt 2 Enter the table number 3 Press the TABLE key 4 Press the BUSINESS RECEIPT key BUSINESS RECEIPT 5 Press the CASH key TABLE 1 10 100 00T1 TAX1 19 1 60 TOTAL 10 00 CASH 10 00 BUSINESS MEETING RECEIPT MEETING MEMBER MEETING AGEND...

Page 137: ...d to table 6 1 Set the key to REG Input Display 2 Press the TRANSFER key Transfer Table 0 0 3 Enter the number of the table from which the items should be trans ferred 4 Press the CASH key 1 0 5 Enter the number of the table to which the items should be transferred 6 Press the CASH key 1 0 Receipt The cash register prints a slip for the transfer TABLE 1 1 10 00T1 2 100 00T1 TABLE 6 Transfer Note F...

Page 138: ... Set the key to REG Input Display 2 Enter the table number 3 Press the TABLE key Table 1 4 Press the SPLIT key 2 3 1 50 00 The last item registered appears in the display 5 Use the and to move to the item to be billed separately 1 1 1 10 00 6 Press the SPLIT key 0 00 7 Press the relevant ten der media key to con clude the receipt or bill for the selected items Receipt Bill The cash register prints...

Page 139: ... 1 50 00 5 Use the and keys to move to the item to be cancelled 2 2 1 100 00 6 Press the EC to clear the item selected 2 2 0 0 00 7 Press the CASH key to return to the registration Cancel 2 100 00 8 Press the TABLE key to exit from the table system The cash register prints a slip for the correction TABLE1 Cancel 1x 2 100 00 8 9 Order type system The order type system organises the printout of orde...

Page 140: ...out notice 8 10 Take away sales Example 3 items with PLU number 1 are sold as take away meals Input Display Receipt 1 Set the key to REG 2 Press the CHANGE VAT key TAX2 3 Complete the PLU regis tration in the normal way 4 Conclude the receipt 1 3 10 00 30 00T1 TAX2 7 1 96 TOTAL 30 00 CASH 30 00 ...

Page 141: ...or the revenue authorities Note To switch Training mode on and off the TRAINING key is required This must first be set up on the keyboard refer to Chapter 6 28 9 1 Activating Training mode 1 Set the key to REG Display 2 Press the TRAINING key Password 3 Enter the current pass code default setting 000000 4 Press the CASH key 17 06 2011 T 0 00 Note If Training mode is switched on a T appears in the ...

Page 142: ...2011 Page 142 Specifications subject to change without notice 9 2 Deactivating Training mode 1 Set the key to REG Display 2 Press the TRAINING key Password 3 Enter the current pass code default setting 000000 4 Press the CASH key 17 06 2011 0 00 ...

Page 143: ...ory deletion Note Printout of the electronic journal can be interrupted and stopped by pressing the CLR key 10 1 1 Printing the EJ with all details Input Display X Report 0 1 1 Set the key switch to position X or Z 2 Select EJ DETAIL REP or the number 96 Use the numeric keys to enter 9 and 6 Or Use the and keys to scroll to the required point in the menu 3 Press the CASH key to con firm the input ...

Page 144: ...o the required point in the menu 3 Press the CASH key to con firm the selection The elec tronic journal appears in the display Use the and keys to scroll through the electronic journal 4 Press the CASH key again to initiate printout of the elec tronic journal 01 FINANCIAL REP 02 FINA REP MON 03 DEPT REP 04 DEPT REP MON 05 PLU REP 06 PLU REP MON 08 CLERK REP 09 CLERK REP MON 10 CLERK PLU REP DAY 11...

Page 145: ...Display MEMORY CLEAR 1 1 Set the key to PRG 2 Select programme number 80 see Chapter 6 1 2 3 Press the CASH key to confirm the selection 4 The information which can be deleted appears in the display 5 Use the and keys to move to MEMORY CLEAR ALL REPORT RESET E JOURNAL AREA PROGRAM AREA CASHIERS AREA DEPARTMENT AREA PLU AREA TABLE AREA ALL AREA 6 Press the CASH key Press Enter Delete Or Press ESC E...

Page 146: ...ts These are reports which are printed at the end of the month 11 2 Report overview Most reports can be printed as X or Z reports Report number Report view according to display Explanation 01 01 FINANCIAL REP Daily X or Z financial report 02 02 FINA REP MON Monthly X or Z financial report 03 03 DEPT REP Daily X or Z department report 04 04 DEPT REP MON Monthly X or Z department report 05 05 PLU RE...

Page 147: ...he digit keys 3 Press the CASH key to confirm the selection 4 The report first appears to gether with the totals in the display 5 Use the and keys to view all the report totals in the display 6 Press the CASH key to start printing 01 FINANCIAL REP 02 FINA REP MON 03 DEPT REP 04 DEPT REP MON 05 PLU REP 06 PLU REP MON 08 CLERK REP 09 CLERK REP MON 10 CLERK PLU REP DAY 11 CLERK PLU REP MON 12 HOURLY ...

Page 148: ...ntage surcharges Add Price Total amount of amount related surcharges Reduce Price Total amount of amount related discounts In Cash Total amount received on account Out Cash Total amount paid out PaidTable Total amount of the tables paid OpenTable Total amount of the tables not paid Net Day s sales incl tables not paid CASH Total of sales paid in cash CREDIT 1 Total of sales paid via credit 1 CREDI...

Page 149: ...fore starting any deleting functions Deleted data cannot be restored Input Display MEMORY CLEAR 1 1 Set the key to PRG 2 Select programme number 80 see Chapter 6 1 2 3 Press the CASH key to confirm the selection 4 The information which can be deleted appears in the display 5 Use the and keys to move to the data area to be deleted ALL REPORT RESET E JOURNAL AREA PROGRAM AREA CASHIERS AREA DEPARTMEN...

Page 150: ...ss the TRAINING key to deactivate Training mode II Department level 2 is active Press the DP SHIFT key to switch between the department levels III Department level 3 is active Press the DP SHIFT key to switch between the department levels 13 2 Printer malfunctions In the event of a printer error switch off the cash register immediately and disconnect the power plug 1 Check that the paper roll is i...

Page 151: ...ar in the display SD CARD BACKUP SD CARD RECOVERY 5 Use the and keys to select SD CARD BACKUP 6 Press the CASH key to con firm the selection Save Please Continue The current programme settings and reports are copied from the cash register onto the SD card and stored there Note The transfer process is indicated in the display during data transfer Never interrupt this process Then disconnect the cas...

Page 152: ...on Save Please Continue The current programme and reports including the electronic journal are transferred from the cash register and stored on the USB flash card Note The transfer process is indicated in the display during data transfer Never interrupt this process Then disconnect the cash register briefly from the mains power supply Note The electronic journal EJ is saved on the USB flash card 1...

Page 153: ...ympia can be connected directly to the PS 2 socket on the cash register and used 14 3 3 Using the barcode reader to programme PLUs in the cash register Input Display PLU Item 1 1 Set the key to PRG 2 Select programme number 03 see Chapter 6 1 2 3 Press the CASH key to confirm the selection The memory location for the first PLU is automatically activated 4 Read the bar code using the bar code scann...

Page 154: ... display When the cash register is connected to the mains power the battery in the cash register is automatically recharged Note The thermal printing is not as dark in battery operation as when mains powered 14 4 1 Technical data 2100 mAh 7 4 Volt 14 4 2 Installing the battery 1 Disconnect the cash register from the mains power supply 2 Open the cash drawer and remove the cash tray 3 Raise the cas...

Page 155: ...id section which matches the cash register No additional power supply is required Special feature After being verified the bank note is laid in a tray at the rear The clerk can issue the change and then put the bank note in the cash drawer This ensures that the verification process is completed drawing very little attention and is not annoying for the customer 14 6 Dallas lock with 4 keys Part num...

Page 156: ...All Rights Reserved Version 2011 05 02 ...

Reviews: