1.6
Getting started
Installing the printing supplies
Your fax prints incoming faxes and copies with a reliable 600 dpi print engine. Your
fax requires two types of printing supplies (sometimes also called consumables):
• The drum cartridge — It yields 16,000 “normal” A4-sized printouts (see
“Specifications,” page
AI
.2). By “normal,” we’re referring to the amount of text
and/or graphics on each page. This is based on an industry-standard test docu-
ment.
• The toner cartridge — It yields 11,500 “normal”, A4-sized printouts (see
“Specifications,” page
AI
.2).
Note: The toner cartridge included with your machine is starter toner cartridge,
which yields 8,000 printouts. Please purchase regular, full-yield toner car-
tridge from your authorized Olympia dealer.
To install these supplies:
Important: Gently close the top cover so that you don’t catch your hands, possibly
injuring them.
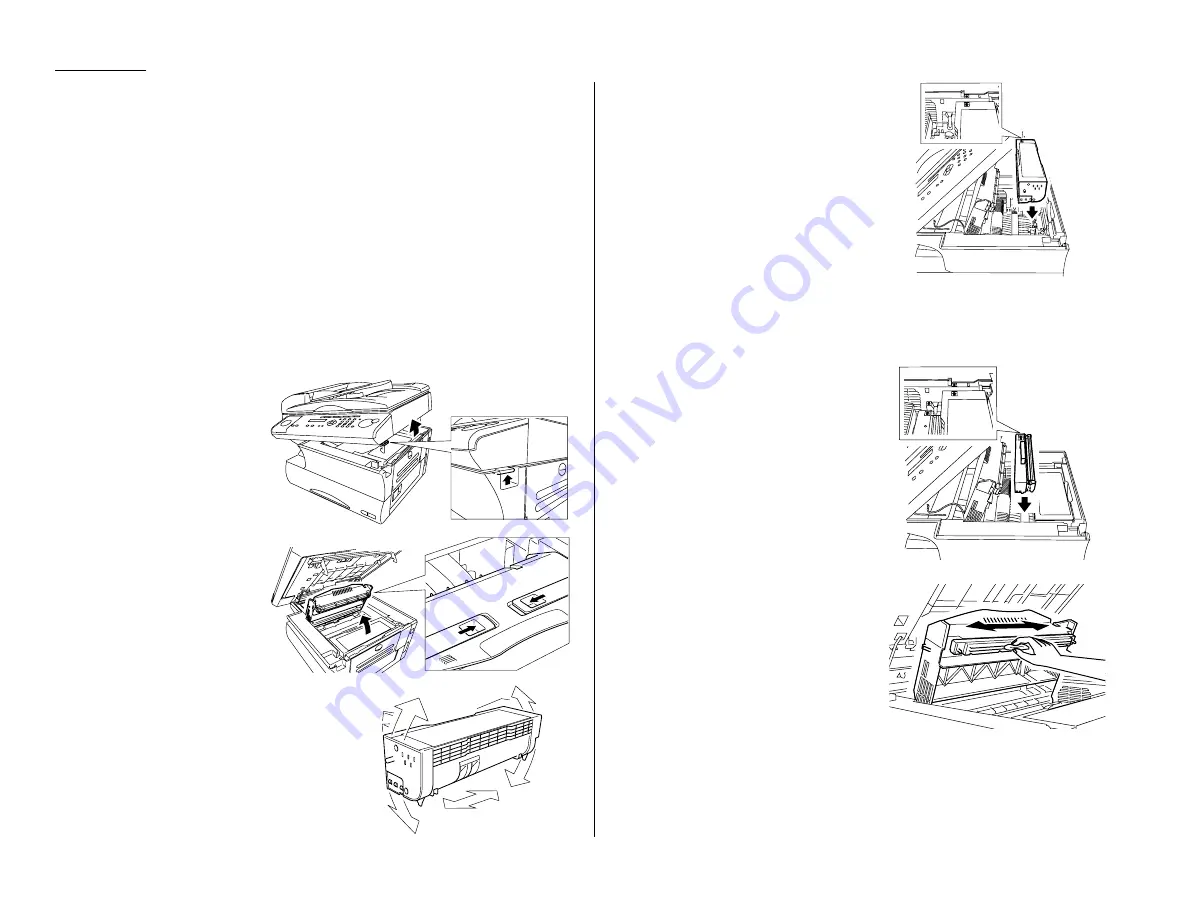
1
Pull up the top cover
release and open the top
cover.
2
Slide the printer cover
release and open the
printer cover.
3
Unpack a new toner cartridge from its
carton. Then, holding the toner car-
tridge with both hands, slowly shake it
to distribute the toner evenly inside the
cartridge.
Note: Do not touch the roller of the
toner cartridge.
4
Gently install the toner cartridge in
the printer, making sure the toner car-
tridge’s two pins fit in the slits inside
the printer frame.
5
Unpack the drum cartridge from its carton.
Note: Shield the drum cartridge from light, especially strong light. Later, if
you have to remove the cartridge from the machine, immediately
wrap it in a thick cloth to protect it from light.
6
Gently install the drum cartridge in
the printer, making sure the drum
cartridge’s four pins fit in the slits
inside the printer frame.
7
Gently clean the LED print head
using the cleaning paper included in
the toner cartridge carton box.
For best print quality, you should
clean the LED head every time you
change the new toner cartridge.
Note: Do not use abrasive materials
on the LED print head, and do
not subject the LED print
head to strongly shock.
8
Gently close the printer cover.
9
Close the top cover. Be sure to push on a portion of the cover to lock it into its
original (closed) position.
Note: The fax machine will not work if the cover isn’t closed properly.
Summary of Contents for OM 9812
Page 1: ...OM 9812 OM 9816 Operating Instructions Plain paper digital Copier Fax Printer Scanner...
Page 7: ...This page intentionally blank...
Page 52: ...2 21 Basic operation This page intentionally blank...
Page 124: ...Changing the default settings This page intentionally blank 4 13...
Page 146: ...Just in case This page intentionally blank 5 21...
Page 147: ...Appendix and index...
Page 154: ...D88 90290 60...


