1.10
Getting started
6
Press
or
until the recording paper size for the bypass tray you want
appears. In this example, we’ve chosen A4.
Note: You can set the primary paper size for the bypass tray in this step.
However, regardless of this setting, you should set the paper size
when you load the paper on the bypass tray. (Refer to below.)
7
Press
ENTER
.
Press
STOP
to return the machine to standby mode.
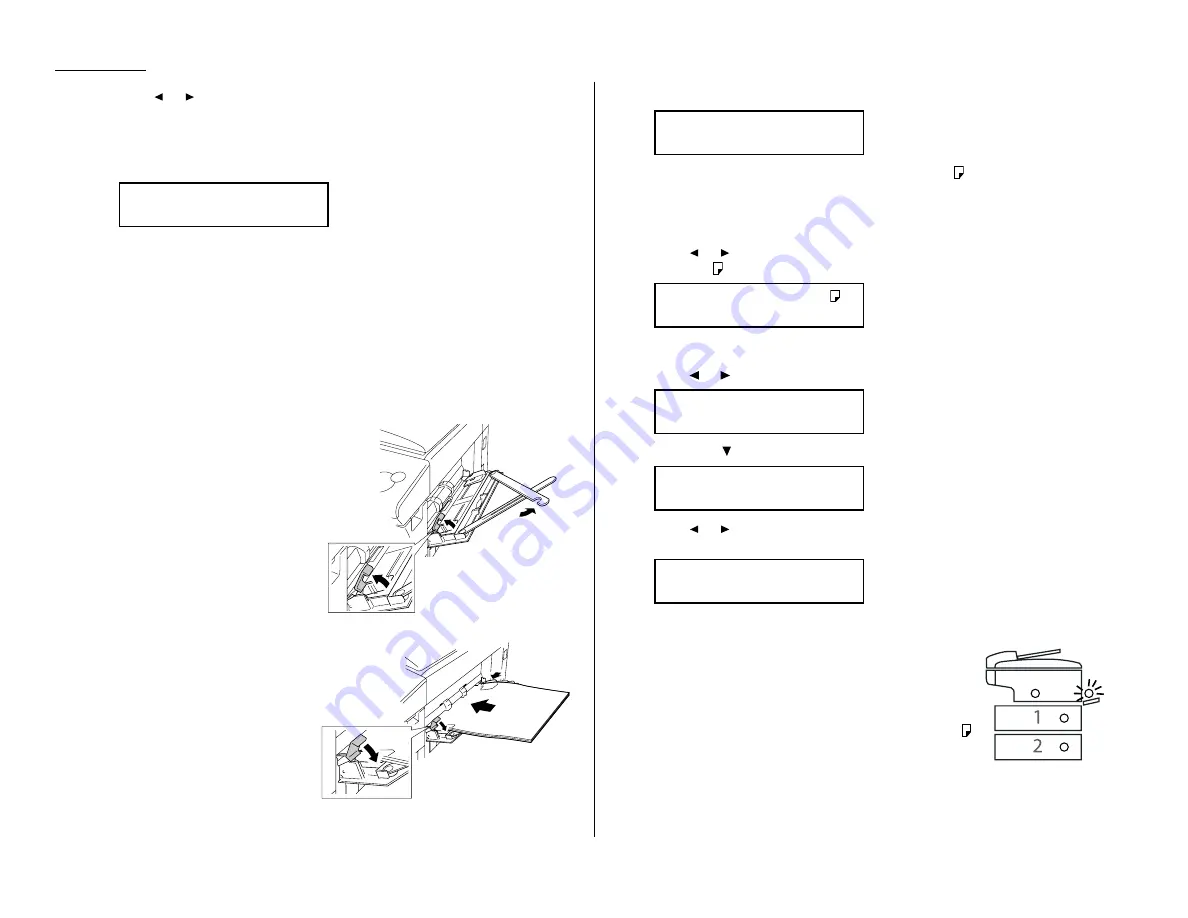
Loading paper in bypass tray
When you need to use a size of paper not currently loaded in your machine’s paper
cassette(s), or when you want to use a special type of paper (such as transparency
film), use the bypass tray.
1
Open the bypass tray on the right
side of your machine.
2
Pull out the hopper of the bypass
tray and pull the flapper release
lever.
3
Place the paper on the bypass
tray. Adjust the paper guide to fit
the paper and insert the paper
until it comes to a stop.
Then push back the flapper
release lever.
4
When you load the paper on the bypass tray, the
LCD
will show:
5
If your recording paper on the bypass tray is A4, A5
or F4, proceed to step 6.
Otherwise, skip to the step 7.
Note: When you use transparency film, skip to step 7 and select “OHP” in
step 8.
6
Press
or
until your desired recording paper size appears. Here, we’ve
chosen A5 :
Skip to step 9.
7
Press or until
“Other” appears.
Then press
or
ENTER
. You will see:
8
Press
or
until your desired recording paper size appears. Here, we’ve
chosen Postcard:
9
Press
ENTER
.
10
Make sure the machine is in the Copy mode, and press
PAPER SIZE
to use the bypass tray until the green light
of the bypass tray of the printer status lights on the
control panel glows.
Helpful tip: In Fax mode, if you have set the A4, A5
or F4 sized paper in the bypass tray, the
machine will use this paper when it runs
out of the paper in the paper cassette dur-
ing the fax reception.
Set Bypass Ppr:Post
/
/
/Enter
Set Bypass Ppr:Exe
/
/
/Enter
Set Bypass Ppr:Other
/
/
/Enter
Set Bypass Ppr:A5
/
/Enter
Set Bypass Ppr:A4
/
/Enter
Bypass Tray
:A4
/
/Enter
Summary of Contents for OM 9812
Page 1: ...OM 9812 OM 9816 Operating Instructions Plain paper digital Copier Fax Printer Scanner...
Page 7: ...This page intentionally blank...
Page 52: ...2 21 Basic operation This page intentionally blank...
Page 124: ...Changing the default settings This page intentionally blank 4 13...
Page 146: ...Just in case This page intentionally blank 5 21...
Page 147: ...Appendix and index...
Page 154: ...D88 90290 60...


