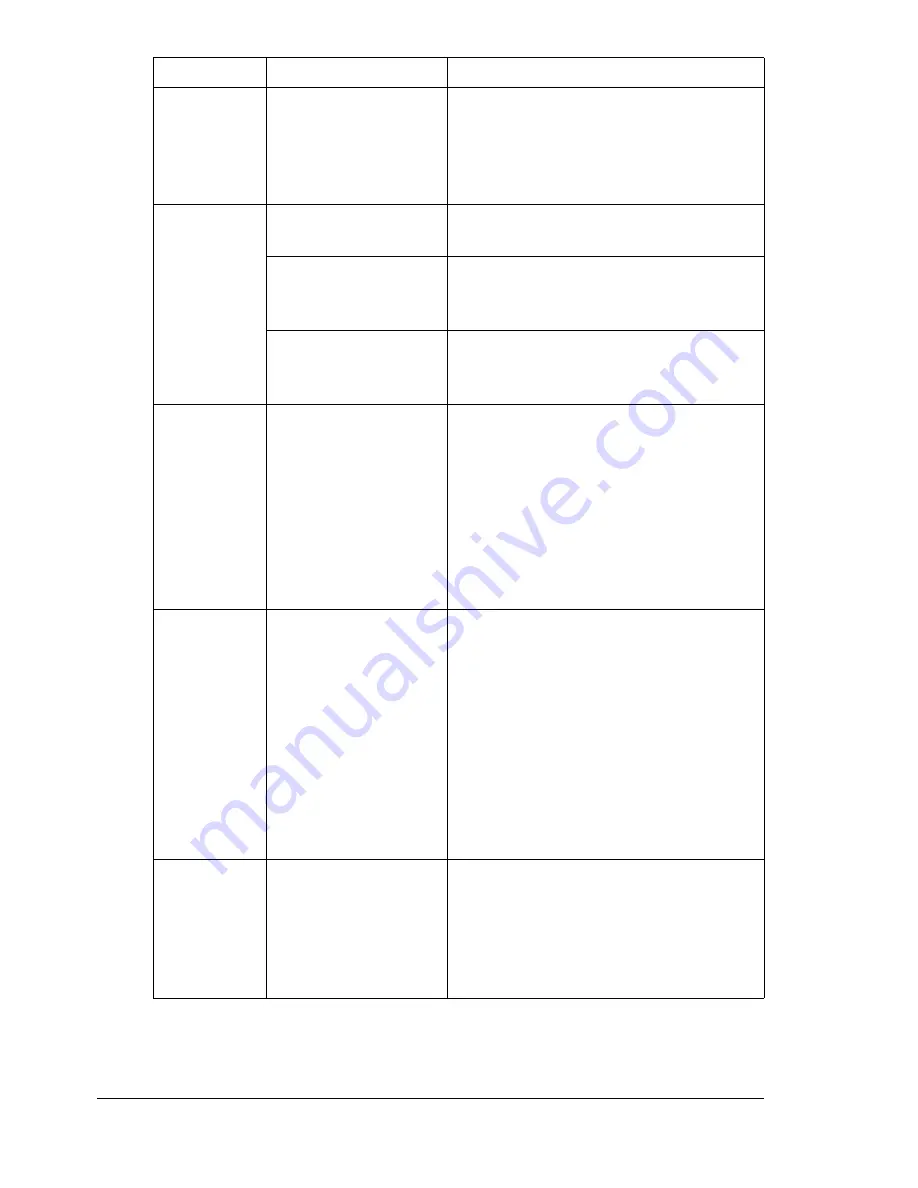
Solving Other Problems
178
Booklet Left
and Right
Binding out-
put is incor-
rect.
Both the printer driver
and the application
have been set for col-
lation.
For Booklet Left Binding and Booklet
Right Binding, choose Collate only in
the printer driver’s Basic Tab. Do not
set collation in the application.
You hear
unusual
noises.
The machine is not
level.
Place the machine on a flat, hard, level
surface.
The tray is not
installed correctly.
Remove the tray that you are printing
from and reinsert it completely into the
machine.
There is a foreign
object stuck inside
the machine.
Turn off the machine and remove the
object. If you cannot remove it, contact
Technical Support.
When copy-
ing or scan-
ning with the
ADF, a band
appears at
the end of
the image or
paper (5 to 6
mm).
A malfunction may
have occurred while
paper was being
transferred with the
ADF.
If a band appears in the copy after
copying, select a copy density setting
that is one level darker.
If a band appears in the image after
scanning, scan using the original
glass.
While scan-
ning with the
ADF at 600
dpi, the
image has
become
lighter and
the back-
ground has
become
darker.
Immediately after the
machine is turned on,
the lamp intensity
increases. There-
fore, the image may
become lighter and
the background may
become darker.
If the image becomes lighter or darker,
scan using the original glass. In addi-
tion, perform the scan operation after
turning the machine on and lighting the
lamp for an hour and a half or more.
The
web-based
utility cannot
be accessed.
The Easy Web Man-
agement Administra-
tor's password is
incorrect.
The Easy Web Management Adminis-
trator password has a 6-character min-
imum and a 16-character maximum.
For details of the Easy Web Manage-
ment administrator password, refer to
the Color Laser MFP Reference Guide.
Symptom
Cause
Solution
Summary of Contents for Omega 2030CN
Page 1: ...Omega 2030CN Printer Copier Scanner User s Guide ...
Page 10: ......
Page 11: ...1 Introduction ...
Page 19: ...2 Control Panel and Configuration Menu ...
Page 46: ...Configuration Menu Overview 36 ...
Page 47: ...3 Media Handling ...
Page 65: ...Loading Media 55 10 ...
Page 68: ...Loading Media 58 4 5 ...
Page 69: ...Loading Media 59 Tray 2 Only plain paper can be loaded in Tray 2 Loading Plain Paper 1 2 ...
Page 71: ...Loading Media 61 6 7 ...
Page 81: ...4 Using the Printer Driver ...
Page 97: ...5 Using Direct Print ...
Page 100: ...Camera Direct Photo Printing 90 ...
Page 101: ...6 Using the Copier ...
Page 114: ...Making Advanced Copies 104 ...
Page 115: ...7 Using the Scanner ...
Page 131: ...8 Replacing Consumables ...
Page 146: ...Replacing the Drum Cartridge 136 ...
Page 147: ...9 Maintenance ...
Page 155: ...Cleaning the Machine 145 6 7 BOTTOM VIEW Laser lens ...
Page 156: ...Cleaning the Machine 146 8 9 ...
Page 157: ...Cleaning the Machine 147 Cleaning the Duplex Option Feed Rollers 1 2 3 ...
Page 158: ...Cleaning the Machine 148 Cleaning the Media Feed Rollers for Tray 2 1 2 ...
Page 159: ...Cleaning the Machine 149 3 4 ...
Page 160: ...Cleaning the Machine 150 Cleaning the Media Feed Rollers for the ADF 1 2 3 ...
Page 162: ...Storing the Machine 152 ...
Page 163: ...10 10 Troubleshooting ...
Page 173: ...Clearing Media Misfeeds 163 8 9 ...
Page 174: ...Clearing Media Misfeeds 164 10 11 12 ...
Page 176: ...Clearing Media Misfeeds 166 16 17 18 19 ...
Page 177: ...Clearing Media Misfeeds 167 20 ...
Page 179: ...Clearing Media Misfeeds 169 Clearing a Media Misfeed from the ADF 1 2 3 ...
Page 180: ...Clearing Media Misfeeds 170 4 5 6 ...
Page 205: ...11 11 Installing Accessories ...
Page 210: ...Duplex Option 200 6 Make sure that both knobs are securely locked 7 ...
Page 212: ...Tray 2 202 2 Be sure to place Tray 2 on a level surface ...
Page 213: ...A Appendix ...
Page 221: ...Index 3 W Watermark tab 83 Z Zoom ratio 94 ...
Page 222: ...Index 4 ...


