background image

111

1

2

3

7

Pr

og

ra

m G
uid

e F

un

cti

on

s

Program Guide Functions

Windows

OLYMPUS related podcast programs can be easily registered and new contents can be 

automatically downloaded on the "Olympus Sonority". New contents can also be redirected 

to the recorder by just connecting to the PC.

Program guide functions are not available for Macintosh. 

To register programs


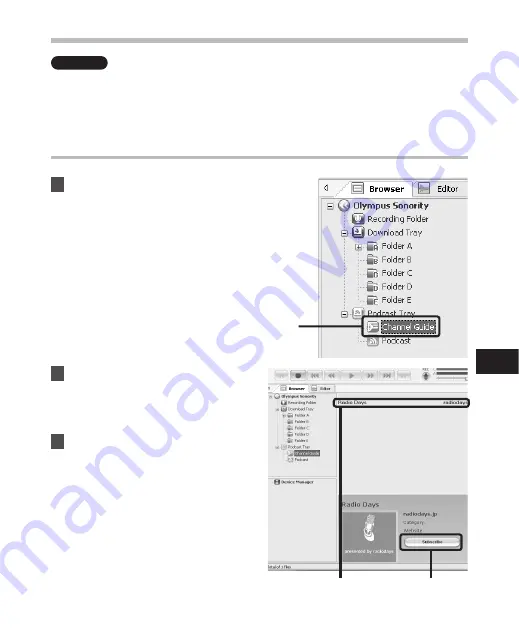
1

  Click [

Channel Guide

] in the 

online service of the Main Tree 

View.

•  Information of programs registered 

online will be displayed.


2

  Click the program you desire 

from the program list.

•  Detailed information on the program 

will be displayed in the Program 

Details View.


3

  Click [

Subscribe

] to register on 

the podcast.

•  Once the program is registered, the 

contents broadcast by the program 

will be displayed in the List View of 

the [

Podcast

] folder.

  Under the initial settings, the latest 

contents being broadcast will be 

automatically downloaded during 

registration.

Summary of Contents for DM-550

Page 1: ...structions for information about using the product correctly and safely Keep the instructions handy for future reference To ensure successful recordings we recommend that you test the record function...

Page 2: ...thorized service station or any other reason is excluded Trademarks and registered trademarks IBM and PC AT are the trademarks or registered trademarks of International Business Machines Corporation M...

Page 3: ...d Proper Usage P 6 Getting Started P 8 About Recording P 28 About Playback P 33 Menu Setting P 44 Using the Recorder on Your PC P 73 Managing Files on Your PC P 85 Importing Content for Listening on t...

Page 4: ...ded settings by recording condition 30 Recording from external microphone or other devices 31 3 About Playback Playback 33 Bookmark mode 36 Setting an index mark or a temp mark 38 How to begin segment...

Page 5: ...voice file to the CD 101 Using iTunes 103 Window names 103 Copying music from CD 104 Transferring music file to the recorder 105 Copying voice file to the CD 106 Importing Podcast Content 107 Register...

Page 6: ...void sand or dirt These can cause irreparable damage Avoid strong vibrations or shocks Do not disassemble repair or modify the unit yourself Do not operate the unit while operating a vehicle such as a...

Page 7: ...call your dealer or local Olympus representative for service Do not expose the batteries to water Do not allow water to contact the terminals Do not remove or damage the batteries insulating sheet Do...

Page 8: ...format files transferred from a computer in addition to files recorded by the device itself You can be enjoyed as a music player at any time s It has a built in Variable Control Voice Actuator VCVA f...

Page 9: ...nority software for Windows and Macintosh P 75 If you transfer voice files recorded with the recorder to a PC you can easily playback organize and edit the files You can perform waveform editing file...

Page 10: ...on 0F2 SCENE button 9 button LIST button button ERASE button 0 button OK MENU button F1 PODCAST button Built in speaker EAR Earphone jack REMOTE jack Connect the receiver of the exclusive remote contr...

Page 11: ...tor File list display File display 1Recording media indicator 2Current file name 3Recorder status indicator Battery indicator Play indicator s Record indicator 5 Pause indicator 4 Stop indicator 1 F P...

Page 12: ...me 8Function guide indicator 7File Lock indicator 8Current file number Total number of recorded files in the folder 9Elapsed recording time Elapsed playback time 0Remaining recording time File length...

Page 13: ...tion of parts 9Current file number Total number of recorded files in the folder 0Playback position bar indicator File length Icon display File format EUPHONY indicator Playback mode indicator Identifi...

Page 14: ...he first time or after long periods of disuse it is recommended that you charge them until full P 15 P 16 4 Slide the POWER HOLD switch in the direction indicated by the arrow and turn the power on 3...

Page 15: ...file the recorder may be reset due to the reduction of the voltage output of the batteries depending on the volume level even if 8 is displayed in the battery indicator In this case lower the volume o...

Page 16: ...USB hub connected If Cannot charge is displayed it means that a battery that cannot be charged is in the recorder Replace the batteries with supplied ones at once P 14 Charging is completed when batt...

Page 17: ...rter battery life In order to prevent battery leakage or rust remove the rechargeable batteries from the products when you will not be using them for a long time and store them separately Notes This r...

Page 18: ...ill be maintained Turning on the power While the recorder s power is off slide the POWER HOLD switch in the direction indicated by the arrow Power supply The display shuts off and the power will be tu...

Page 19: ...pears on the display the recorder is set to HOLD mode Exit HOLD mode Slide the POWER HOLD switch to the A position Notes If you press any button in HOLD mode the clock display flashes for 2 seconds bu...

Page 20: ...to set Select the item from the hour minute year month and day with a flashing point 2 Press the or button to set Follow the same steps by pressing the 9 or 0 button to select the next item and press...

Page 21: ...0 Changingthetimeanddate While the recorder is during stop mode press and hold the STOP 4 button to display the Time Date and Remain If the current time and date is not correct set it using the proced...

Page 22: ...oSD card the wrong way or at an angle could damage the contact area or cause the microSD card to jam If the microSD card is not inserted all the way data may not be written to the microSD card 3 Close...

Page 23: ...after pushing the microSD card inward may cause it to eject forcefully out of the slot Before inserting the microSD card turn off the write protection function Check the Olympus website regarding mic...

Page 24: ...boutthefoldersforvoicerecordings Folder A Folder E within the Recorder folder are the folders for voice recordings When recording with this recorder select any one of the five folders and then record...

Page 25: ...music files to the device using Windows Media Player a folder is automatically created within the Music folder which has a layered structure as shown in the diagram below Music files that are in the s...

Page 26: ...Podcast please see P 107 Each folder can store up to 999 files Up to 128 folders can be createdunderthe Podcast folder including Podcast AboutthefolderforAudibleContents Audible files can be redirecte...

Page 27: ...laybacks Content playbacks Operation of the folders for voice recordings OK button LIST button File display Each time you press this it opens the folder or file selected in the list display and procee...

Page 28: ...nd start recording again To ensure recording from the beginning start speaking after you see the recording indicator light on When remaining recording time is less than 60 seconds the recording indica...

Page 29: ...ning while audio is recorded If you start recording after inserting the earphone into the EAR jack on the recorder you can hear the sound being recorded The recording monitor volume can be adjusted by...

Page 30: ...ings and business negotia tions with a small number of people ST XQ ST HQ MP3 256kbps MP3 192kbps Middle Wide Dictation with a lotofbackground noise HQ Low Off Music playing wild birds sing ing and ra...

Page 31: ...microphones are useful for recordings such as outdoor recording of wild birds singing The metal cut body provides a sturdiness to the high rigidity Tie clip microphone omni directional ME15 Small conc...

Page 32: ...e audio output terminal earphone jack of the other device and the MIC jack of the recorder with the connecting cord KA333 optional for dubbing Note When you adjust the various sound quality settings r...

Page 33: ...ear on the display This will stop the file being played back midway When the resume function is activated the stopped location will be registered even if the power is turned off The next time the powe...

Page 34: ...button it will stop Press the PLAY or OK button to start playback from where it was stopped While the recorder is during playback mode press and hold the 0 button When you release the 0 button the rec...

Page 35: ...ction enables repeated playback of part of the file being played Replace P 56 This changes the order of the files in the selected folder It is useful for playing back files in a preferred order while...

Page 36: ...properly For WAV files this recorder can only playback those in the linear PCM format WAV files other than these cannot be played back This recorder is compatible with Microsoft Corporation DRM9 but n...

Page 37: ...slow playback or fast playback The next file is cued and playback starts at the previously set speed Press the 0 button during playback slow playback or fast playback The file being played is cued and...

Page 38: ...rily remember desired positions If a temp mark P 38 is marked in the middle of the file it reproduces from the position If the skip space is set at other than file skip P 52 the recorder will F Skip f...

Page 39: ...he erased index or temp number will automatically move up Playback Notes Temp marks are temporary markings so if you transmit a file to the PC or move it with a PC they will be automatically erased Up...

Page 40: ...g can be conducted when is flashing in the same manner as during normal playback and you can quickly proceed as far as the end position P 37 When it reaches to the end of the file while is flashing th...

Page 41: ...tton will release segment repeat playback and reverse to the beginning of the current file dPress the 9 button Pressing the 9 button will release segment repeat playback and fast forward and cue to th...

Page 42: ...File Erase Notes The locked files and files set as read only cannot be erased P 46 If an action is not selected within 8 seconds the recorder will return to stop status It may take over 10 seconds to...

Page 43: ...ely When the lights are flashing playback continues and you can rewind or fast forward as usual and fast forward to the end of erase If the file reaches the end during the flashing of the lights that...

Page 44: ...the tab that contains the item you want to set You can change the menu display by moving the settings tab cursor 3 Press the OK or 9 button to move the cursor to the item to set 4 Press the or button...

Page 45: ...playback Notes The recorder will stop if you leave it idle for 3 minutes during a menu setup operation when a selected item is not applied When entering menu settings during recording or playback the...

Page 46: ...is selected Name File name Date Time stamp Size File size Bit Rate 1 File format Artist 2 Artist name and Album 2 Album name will appear on the display 1 When a linear PCM format file has been select...

Page 47: ...Highest recording sensitivity suitable for conferences with large crowds and recording audio at a distance or low volume Middle Suitable for recording meetings and seminars with a small number of peop...

Page 48: ...y a directivity stereo sound Wide Recording by an expansive stereo sound Off Disables this function Low Cut Filter The recorder has a Low Cut Filter function to minimize low frequency sounds and recor...

Page 49: ...ing on the selected microphone sensitivity mode P 47 If the starting level is not adjusted within 2 seconds the display will return to the previous If the surrounding noise is loud the starting sensit...

Page 50: ...eveloping an oppressed or closed in feel or togrowingtiredoverextendedlistening Level adjustmentsofthe EUPHONY settingcanbe set to four stages according to preference Power This mode focuses more on l...

Page 51: ...peed Theplaybackspeedofthefilecanbechanged between 0 5 and 2 timesspeed Changethe speed according to need such as listening to meeting content at a fast speed or reviewing spots that you couldn t catc...

Page 52: ...ayed for a set period This function is convenient for quickly skipping to another playback position or repeatedly playing back short phrases 1 Select Forward Skip or Reverse Skip 2 Set the skip space...

Page 53: ...sables this function LED light will be cancelled Beep The recorder beeps to alert you to button operations or warn you of errors System sounds may be turned off Volume3 Increase the volume of beeps Vo...

Page 54: ...names registered in the template with Olympus Sonority Settings Sets a folder name from the preset template Time Date Refer to Setting time and date Time Date P 20 USB Class USB Settings Refer to Cha...

Page 55: ...cording media can be seen from the menu screen When no microSD card is inserted only information for the built in memory will seen The domain area which uses the administrative files which the recorde...

Page 56: ...rom the menu on the File Menu Please refer to P 44 P 45 for details on menu settings 3 Press the or button to select the file you want to move 4 Press the OK or 9 button The cursor will flash to confi...

Page 57: ...ove a file in the built in memory or microSD card to another folder within the built in memory copy memory Copy a file in the built in memory or microSD card to another folder within the built in memo...

Page 58: ...ber of file exceeds 999 Do not remove the batteries during moving or copying This may damage the datas A file cannot be moved or copied to the same folder When the operation is cancelled during moving...

Page 59: ...fer to P 44 P 45 for details on menu settings 3 Press the button to select Start and then press the OK button Dividing will be displayed and file splitting will start Splitting is completed when File...

Page 60: ...y Time Rec Mode Folder and Mic Sense Select Finish to complete the setting and return to the preset number selection display in Step 2 5 Press the OK or 9 button to move to the respective setting On O...

Page 61: ...nse selection 6 Completing the setting 1Pressing or button to select Finish 2Press the OK button to complete the setup screen Programmed settings will be applied and the screen will return to the pres...

Page 62: ...respective recording scene settings press the or button in the Scene Select screen to select the item you want to confirm then press the 9 button to confirm in the setting confirmation screen To end t...

Page 63: ...Sence Middle Low Middle High Rec Mode ST XQ HQ ST XQ ST XQ Rec Level Auto Auto Auto Auto Zoom Mic Off Off Wide Zoom Low Cut Filter Off On On On VCVA Off Off Off Off Standby On On On On Menu setting m...

Page 64: ...to set Select items you want to set from among On Off Day Start Time Volume Alarm Sound Playback File Select Finish to complete the setting and return to the preset number selection display in Step 2...

Page 65: ...selection Start Time setting 1Press the 9 or 0 button to select Hour and Minute in the Start Time and Hour and Minute in the Stop Time 2Press the or button to set 3Press the OK button to exit Start Ti...

Page 66: ...arting times Preset 1 has the highest priority and Preset 3 has the lowest If the recorder is in use or if operations are being performed at the scheduled time the Alarm Playback function will not be...

Page 67: ...the 9 button to confirm in the setting confirmation screen To end the setting confirmation screen press the F1 button and the display will return to the Scene Select screen 3 Press the OK or 9 button...

Page 68: ...ovided Off Guidance will be canceled 2Press the OK button to exit On Off selection Speed setting 1Press the or button to select from Speed5 Speed4 Speed3 Speed2 and Speed1 2Press the OK button to exit...

Page 69: ...tting 4 Press the or button to select the item to set Menu setting method When USB Connect is selected PC Setting for connecting to the PC using the USB cable provided Connected as Storage or Composit...

Page 70: ...pter is connected in the PC status the recorder will display Please wait and cannot be operated on Only charging is possible The PC cannot recognize when the recorder is connected to the PC when setti...

Page 71: ...formatting the recorder 1 Select Format from the menu in Device Menu Please refer to P 44 P 45 for details on menu settings 2 Press the or button to select the recording media to format 3 Press the O...

Page 72: ...ta Never format the recorder from a PC Once the recorder is formatted the music files with DRM may not be transferred to the recorder again When the recorder is formatted all the saved data including...

Page 73: ...e is stopped data may not be successfully transferred On a PC do not format the drive of the recorder Initialization is not successfully achieved on a PC For initialization follow the instructions in...

Page 74: ...rs or more is recommended USB port One or more free ports Others Audio device Environment where the Internet can be utilized Macintosh Operating System Mac OS X 10 4 11 10 5 CPU PowerPC G5 or Intel Mu...

Page 75: ...ssage folder on the hard disk Voice file can be sent as an E mail attachment Changing User ID The user ID will be automatically given to files that are recorded with the recorder Changing a Folder Nam...

Page 76: ...staller Wizard instructions 6 Confirm your acceptance of the terms of the Licensing Agreement You must accept the terms of the Licensing Agreement to install Olympus Sonority After checking the Agree...

Page 77: ...accept the terms of the Licensing Agreement to install Olympus Sonority After checking the Agree box click Next 7 Changing the Installation Destination The installation destination can be changed Cli...

Page 78: ...and follow the instructions given 7 When the Maintenance Complete screen is displayed click Finish to complete uninstalling Macintosh 1 Exit Olympus Sonority 2 Open Finder and double click the Sonorit...

Page 79: ...k the Contents tab 2 Double click the icon of the desired topic heading 3 Double click the icon of the desired topic An explanation of the topic is displayed Search by Key word 1 Open Online Help and...

Page 80: ...u connect the recorder to a Windows and open My Computer it will be recognized by the drive name of the productname IfamicroSDcardisinserted Removable Disc will be displayed Macintosh When you connect...

Page 81: ...the desktop to the garbage bin by Drag Drop it 2 Confirm that the recorder display lamp is gone before disconnecting the USB cable Notes NEVER disconnect the USB cable while the recording indicator li...

Page 82: ...n the bottom right of the screen Macintosh Disabling automatic start 1 From the menu bar click System Environment Setting The setting dialog box will appear 2 Turn the automatic start up in the settin...

Page 83: ...the PC s Olympus Sonority will be displayed Olympus Sonority Browse Screen This is the main screen of the Olympus Sonority The display screen is the display screen in Windows 5Device Tree View Folders...

Page 84: ...he Main Treeview and displays the File List Display Area 2Opening the Program Guide Displays the latest information on the Podcast Program Guide 3Updating latest information Updates the latest informa...

Page 85: ...For explanations of Download Folders and Download All refer to Online Help P 79 Download Selected Files 1 Select the folder From the Device Tree View select the folder that contains the voice file you...

Page 86: ...g If you do the data will be destroyed Depending on the size of the voice file and your PC it may take some time to download the files The downloaded files will be stored in the download tray folder t...

Page 87: ...u would like to play 2 Select the voice file Select the file to playback from the File List Display Area 3 Play the voice file Click the play button of the Play Control Bar Other playback control such...

Page 88: ...elected 6 Click the Write Track Zone The Save dialog box will appear Using the One touch effect Function Windows Macintosh You can use the Waveform Editing Tab in the Olympus Sonority to easily proces...

Page 89: ...e voice file Click OK to upload the voice file to the recorder 5 Upload complete Once the transmission screen closes and the record indicator light on the recorder is OFF upload is completed You can a...

Page 90: ...sfer dialog will appear 4 Copy voice guide data If you click the OK button in the File Transfer dialog it will start copying voice guide data and a window indicating copying progress will appear 5 Cop...

Page 91: ...he Waveform Editing Tab Uses as a USB Speaker When the recorder is being used as a USB speaker it is possible to output the sound through the recorder rather than from the speakers attached to a compu...

Page 92: ...y will be issued by mail 3 Select Upgrade to Olympus Sonority Plus from the Help menu The Upgrade to Olympus Sonority Plus dialog will be displayed 4 In the Upgrade to Olympus Sonority Plus dialog ent...

Page 93: ...ing Function for settings in this recorder detailed settings such as recording mode alarm setting timer recording etc Functions Available with the Music Editing Plug in By purchasing a Music Editing P...

Page 94: ...er to the recorder Please see Transferring music file to the recorder P 98 for details Import files using iTunes Copy music files and language content from CDs to a computer Please see Copying music f...

Page 95: ...he Internet without the copyright holder s permission may not be reproduced distributed publicized re publicized on the Internet or converted into WAV WMA or MP3 files for the purpose of commercial bu...

Page 96: ...on 5Stop button 6Previous button 7Play button 8Next button 9Mute button 0Volume slider Windownames Windows Media Player 11 Windows Media Player 10 1Features taskbar 2Quick Access Panel button 3Seek sl...

Page 97: ...k View Album Info for Windows Media Player 10 as necessary If Internet connectivity is available CD information is searched 3 Put a check mark on the music file that you want to copy 4 Click Start Rip...

Page 98: ...and set as follows Click on the Create folder hierarchy on device to check If you uncheck and syncronize the file it will be transfered under the folder Home and the file will not be indicated 1 2 Th...

Page 99: ...Connect the recorder to a PC and start Windows Media Player 2 From the Features taskbar click Sync 3 From the pull down menu on the left side window select the play list to be transferred to the recor...

Page 100: ...y need to be set again 6 Click Start Sync The file is transferred to the recorder The music file transferred to the recorder is displayed in Item on Device Notes Copying the music files with DRM purch...

Page 101: ...List on the right 4 Click Burn menu again and select Audio CD or Data CD When Audio CD is selected A file is converted and copied in music CD in order to play it by the audio equipment which can play...

Page 102: ...iles that you want to copy 4 Select format of CD before clicking Start Burn When Audio CD is selected A file is converted and copied in music CD in order to play it by the audio equipment which can pl...

Page 103: ...our computer from music CDs and acquired over the Internet can be transferred to and played back with this recorder By using iTunes music files from music CDs can be converted ripped P 104 and music f...

Page 104: ...files to your PC and click OK This recorder is compatible with music files in the MP3 and WAV formats P 36 Import Using Set the file format for copying music file from a CD Please select MP3 or WAV S...

Page 105: ...fer The order of music pieces can be changed by Drag Drop of the music file in the play list displayed 3 Double click the corresponding drive with the recorder and open Music folder When you connect t...

Page 106: ...rt iTunes 2 Select the desired playlist and put a check mark on the voice files to copy to the CD R RW 3 Click Burn Disc 4 To set the CD format for copying voice files to CD R RW and click Burn Disc W...

Page 107: ...ority 2 Open a web browser and go to a Podcasting site 3 Drag the Podcast registration icon and drop it in the Podcast folder in Olympus Sonority Podcast registration icons differ depending on Podcast...

Page 108: ...ng the following procedure Program registration update and download functions are not available in Macintosh Use iTunes or other applications for these functions 1 Select the Podcast folder 2 Select a...

Page 109: ...ownload manually the content can be downloaded with the procedure described below Program registration update and download functions are not available in Macintosh Use iTunes or other applications for...

Page 110: ...iTunes etc can be transmitted to this recorder by dragging and dropping it in the recorder s Podcast folder 1 Select the Podcast folder 2 Select the content you want to transfer and drag it to the Po...

Page 111: ...ams 1 Click Channel Guide in the online service of the Main Tree View Information of programs registered online will be displayed 2 Click the program you desire from the program list Detailed informat...

Page 112: ...e web browser and download the AudibleManager http www audible com United States http www audible co uk United Kingdom http www audible fr France http www audible de Germany 2 Start up the downloaded...

Page 113: ...tallation starts Wait until the process has been completed Once the installation has been completed AudibleManager restarts Verify that the device in use has been added to the Mobile Devices menu Purc...

Page 114: ...l the transfer of the content has been completed When it has been completed the transferred content is displayed in the contents listing of the device Also the transferred content is displayed in the...

Page 115: ...e recorder are selected Normal mode See the Operating Recorder in Audible Mode P 117 for details File Display Screen in Audible Mode In the Audible mode Play Mode P 50 becomes the File setting regardl...

Page 116: ...0 button to move the stop position while the recorder is stopped The Playback Position will not be updated Section Up to a maximum 100 divisions chapters of a story or segments of news are set arbitr...

Page 117: ...ning of the last file When the 9 button is held down during playback and the end of the file is reached the recorder goes back to the beginning of the file and stops Rewinding Press and hold the 0 but...

Page 118: ...tton during playback The recorder skips three seconds forward or to the starting position of the next section whichever is closer and starts to playback the file After reaching the end of the file the...

Page 119: ...window 3 Open the product name folder When you open My Computer it will be recognized by the drive name of the product name 4 Copy the data 5 Disconnect the recorder from the PC P 81 Macintosh 1 Conn...

Page 120: ...sary files P 42 Memory Error Error in the memory Error in the memory This is a malfunction so go to the store where you purchased the recorder or an Olympus service station for repair P 127 Card Error...

Page 121: ...he recording level and then try recording once more P 47 Recording level too low The microphone sensitivity is too low Set the microphone sensitivity to High or Middle mode and try again P 47 This cou...

Page 122: ...be recognized with the recorder Connect the recorder to PC for erasing folders Noise is audible through the recording monitor Acoustic feedback is occurring When the built in speaker amps and the lik...

Page 123: ...p functions can be operated through the remote control The receiving position can beadjusted therebyallowingyoutooperate the recorder from various different angles s Telephone pickup TP7 Earphone type...

Page 124: ...g AC adapter A514 5 V 4 External dimensions 110 mm 38 9 mm 16 mm without protrusions 4 Weight 84 g including battery 4 Operating temperature 0 C 42 C Overall frequency response 4 During recording or p...

Page 125: ...535h 128h 267h 524h LP 522h 1065h 255h 531h 1042h It is possible to record exceeding 2GB The recording will continue even if the volume of a single file exceeds 2 GB in the linear PCM format recordin...

Page 126: ...ardless of the memory remaining amount the longest sound recording time per file is restricted to the above value Guide to battery life 4 Alkaline batteries Recording mode Built in stereo microphone D...

Page 127: ...of the waste batteries 8 Specifications Technical assistance and support Specifications Technical assistance and support Technical assistance and support The following are contact information for tech...

Page 128: ...rkway P O Box 610 Center Valley PA 18034 0610 U S A Tel 1 888 553 4448 http www olympusamerica com Premises Goods delivery Wendenstrasse 14 18 20097 Hamburg Germany Tel 49 0 40 237730 Letters Postfach...

Reviews: