background image

59

4

1

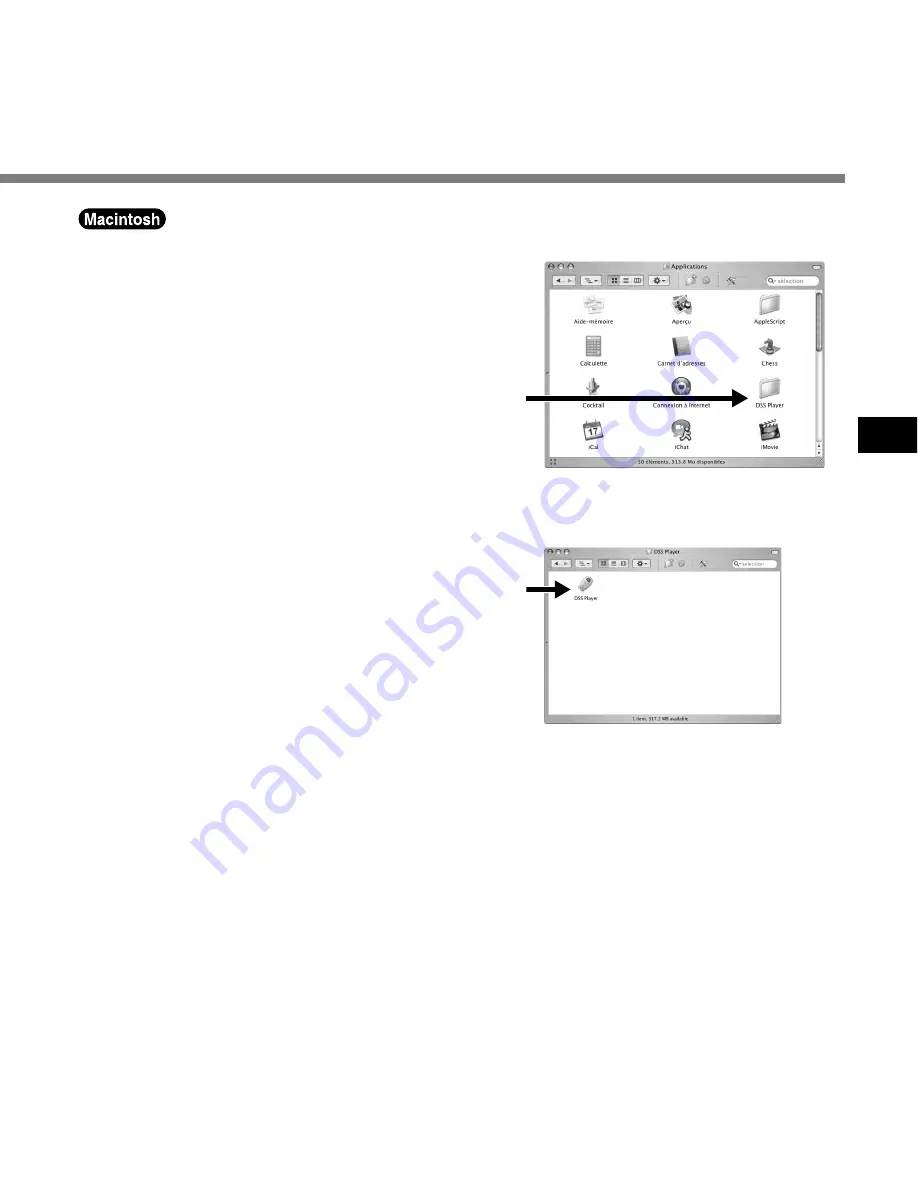
Start your Macintosh.

2

Connect the recorder to your PC.

For cable connection instructions, see
“Connecting to Your PC Using the USB
Cable” (

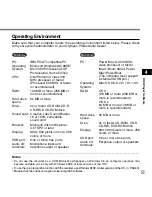
 P.55).

3

Double-click the [DSS Player for
Mac] (OS 9.x)/[DSS Player] (OS X)
folder.

The DSS Player (for Mac) folder opens.

4

Double-click DSS Player.

DSS Player for Mac (OS 9.x)/DSS Player
Plus (OS X) launches.

For the OS X users: “The user’s registration
screen” is displayed when first launched.

5

Register user information (OS X).

The user’s registration screen will be
displayed at the time of initial startup.
Please input the serial number.
Please see the seal attached to the CD-
ROM package included with the DSS
Player, for the serial number.
After the input has ended, click [OK] to
complete the registration.

3

4

Running DSS Player

..............................................................................................................................................................

Note

The Mac version DSS Player does not have the automatic start function.

Summary of Contents for DS-3300

Page 1: ...e instructions for information about using the product correctly and safely Keep the instructions handy for future reference To ensure successful recordings we recommend that you test the record function and volume before use ONLINE INSTRUCTIONS EN DIGITAL VOICE RECORDER DS 3300 ...

Page 2: ... and Ejecting a Card 21 2 Basic Operations Recording 23 Microphone Sensitivity MIC SENSE 27 Recording Modes REC MODE 28 Using the Variable Control Voice Actuator VCVA 29 Hands free Recording 30 Recording Monitor 30 Playing 31 Erasing 33 3 Other Functions Menu List 37 Learning to Use the Menu 38 Locking Files LOCK 39 Index Marks 40 LCD Display Information 41 Setting Priority Levels 43 Setting Job D...

Page 3: ...ts 67 Using Voice Recognition Software Optional 68 Joining Files 72 Splitting Files 74 USB Microphone USB Speaker 76 Sending Dictation Files Receiving Document Files 77 Using Online Help 54 Connection to Your PC 55 Running DSS Player 58 Window Names 60 6 Using the Recorder as a Reader Writer Using the Recorder as a Reader Writer 88 7 Other Information Alarm Message List 89 Troubleshooting 90 Acces...

Page 4: ...is manual carefully to ensure that you know how to operate it safely and correctly Keep this manual in an easily accessible location for future reference Important Safety Precautions Certain symbols are used in the user s manual and on this product to help protect users their surroundings and their property from possible injury or damage Please familiarize yourself with the following definitions a...

Page 5: ... unit malfunction or during repair work It is recommended to back up and save important content to other media such as a computer hard disk Batteries Rechargeable Battery Pack BR402 Danger Do not solder lead wires or terminals directly onto a battery or modify it Do not connect the and terminals together This may cause fire overheating or electric shock When carrying or storing the battery BR402 b...

Page 6: ...e than two batteries charge them at the same time When using new batteries or batteries which have not been used for a long time be sure to recharge them even if they were only used for a short period of time Warning Do not use the batteries if you find something wrong with them such as deformity or leakage This may cause explosion or overheating Do not disassemble Keep batteries out of the reach ...

Page 7: ...mpleted if the charging indicator is not turned off after 3 hours plug the power supply cord out Contact the store of purchase or Olympus Service Station for repair since it may be a malfunction Be sure to charge batteries within the temperature range of 0 C 40 C 32 F 104 F If not there may be explosion fire leakage or damage to batteries Do not put anything heavy on the charger or leave it in an ...

Page 8: ...oise heat smoke or a burning odor 1 do not touch any of the exposed parts 2 immediately disconnect the power supply plug from the power outlet and 3 call your dealer or local Olympus representative for servicing Continued use of the AC adapter under these circumstances could result in electric shock fire or injury Make sure to hold the plug when removing the power plug from the outlet Do not bend ...

Page 9: ...ptional Ni MH Rechargeable Battery Pack BR402 P 14 1 and for downloading data from the recorder to a PC P 61 The recorder has multi programmable button CUSTOM P 18 Recording and storing voice in DSS format Two recording modes SP Standard Playback mode or LP Long Playback mode P 28 Five folders and up to 199 files folder for a maximum of 995 recordings P 23 Built in Variable Control Voice Actuator ...

Page 10: ...ding time may be shorter if many short recordings are made 2 Total recording time of two files The maximum recording time per file is 99 hours xD Picture Card Notes When initializing formatting a card confirm that no necessary data is stored on the card beforehand Initialization completely erases the existing data on the card Cards used in a recorder must be formatted in the same recorder first un...

Page 11: ...INDEX button 0 FOLDER MENU button Built in speaker STOP button PLAY button ERASE button CUSTOM button Programmable Display LCD panel Record Play indicator lamp POWER ON OFF switch VOLUME button VOLUME button Card cover Card cover lock q Battery cover w PC USB terminal Cradle attachment point Identification of Parts Identification of Parts 1 2 3 4 5 6 7 8 9 0 q w ...

Page 12: ... number of recorded files in the folder 6 Erase lock indicator 7 Character Information display 8 Microphone sensitivity display 9 VCVA Variable Control Voice Actuator indicator 0 Record mode indicator Display LCD Panel Identification of Parts 1 2 3 4 5 6 7 0 9 8 Identification of Parts ...

Page 13: ...recorder before replacing the batteries Removing the batteries while the recorder is in use may corrupt the card If you are recording into a file and the batteries run out you will lose your currently recorded file since the file header will not be written It is crucial to replace the batteries when one hash mark in shown in the battery icon Be sure to replace both batteries at the same time Never...

Page 14: ...n the display charge the battery as soon as possible When the battery is too weak the recorder shuts down and BATTERY LOW appears on the display Notes The Olympus Ni MH Rechargeable Battery Pack BR402 is sold separately Removing the battery pack while the recorder is in use may corrupt the file If you are recording into a file and the battery run out you will lose your currently recorded file sinc...

Page 15: ...s complete it will take only few minutes to charge the battery The PC must be ON when charging battery via the USB cable connection Charging battery via the USB cable connection may not be successful depending on the power supply capacity of your PC Use the AC adapter instead If you change the recorder toAUDIO device while charging battery only via the USB cable connection charging may stop Do not...

Page 16: ...Discharging Batteries self discharge while they are not in use Be sure to charge them regularly before use Battery life Charging and discharging are possible for approximately 500 times depending on usage Operating temperature Batteries are chemical products Battery efficiency may change even when operating within the recommended temperature range but this is not a malfunction Recommended temperat...

Page 17: ... switch on the back of the recorder is in the OFF position none of the buttons or switch on the recorder will be active Slide the power switch to the ON position to activate the recorder PowerSaveMode When the recorder is ON but not in use for 10 minutes by default it will switch to power save mode automatically To reactivate the recorder again press any of the buttons on the recorder ...

Page 18: ...ptions can be set by your Olympus Professional Dealer These additional and customisable options are as follows Setting for beep sound Setting for NEW button operation Setting for REC button operation Setting for Splash screen Adding removing of user defined fields Switching the display languages Changing the number of folders Assigning functionality to CUSTOM button Assigning functionality to the ...

Page 19: ... the REC button to accept the hour You can choose between 12 and 24 hour display by pressing the CUSTOM button while setting the hour and minute Example 5 45 P M 5 45 PM 17 45 Initial setting 2Set the minute 1 Press the FF button or REW button to set the minute 2 Press the REC button to accept the minute 3Set the year 1 Press the FF button or REW button to set the year 2 Press the REC button to ac...

Page 20: ...rder will save the items that were set to that point You can set the time and date from your PC using DSS Player software P 50 1Press and hold the FOLDER MENU button for 1second or longer The menu appears P 37 2Press the FF or REW button until TIME DATE in SUB MENU flashes on the display 3Press the REC button Time Date screen appears The hour indicator flashes indicating the start of the Time Date...

Page 21: ...he card to jam If the card is not inserted all the way data may not be written to the card 3Close the card cover securely Card inserted fully into the slot The message PLEASE WAIT on the display flashes for seconds Card not inserted fully into the slot When the card cover is closed the message INSERT CARD on the display flashes for a few seconds Pressing any button will sound beeps and flash the m...

Page 22: ...ears on the display The power is switched off automatically 3Push the card inward to unlock it and let it eject partially The card is visibly out of the slot and can be removed safely 4Hold the card straight and pull it out Inserting and Ejecting a Card Inserting and Ejecting a Card Note Releasing your finger quickly after pushing the card inward may cause it to eject forcefully out of the slot ...

Page 23: ...tion overwrite However that can be changed to any of the following settings Append Appends the recording to the end of the current file Insert Inserts the recording at the current position in the file Overwrite Overwrites the recording starting at the current position in the file 1Press the NEW button to create a new file a Current recording mode b New file number c Selected Author ID 2Press the R...

Page 24: ...lect a different recording mode SP or LP than that of the original file when appending recording Review Recording Press the REW button while recording and release it when you want to start playing a file The recorder plays up to the end of file then stops You can overwrite or append additional recordings in the same file from that point Pause Press the REC button while recording REC PAUSE will fla...

Page 25: ...icator lamp glows red 3Press the STOP button to stop overwriting Overwrite Recording You can overwrite a previously recorded file from any point within the file Note that the overwritten recordings will be erased 14M00S AUTHOR A 10M25S 1 3 2 Recording Note You cannot select a different recording mode SP LP than that of the original file before overwrite recording ...

Page 26: ...e remaining recording time will alternate on the display 4Press the STOP button to stop inserting the additional recording Insert Recording Additional recording can be inserted into previously recorded file AUTHOR A 00M10S 02M25S INSERT AUTHOR A 00M12S I NSERT REC Recording Recording 2 1 4 3 AUTHOR A 00M11S 4H33M06S Notes The recording time and date of the file is updated to the time and date of t...

Page 27: ...ensitivity setup process begins 4Press the FFor REWbutton to choose between CONF and DICT CONF High sensitivity mode that records sounds in all directions DICT Low sensitivity mode suited for dictation 5Press the REC button to select the option 6Press the FOLDER MENU button to close the menu 2 4 1 6 3 5 SUB MENU EXIT REC MODE MIC SENSE MIC SENSE CONF CONF DICT MIC SENSE MIC SENSE Note If you want ...

Page 28: ...er REC MODE will be displayed on the screen P 37 2Press the REC button The recording mode setup process begins 3Press the FF or REW button to choose between SP and LP 4Press the REC button to select the option 5Press the FOLDER MENU button to close the menu EXIT REC MODE REC MODE VCVA MIC SENSE SP LP REC MODE REC MODE 3 1 5 2 4 Note Choose SP mode for recording meetings or lectures with crisp clar...

Page 29: ...ing starts and flashes when recording pauses Adjust the Start Stop Actuation Level 1Press the FOLDER MENU button during recording The VCVA level screen is displayed 2Press the FF or REW button to adjust the actuation level The VCVA level can be set to any of 15 different values The higher the value is the more sensitive the recorder can react to sounds At the highest value even the faintest sound ...

Page 30: ...cording is in progress Insert the earphone plug into the earphone jack and use the VOLUME button to control the volume level Recording Monitor Default settings VOLUME button Switch FF LISTEN REW Press NEW Press and hold REC REV Release STOP PLAY Note Insert the plugs to the end as shown in the illustration when inserting the earphone or external microphone Notes The Olympus foot switch RS25 26 is ...

Page 31: ...nt playback time b Total recording time of the file being played 2Press the VOLUME or VOLUME button to adjust the volume The display shows the volume level You can choose between 0 to 30 3Press the STOP button at any point you want to stop the playback You can start playing a file at any point AUTHOR A 00M05S LENGTH 27M58S a b 1 3 2 ...

Page 32: ...essed within 2 seconds the recorder skips to the beginning of the previous file Playback functions Fast Forward FF Rewind REW Cue CUE Review REV Operation Press the FF button once while stopped Press the REW button once while stopped Hold the FF button while stopped or playing a file Hold the REW button while stopped or playing a file How to Cancel Press the PLAY button The recorder starts the ope...

Page 33: ...DONE is displayed when the file is erased File numbers will be reassigned automatically FOLDER A F I LE ERASE FOLDER A F I LE ERASE FOLDER A ERASE DONE Erasing a File Erasing or deleting a file from any of the folder on the recorder is a very simple process 2 3 Notes If the ERASE button is not pressed within the 8 seconds after FILE ERASE starts flashing the recorder will revert to the stop status...

Page 34: ... while ALL ERASE is flashing The display changes to ALL ERASE and erasing will start ERASE DONE is displayed when the files are erased Any locked files in the folder will be reassigned new file numbers in ascending order FOLDER A ALL ERASE FOLDER A ALL ERASE FOLDER A ERASE DONE 1 2 Notes If the ERASE button is not pressed within the 8 seconds after ALL ERASE starts flashing the recorder will rever...

Page 35: ...ally 2Press the ERASE button at the point to start erasing While playback continues PARTIAL ERASE and the file length will alternate on the display AUTHOR A 5M01S START ERASE AUTHOR A 45M32S END ERASE 3Press the ERASE button at the point to end erasing The erase starting point time set in step 2 and the ending point time set in this step will alternate on the display for 8 seconds 1 2 3 ...

Page 36: ...pears on the display partial erase is complete AUTHOR A 5M01S ERASE DONE Erasing 4 AUTHOR A 5M01S PART I AL ERASE Notes If the ERASE button is not pressed within the 8 seconds after START or END starts flashing the recorder will revert to the stop status An erased file cannot be restored Locked files cannot be partially erased P 39 ...

Page 37: ... or OFF disabled Microphone sensitivity setting Select between CONF high sensitivity mode or DICT low sensitivity mode P 27 Press the REC button Returns to the MENU Switches to the SUB MENU Exit MENU and return to STOP mode Locking files setting P 39 Select ON locked or OFF unlocked SUB MENU MENU USB charge setting Select ON enabled or OFF disabled Notes If you press the STOP button or FOLDER MENU...

Page 38: ...on for 1 second or longer The menu appears P 37 2Press the FF or REW button to highlight a menu item you want to modify change 3Press the REC button to select that menu item The possible options for the menu item will be in view 4Press the FF or REW button to highlight an option or setting 5Press the REC button The highlighted option will be selected and the new setting saved 6Press the FOLDER MEN...

Page 39: ...ess the FF or REW button until LOCK in SUB MENU flashes on the display 3Press the REC button The file locking setup process begins 4Press the FF or REW button to choose between ON and OFF ON Locks the file and prevents it from being edited or erased OFF Unlocks the file and allows it to be edited or erased a Erase lock indicator 5Press the REC button to select the option 6Press the FOLDER MENU but...

Page 40: ...ying a file The recorder stops for 1 second when it reaches the index mark Clearing an Index Mark 3Locate the index mark you want to clear 4PresstheERASE buttonwhiletheindex number appears for approximately 2 seconds on the display The index mark is erased Index Marks AUTHOR A 12M05S I NDEX 08 SET AUTHOR A 12M05S I NDEX 08 CLEAR Index Marks 2 4 1 Notes Up to 16 index marks can be set in a file Att...

Page 41: ... Shows the time that the file was recorded 7 Current time and date Shows the current time and date During the playback operation the TIME DATE or the counter appears 5 Memory remaining Shows the remaining recording time 4 File comment Shows a comment added to the file If there is no comment will appears If a comment contains many characters it will scroll horizontally to display the complete comme...

Page 42: ...splays the remaining time available for recording in bar mode and the current time and length of the file AUTHOR A E F 25M01S 2H33M25S While Recording in VCVA Mode 1 VCVA recording level meter Displays the sound input level graphically and the remaining time available for recording in countdown mode STANDBY appears if the VCVA actuation level isn t reached 2 Remaining memory bars Displays the rema...

Page 43: ...evel a Priority level indicator To Set a Priority Level on an Existing File AUTHOR A LENGTH 00M00S 27M58S a Setting Priority Levels To Set a Priority on a New File AUTHOR A NEW F I LE REMA I N 2H33M12S AUTHOR A 00M00S LENGTH 27M58S AUTHOR A NEW F I LE REMA I N 2H33M12S Setting Priority Levels 1 2 2 1 1Press the NEW button A new file is created 2Press or hold the PRIORITY CUSTOM button to choose th...

Page 44: ... upload a Job Data list list of Author IDs and Work Types to the recorder By default the Author ID is set to DS3300 1Turn ON the recorder When more than one Author ID exist on the recorder the ID list will be displayed 2Press the FF or REW button to select the Author ID that you want to assign to the recorder from the ID list 3Press the REC button to set the ID All recordings made by the author du...

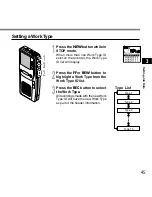
Page 45: ...button while in STOP mode When more than one Work Type ID exist on the recorder the Work Type ID list will display 2Press the FF or REW button to highlight a Work Type from the Work Type ID list 3Press the REC button to select the Work Type All recordings made with the new Work Type ID will have the new Work Type as part of the header information ...

Page 46: ...aracter Press and hold the REC button Finish entering ID Press the ERASE button Erase the characters being entered If multiple Option Items are programmed into the recorder each Option Item ID is entered in the same way described above When entering the final ID is done the recorder switches to NEW mode Setting Option Item PAT I ENT NO 7_ 34567890AB The recorder can be programmed with additional u...

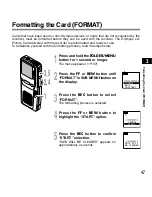
Page 47: ...n 5Press the REC button to confirm START selection DATA WILL BE CLEARED appears for approximately 2 seconds Cards that have been used on non Olympus devices or cards that are not recognized by the recorder must be formatted before they can be used with the recorder The Olympus xD Picture Card delivered with the recorder is preformatted and ready for use To familiarize yourself with the formatting ...

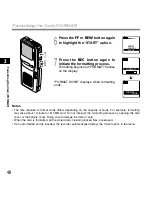
Page 48: ...MAT 6 7 Formatting the Card FORMAT Notes The time required to format cards differs depending on the capacity of cards For example formatting may take about 1 minute for 512 MB card Do not interrupt the formatting process by opening the card cover or the battery cover Doing so will damage the data or card When the card is formatted all the stored data including locked files are erased If an unforma...

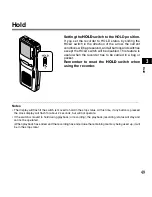
Page 49: ...e carried in a bag or pocket Remember to reset the HOLD switch when using the recorder Notes The display will flash if the switch is moved to hold in the stop status At this time if any button is pressed the clock display will flash for about 2 seconds but will not operate If the switch is moved to hold during playback or recording the playback recording status will stay and cannot be operated Whe...

Page 50: ...sferred while the record play indicator lamp is blinking When removing the USB cable be sure to follow the description in P 56 If the USB cable is removed before the drive is stopped data may not be successfully transferred On a PC do not format the drive of the recorder Initialization is not successfully achieved on a PC For initialization follow the instructions in the menu screen of the recorde...

Page 51: ...s IBM PC AT compatible PC Microsoft Windows 98 98SE Me 2000 Professional XP Professional Home Edition Intel Pentium II class 333 MHz processor or faster Processor 500 MHz or faster is recommended 128 MB or more 256 MB or more is recommended 50 MB or more 2x or faster CD ROM CD R CD RW DVD ROM drive Creative Labs Sound Blaster 16 or 100 compatible sound card Microsoft Internet Explorer 4 01 SP2 or ...

Page 52: ...ccording to the instructions on the screen Before you connect your recorder to your PC you must first install the DSS Player software Make sure to exit all running applications eject the floppy disk if you are using one and logon as administrator if you are running Windows 2000 XP Professional only or Mac OS X on the network 1Insert Olympus DSS Player CD into the CD ROM drive 2Double click the CD ...

Page 53: ...ence file in the following location OS X Macintosh HD User Library Preferences OS 9 x Macintosh HD System Folder Preferences 3Delete the Executable file Delete the DSS Player for Mac OS 9 x DSS Player OS X file in the location where you installed the file For OS X users uninstalling has been completed For OS 9 x users proceed to step 4 4Delete the Driver file Delete the following files in the foll...

Page 54: ... DSS Player is running press F1 on the keyboard While DSS Player is running select DSS Player for Mac Help OS 9 x DSS Player Help OS X from the Help menu Using Online Help For information on the DSS Player usage and features refer to the online Help To start online Help Using Online Help Note Online Help is available after the DSS Player is installed ...

Page 55: ...ars In this case cancel the wizard by pressing the Cancel button in the wizard screen and then install or continue the installation of DSS Player software You can directly connect the recorder s USB terminal to your PC or use the cradle included in the package desktop holder Connecting to Your PC Using the USB Cable Connection to Your PC Notes NEVER remove the card or disconnect the USB cable whil...

Page 56: ...SB cable while the record play indicator lamp is flashing If you do the data on the card will get destroyed Some PCs and USB hubs may not supply sufficient power and the recorder fails to connect Refer to your PC User s Manual regarding the USB port or USB hub on your PC When using a USB hub to connect the recorder always use a self powered AC adapter USB hub Make sure to push the cable connector ...

Page 57: ...REMOTE is displayed on recorder it indicates proper connection Connecting to Your PC Using the Cradle Connection to Your PC Notes Never touch the contact points at the bottom of the cradle as that may cause bad connection With a PC connected the recorder cannot be operated with the foot switch RS25 26 When connecting the recorder to a PC via the cradle remove the foot switch ...

Page 58: ... application 2Click DSS Player Pro The check mark on DSS Player Pro disappears 2 3 Running DSS Player Manual start 1Start Windows 2Click the start button then select All Programs All program menu will be displayed 3Select Olympus DSS Player Pro then click Dictation Module Note If you connect the recorder before installing DSS Player the Add New Hardware Wizard dialog box will open If this happens ...

Page 59: ...r Plus OS X launches For the OS X users The user s registration screen is displayed when first launched 5Register user information OS X The user s registration screen will be displayed at the time of initial startup Please input the serial number Please see the seal attached to the CD ROM package included with the DSS Player for the serial number After the input has ended click OK to complete the ...

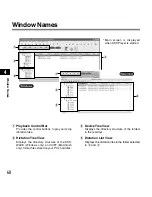
Page 60: ... directory structure of the DSS WAVE Windows only and AIFF Macintosh only format files stored on your PC s hard disk 3 Device Tree View Displays the directory structure of the folders in the recorder 4 Dictation List View Displays the dictation files in the folder selected in 2 and 3 1 4 2 3 1 4 2 3 Main screen is displayed when DSS Player is started ...

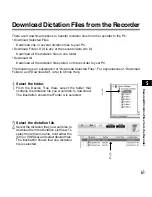
Page 61: ...d Files For explanations of Download Folders and Download All refer to Online Help 2Select the dictation file Select the dictation file you would like to download from the Dictation List View To select more than one file hold either the Ctrl or Shift key and select desired files The illustration shows that one dictation file is selected Download Dictation Files from the Recorder 1 2 Download Dicta...

Page 62: ...roperties To change the download options and filename format check the Tools menu Options Notes NEVER remove the card or disconnect the USB cable while the record play indicator lamp is flashing If you do the data on the card will get destroyed Depending on the size of the dictation file and your PC it may take some time to download the files The downloaded files will be stored in the download tra...

Page 63: ... Author ID The ID that has been set on the recorder The default ID is DS3300 The Author ID can be modified with DSS Player P 66 File Name Format File names are assigned in the following manner Other playback control bar such as Rewind Fast Forward Stop Speed Control Volume Control Time Axis and Index Skip are also available on the Playback Control Bar The DSS Player can playback voice through the ...

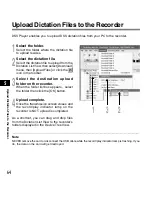
Page 64: ...n 4Upload complete Once the transmission screen closes and the record play indicator lamp on the recorder is NOT upload is completed 2 1 Upload Dictation Files to the Recorder Upload Dictation Files to the Recorder As a shortcut you can drag and drop files from the Dictation List View to the recorder s folders displayed in the Device Tree View 3 DSS Player enables you to upload DSS dictation files...

Page 65: ...ected to your PC and the Record and Playback controls to edit recordings Recording a new file 1From the DSS Player main window click the File menu then select New File or click the icon Remote Dictation window appears 2Press the record button in the Remote Dictation window or press the REC button on the recorder to start recording 3Press the stop button or press the STOP button on the recorder to ...

Page 66: ...n select Create Send Job Data The Create Send Job Data window appears Enter your user ID in the field indicated by the arrow 2Click the Transfer button The new user ID will be transferred to the recorder 1 2 Changing User ID Author ID Note NEVER remove the card or disconnect the USB cable while the record play indicator lamp is flashing If you do the data on the card will get destroyed ...

Page 67: ...our DSS Player to create edit comments then transfer them from the PC to the recorder You can also edit file comments imported from the recorder to a PC Click the Tools menu then select Edit Comment File comments can use up to 100 alphanumerical characters and symbols Editing File Comments Changing a Folder Name Editing File Comments The folders in the software and recorder can be renamed to refle...

Page 68: ...s recommended that you train your voice recognition software first to learn the characteristics of the speaker s voice and the recorder s built in microphone for maximum accuracy Using Voice Recognition Software Optional Audio set up 4From the IBM ViaVoice VoiceCenter select ViaVoice Tool then Analyze My Voice The ViaVoice User Wizard window appears 5From the Device list box select Olympus DSS Fil...

Page 69: ...ding to the instruction on screen During audio setup enrollment please input voice data from the recorder It is recommended that you enroll while in your normal surrounding environment settings This will help improve the voice recognition by registering your voice characteristics and your environment Notes Windows 98SE or later OS is required when using voice recognition function with the recorder...

Page 70: ...f voice recognition Click the icon The voice recognition software window appears and voice recognition starts Noise Canceling Function Check Use Noise Cancel in the Voice Recognition menu to output voice using the noise canceling function to the voice recognition software Check the voice recognition software operating manual for voice recognition functions such as modifying converted characters Th...

Page 71: ... relatively quiet environment Have the recorder microphone 5 to 10 cm 2 to 4 inches away from your chin Speak normally It is recommended to use the noise cancellation microphone ME12 when recording Dictation files recorded under the following conditions cannot be processed by voice recognition because their recognition accuracy rates will be very low A conference or meeting where many voices are r...

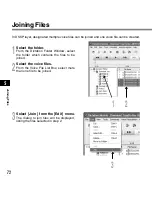
Page 72: ...m the Dictation Folder Window select the folder which contains the files to be joined 2Select the voice files From the Voice File List Box select more than one file to be joined 3Select Join from the Edit menu The dialog to join files will be displayed listing the files selected in step 2 Joining Files 3 2 1 Joining Files ...

Page 73: ...ames The file name is created automatically after joining and also it enables input optionally 6Press the Join button The resulting file is saved under the name specified in step 5 and stored in the selected folder 5 4 6 Joining Files Notes If the files to be joined have different recording modes the mode of the file listed at the top is selected The Joining Files function is not available for the...

Page 74: ...er Select the folder containing the file to be split from the Dictation Folder Window 2Select the voice files Select one file to split from the Voice File List Box 3Select Split from the Edit menu The setting dialog of the file to be split will be displayed Splitting Files 3 2 1 Splitting Files ...

Page 75: ...e file name is created automatically after splitting and also it enables input optionally 6Press the Split button The splitting of the file will complete and the file name designated in procedure 5 will be saved Playback Stop button The display will change whenever the button is pressed Split position Time axis Playback slider Shows the current playback position and split position 6 4 5 Input file...

Page 76: ...aker Notes USB audio function cannot be used with Windows 98 or Mac OS 9 x The USB audio function is available only with Windows 98SE and later versions or Mac OS10 1 5 and later versions of OS For Mac OS OS10 1 5 or later versions support the USB speaker function only Mac OS10 2 7 or later versions support the USB microphone function as well If you switch the recorder to Audio device the recorder...

Page 77: ...r Corporate or Workgroup Select when using MAPI Compliant services such as Microsoft Exchange Lotus Notes or Group Wise For details on the setting procedure see P 78 Sending Dictation Files Receiving Document Files DSS Player software can send dictation files to a third party by e mail or FTP Setting the E mail FTP Service E mail FTP service needs to be set to send receive files When using E mail ...

Page 78: ...ment Files Setting Connection for MAPI Compliant Service 1Click the start button of Windows OS select Settings then Control Panel The Control Panel appears 2Check whether the Mail or Mail and Fax icon is present in the Control Panel If the icon exists the MAPI subsystem has already been installed on your computer Go to the Activating Send Mail Function Create a Profile section in this manual P 82 ...

Page 79: ...ter installing Outlook 2000 start the program When the following window appears click the Next button 2Select Corporate or Workgroup and click the Next button 3A dialog box for setting up Microsoft Outlook appears This is the wizard for creating a profile For information on creating a profile check step 3 in the Activating Send Mail Function P 82 Sending Dictation Files Receiving Document Files ...

Page 80: ...4Select Add a new e mail account and click the Next button 5Select your e mail server type If you are going to use an MAPI compliant Workgroup system such as Lotus Notes or Novell GroupWise select Additional Server Types click the Next button to continue If you are going to use an internet standard E mail account select POP3 server click the Next button and skip to step 7 ...

Page 81: ...ee the following dialog box Enter the necessary information and click the More Settings button Sending Dictation Files Receiving Document Files Click the Connection tab in the following dialog box and make sure the appropriate connection method is selected 8After the setup is completed click the Tools menu select Options then click the E mail FTP tab Select the MAPI profile name you have created ...

Page 82: ...ou want to set up a dialup connection through an internet service provider select Internet E mail in the list If you want to set up to use a LAN within your company also select Internet E mail in the list Activating Send Mail Function Create a Profile The Profile is the group of information services to set up the Messaging application The information services allow you to access the Mailbox and th...

Page 83: ...nding function and check the check box 4Select the sending method Click the E mail button for selecting an E mail address Click the FTP button for selecting an FTP profile 5Click the Next button and follow the instructions on the screen 6When the wizard is complete it returns to the profile in the Option Setting dialog box Sending Dictation Files Receiving Document Files Please make sure that the ...

Page 84: ...nd BCC selections are optional Click the OK button to finish If the recipient information is not present in theAddress Book use the New Contact button to add new contact information to the Address Book Setting the FTP destination 1Click the FTP button The FTP destination dialog box appears 2Click the To button The FTP Profiles dialog box appears 3Select a profile from the list One profile can be s...

Page 85: ...of a document file to receive When using E mail to receive a document file the application software receives the attached file if it is in the registered file format When using FTP to receive a document file the application software receives the attached file stored in the folder of destination server if it is in the registered file format Any document file associated with a dictation file sent fr...

Page 86: ... the Send Receive files icon According to the profile set the application establishes a connection to the server and receives document files The received document files are saved to the Documents folder in the Dictation Tree View Clicking the Display Dictations Documents icon in the toolbar displays dictation files and document files at the same time By dragging and dropping a document file to a d...

Page 87: ... the certain interval for sending dictation files and or receiving document files 1From the Tools menu select Options then click the General tab in the Option dialog box 2Check Auto send receive and enter the time interval of automatic attempts of sending and receiving 3Set the auto sending function and the document file retrieve function according to the instructions on P 83 85 respectively Sendi...

Page 88: ...talled for the recorder to be recognized Example Copying Data from PC to Card Using Explorer or Finder 1Start Windows 2Connecting the recorder to your PC For connection procedure refer to Connecting to Your PC Using the USB Cable P 55 3Open Windows Explorer or Finder window The recorder will appear as a removable drive icon 4Copy data to card While the data are being written or copied the record p...

Page 89: ...Y ERROR MEMORY FULL FORMAT ERROR SYSTEM ERROR INSERT CARD CARD COVER IS OPEN Action Charge the battery or replace with new batteries P 13 15 Unlock the file P 39 Erase index marks that are no longer required P 40 Erase unnecessary files P 33 Erase unnecessary files P 33 Insert a compatible card Erase files that are no longer required or insert another card Reformat the card P 47 This is a malfunct...

Page 90: ...tom Nothing appears on the display Won t start Unable to record No playback tone heard Unable to erase Noise heard during playback Recording level too low Unable to set index marks Cannot find the recorded voice Cannot connect to PC Cannot connect to a PC using a cradle Action Verify polarity is correct P 13 14 Charge the battery or replace with new batteries P 13 15 Turn the recorder ON P 17 Turn...

Page 91: ...ice recognition software External microphone ME15 A lavalier omnidirectional microphone that clips to clothing Used to record your own voice or people near you Ni MH Rechargeable Battery Pack BR402 High efficiency rechargeable long life battery AC adapter A511 D 7AC Connect to the cradle to recharge the Ni MH battery pack Foot switch RS25 26 Connect to the serial or USB port of your PC for hands f...

Page 92: ...layback Approx 10 hours Speaker Built in ø28 mm round dynamic speaker MIC EAR jack ø3 5 mm mini jack impedance MIC 2 kΩ EAR 8 Ω or more Maximum working output 3 V DC 220 mW or more 8 Ω speaker Input power requirement Rated voltage 3 V Batteries Ni MH Rechargeable Battery Pack BR402 or Two AAA batteries LR03orR03 orTwoNi MH rechargeable batteries BR401 Specifications External dimensions 110 2 x 50 ...

Page 93: ...our DS 3300 we recommend that you contact your Olympus Professional Dealer that sold you the system If your dealer cannot fix your problem please call our technical hotline number or send an E mail For customers in the U S and Canada Phone 1 888 553 4448 E mail distec olympus com For customers in Europe E mail dss support olympus europa com Technical Assistance and Support Technical Assistance and...

Page 94: ...CE USE Canadian RFI This digital apparatus does not exceed the Class B limits for radio noise emissions from digital apparatus as set out in the Radio Interference Regulations of the Canadian Department of Communications Cet appareil numérique ne dépasse pas les limites de Catégorie B pour les émissions de bruit radio émanant d appareils numériques tel que prévu dans les Règlements sur l Interfére...

Reviews: