82
6.2 Removal of the lamp
CLV-190 INSTRUCTION MANUAL
Ch.6
CAUTION
• Handle the lamp carefully. Do not apply excessive force or scratch the examination
lamp. The glass surface may crack, the lamp life may shorten, or the light source
may be damaged due to the high pressure inside the lamp.
• When replacing the examination lamp, use a clean, lint-free cloth to wipe off
residual heat compound from the heat sink. If the heat compound is not wiped off
completely, the lamp’s heat efficiency will be impaired and the examination lamp life
will be shortened significantly.
• Be sure to reset the lamp usage indicator as described in Section 6.4, “Lamp usage
indicator reset” after replacing.
Otherwise, the incorrect total working hours of the examination lamp will be
indicated.
6.2
Removal of the lamp
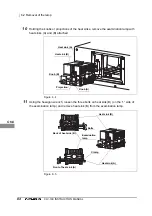
1
When the examination lamp is ON, press and hold the lamp button for about 1 second
to extinguish it.
2
Wait for a few minutes to allow the light source to cool the lamp chamber sufficiently.
NOTE
While the light source is ON and the examination lamp is extinguished, a fan built
into the light source cools the lamp chamber.
3
Turn the light source OFF.
4
Disconnect the power cord from the hospital-grade wall mains outlet.
Summary of Contents for EVIS EXERA III
Page 2: ......
Page 6: ...iv Contents CLV 190 INSTRUCTION MANUAL...
Page 20: ...14 Summary of the Equipment Functions CLV 190 INSTRUCTION MANUAL...
Page 22: ...16 1 1 Checking the package contents list CLV 190 INSTRUCTION MANUAL Ch 1...
Page 32: ...26 2 3 Rear and side panels CLV 190 INSTRUCTION MANUAL Ch 2...
Page 98: ...92 6 4 Lamp usage indicator reset CLV 190 INSTRUCTION MANUAL Ch 6...
Page 108: ...102 7 8 Transportation CLV 190 INSTRUCTION MANUAL Ch 7...

