TO PRINT A PHOTO FROM PORTABLE
MEMORY
•
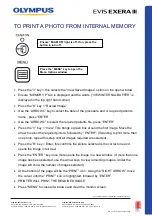
Ensure “EXAM ON” light is off. If on, press the button to turn off
•
Press the “3” key = this selects the “View Saved Images” option on the open window
•
Using the “DOWN ARROW” scroll down to highlight “MEMORY P” tab and press enter.
This changes the is displayed and the words (“VIEW PORTABLE IMAGES” is displayed
in the top right hand corner)
•
Press the “S” key = “Review Image”
•
Use the “ARROW’s” key to select the date of the procedure and or required patients
name , press “ENTER
•
Use the “ARROW’s” to select the required patients file, press “ENTER”
•
Press the “V” key = “View” This brings a green box around the first image. Move the
arrow to select the required picture, followed by “ENTER”. (If wanting to print more than
one photo, repeat this step until all images required are selected).
•
Press the “R” key = Enter, this confirms the picture selected is the correct one and
opens the image in full view.
•
Press the “ENTER” key once more opens the image in a new window. (If more than one
image has been selected, use the arrow keys to view remaining images. Under the
image will show the number of images selected)
•
At the bottom of the page will be the “PRINT” icon. Using the “RIGHT ARROW”, move
the cursor until the “PRINT” icon is highlighted, followed by “ENTER”.
•
PRINTER WILL PRINT THE REQUIRED IMAGE.
•
Press “MENU” to close all windows and clear the monitor screen.
Press the “MENU” key to open the
Menu Options window
QR 07.2
81
V1.0
November
2019
For
complete
product details see Instructions for Use.
OLYMPUS AU STRALIA PTY LTD
3 Acacia Place, Notting Hill VIC 3168, Australia
Customer Service: 1300 132 992 | www.olympusaustralia.com.au
OLYMPUS NEW ZEALAND LIMITED
28 Corinthian Drive, Albany, Auckland NZ 0632
Customer Service:
0508 659 6787
| www.olympus.co.
nz


