background image

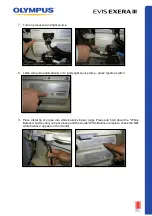
7.

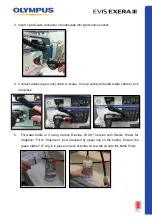
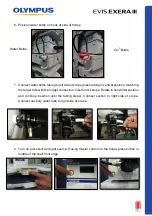
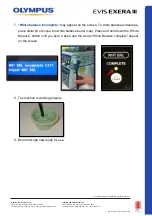
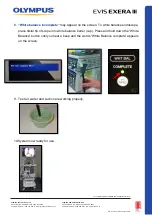
Turn on processor and light source.

8.

Lamp will ignite automatically or to ignite light source lamp - press ‘Ignition’ switch

9.

Place distal tip of scope into white balance barrel (cap). Press and hold down the “‘White
Balance” button until you hear a beep and the words “White Balance complete, check the NBI
white balance” appear on the monitor

Summary of Contents for EVIS EXERA III

Page 1: ...e selection Repeat the same process for SWITCH 2 SWITCH 3 and SWITCH 4 When all selections have been made press the ESC button twice A confirmation window opens and asks for confirmation of the settin...

Page 2: ...button top left hand corner of the keyboard to check the button settings Press this button again to clear the screen or press ESC button To change the user settings press the SHIFT Key and the ADD DAT...

Page 3: ...HE MEMORY DEVICE WILL BE CLEARED ARE YOU SURE Using the left arrow select the Y Yes button on the screen and press the ENTER key The Formatting commences PLEASE WAIT appears on the screen and the acce...

Page 4: ...AGE number then press the ENTER key Use the DOWN ARROW to select the number of images per page required then press ENTER Press the ESC on keyboard to close the window QR 07 281 V1 0 November 2019 For...

Page 5: ...nformation has been recorded After the last patient s information has been entered press the MENU key A confirmation window appears to confirm the information recorded Press the ENTER to confirm and t...

Page 6: ...mation Press the MENU key to close all windows To select the next Patient s information press the SHIFT Key and the CURSOR keys at the same time The PATIENTS DATA LIST will appear Use the DOWN ARROW t...

Page 7: ...cessor USB stick Use the DOWN ARROW until the CURSOR reaches COMMENTS if needed can type in procedure e g Gas or Colon Press the ADD DATA key on the top left hand side of the keyboard UNTIL all the pa...

Page 8: ...to confirm the selection Once all the required files have been selected for deletion and are highlighted press the R key ENTER function which appears on the bottom left hand side of the screen A windo...

Page 9: ...d opens the image in full view Press the ENTER key once more opens the image in a new window If more than one image has been selected use the arrow keys to view remaining images Under the image will s...

Page 10: ...equired are selected Press the R key Enter this confirms the picture selected is the correct one and opens the image in full view Press the ENTER key once more opens the image in a new window If more...

Page 11: ...irm selection followed by the R key ENTER bottom left hand side of the screen The images titles change color from BLACK to GREY The file stays there until it is over ridden by the next new file Ensure...

Page 12: ...the Yes Y button and press the Enter key The selected folder and images in it are transferred to the portable memory The file names on the internal memory of the transferred image files are grayed out...

Page 13: ...ith the 190 series endoscopes no cap is required for the one touch connector at the light guide end Cleaning is exactly the same 1 Immerse the entire endoscope in freshly prepared enzymatic solution 2...

Page 14: ...brush through the instrument channel until it emerges at the distal end Clean bristles and carefully pull back through channel and out of suction cylinder Repeat until bristles are clean 5 Insert cha...

Page 15: ...e universal cord with the channel brush 7 Brush the suction air water valve housing and biopsy instrument port with the short stubby brush using a rotating motion 8 Attach the Channel Cleaning Plug MH...

Page 16: ...extra injection tubes 10 For Auxiliary water channel flush with 90 mls of enzymatic solution this is found on the colonoscopes and gastroscopes If you have a colonoscope gastroscope with an auxiliary...

Page 17: ...act time has been reached flush the channels with 90mls of fresh water followed by 90mls of air through each channel 14 Disconnect Channel Cleaning Plug and injection tubing from the endoscope 15 Fina...

Page 18: ...faces of the endoscope Please refer to the manuals for recommendations on cleaning and brushing for bronchoscopes and duodenoscopes QR 07 281 V1 0 November 2019 For complete product details see Instru...

Page 19: ...have a water proof cap attached to it whereas with the 190 series endoscopes no cap is required for the one touch connector at the light guide end Cleaning is exactly the same 1 Immerse the entire end...

Page 20: ...brush through the instrument channel until it emerges at the distal end Clean bristles and carefully pull back through channel and out of suction cylinder Repeat until bristles are clean 5 Insert cha...

Page 21: ...he universal cord with the channel brush Brush the suction air water valve housing and biopsy instrument port with the short stubby brush using a rotating motion 7 Attach the Channel Cleaning Plug MH...

Page 22: ...ction tubes 9 If you have a colonoscope or gastroscope with an auxiliary water channel attach the corresponding cleaning tube Auxillary water tube MAJ 855 to the channel opening and inject 90ml of enz...

Page 23: ...lution and flush each channel with 90mls of enzymatic solution 13 Allow endoscope to soak for recommended time as per manufacturer s recommendation of contact by enzymatic solution to allow break down...

Page 24: ...to the manuals for recommendations on cleaning and brushing for bronchoscopes and duodenoscopes 16 Place the endoscopes in a yellow bio hazard bag this to prevent cross contamination Place this in th...

Page 25: ...r follow the instructions given in Transporting outside the hospital which can be found in the Olympus manual for the endoscope being returned reference Olympus operational manual For 180 series For e...

Page 26: ...on the bottle line with Water for Irrigation Ensure the green rubber O ring is in place on neck of bottle 2 Screw the lid MAJ 1025 lid firmly onto the water bottle MAJ 902 CO water bottle lid has an a...

Page 27: ...gas tube to water bottle the end with the white tag connects to the water bottle by turning it clockwise 4 Connect the instrument side connector of the gas tube to the CO gas outlet of the endoscopic...

Page 28: ...button turns green and gas supply indicator shows the amount of gas in the CO cylinder 7 When ready to use during procedure press the START STOP button to commence the flow of CO Turn OFF the air flo...

Page 29: ...is cleaned and sterilised along with the water bottle and lid as per instruction manual The red LED illuminates when the cylinder is empty EVIS EXERA II 180 series EVIS EXERA III 190 series QR 07 281...

Page 30: ..._____________________________________________________________ Short About 15 minutes _______________________________________________________________ OFF The Automatic stop function is turned off _____...

Page 31: ...alance cap present White balance button held for sufficient time to complete white balancing If endoscope has already been white balanced it may not be necessary to repeat Considerations brand new end...

Page 32: ...s the air water valve and then attach it again The air water valve is damaged Replace it with a new one The air water valve cannot be attached Incompatible air water valve is used Use a compatible air...

Page 33: ...e position detecting unit For the SIF Q180 Endoscope Single Use Splinting Tube Issue Cause Solution The balloon does not inflate deflate The air flow tube is connected incorrectly Connect it correctly...

Page 34: ...plugged in Check electrical connection The image is poor and yet I have correct colour Check video cable is correctly plugged in Check electrical connection Check white balance No image on screen Chec...

Page 35: ...ical contacts or shortage of light control contacts ensure endoscope is completely dry before inserting into connector socket Poor Airflow through light source Collection of dust in air intake located...

Page 36: ...rt to service centre after notifying Olympus Internal leak can occur in one or more of the following areas Biopsy channel suction channel air water channel suction cylinder air water cylinder Internal...

Page 37: ...p Bends and Crimps Cause Sink basin too small Cuts and Holes Cause Stacking endoscopes Reprocessing with sharp objects Vigorous cleaning of distal tip Poor packaging of endoscope in transport case Wha...

Page 38: ...sh Angulation Controls Brakes Stretched or Broken Cause Harsh manipulation with locks on What you can do Reprocess endoscopes with locks off Avoid harsh manipulation of insertion tube bending section...

Page 39: ...hat you can do Ensure the variable stiffness adjustment ring is in the O position each time after use and prior to cleaning and reprocessing Contact Olympus Australia QR 07 281 V1 0 November 2019 For...

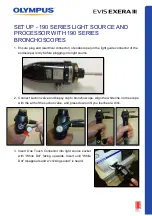
Page 40: ...nd electrical connector of endoscope on the light guide connector of the endoscope is dry before plugging into light source 2 Connect suction valve and biopsy cap to bronchoscope Align the white line...

Page 41: ...cable with the ridge facing upwards and the word UP visible Insert the connector until a click sound is heard 4 Insert Light Guide Connector into light source socket 5 Connect videoscope curly cable...

Page 42: ...lly or to ignite light lamp press and hold lamp Standby switch until it beeps Lamp turns on and green light next to ON illuminates 8 White Balance Incomplete may appear on the screen To white balance...

Page 43: ...omplete product details see Instructions for Use OLYMPUS AUSTRALIA PTY LTD 3 Acacia Place Notting Hill VIC 3168 Australia Customer Service 1300 132 992 www olympusaustralia com au OLYMPUS NEW ZEALAND...

Page 44: ...on the light guide connector of the endoscope is dry before plugging into light source Connect suction air water valves and biopsy cap to endoscope 2 Connect video Link curly cable to video processor...

Page 45: ...Line up yellow dots and rotate cable to lock into place 5 Fill water bottle or if using Carbon Dioxide fill CO2 Version with Sterile Water for Irrigation Fill to maximum level denoted by upper line o...

Page 46: ...arger hole with the longer connection Insert until it stops Rotate to horizontal position and continue insertion until the tubing stops Connect suction to right side of scope Connect auxiliary water t...

Page 47: ...turns on and green light next to ON illuminates 10 White Balance Incomplete may appear on the screen To white balance endoscope place distal tip of scope into white balance barrel cap Press and hold...

Page 48: ...For complete product details see Instructions for Use OLYMPUS AUSTRALIA PTY LTD 3 Acacia Place Notting Hill VIC 3168 Australia Customer Service 1300 132 992 www olympusaustralia com au OLYMPUS NEW ZE...

Page 49: ...ndoscope is dry before plugging into light source 2 Connect suction valve and biopsy cap to bronchoscope Align the white line on the scope with the arm of the suction valve and press down until you fe...

Page 50: ...f using master control on the trolley press button in middle of top shelf front edge or turn on at video processor and light source 6 Lamp will ignite automatically or to ignite light lamp press and h...

Page 51: ...omplete appear on the screen 8 Test suction is working properly 9 Bronchoscope now ready for use QR 07 281 V1 0 November 2019 For complete product details see Instructions for Use OLYMPUS AUSTRALIA PT...

Page 52: ...ctor electrical components gold finger marks are dry before inserting into light source Connect suction air water valves and biopsy cap to endoscope 2 Insert One Touch Connector into light source sock...

Page 53: ...O2 Version with Sterile Water for Irrigation Fill to maximum level denoted by upper line on the bottle Ensure the green rubber O ring is in place on neck of bottle Screw the lid onto the bottle firmly...

Page 54: ...insertion until the tubing stops Connect suction to right side of scope Connect auxiliary water tube to right side of scope 6 Turn on processor and light source If using master control on the trolley...

Page 55: ...e appears on the screen 9 Test air water and suction are working properly 10 System now ready for use QR 07 281 V1 0 November 2019 For complete product details see Instructions for Use OLYMPUS AUSTRAL...

Page 56: ...scope on the light guide connector of the endoscope is dry before plugging into light source Connect suction air water valves and biopsy cap to endoscope 2 Insert scope into light source socket 3 Conn...

Page 57: ...ine on the bottle Ensure the green rubber O ring is in place on neck of bottle Screw the lid onto the bottle firmly 5 Position water bottle on hook at side of trolley 6 Connect water bottle to scope C...

Page 58: ...ly or to ignite light source lamp press Ignition switch 9 Place distal tip of scope into white balance barrel cap Press and hold down the White Balance button until you hear a beep and the words White...

Page 59: ...ear on the monitor 11 Test air water and suction are working properly 12 System now ready for use QR 07 281 V1 0 November 2019 For complete product details see Instructions for Use OLYMPUS AUSTRALIA P...

Page 60: ...er under fluid 4 During Leakage Test If continuous bubbling at the connection of the leakage tester MB 155 to the endoscope is noted this indicates a leak Either the leakage tester or the endoscope co...

Page 61: ...flickering image distortion and the display of error messages Lint attached to the electrical contact The One touch Connector Use lint free gauze e g medical lint free gauze for reprocessing the endos...

Page 62: ...e output socket or other problems may cause abnormal images Please contact Olympus for further troubleshooting assistance Normal condition inside the output socket Accumulated lint inside the output s...

Reviews: