background image

E-12

Display unit

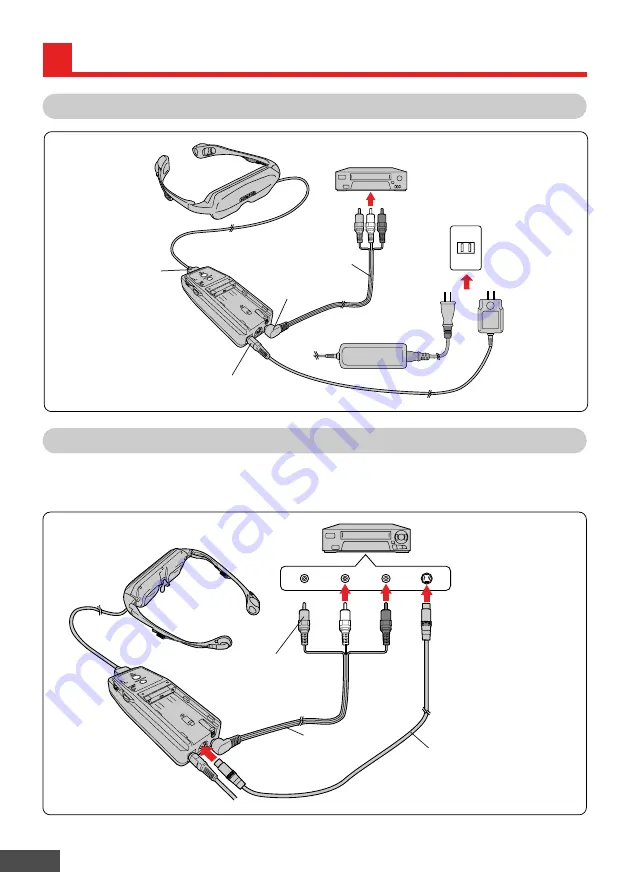
Basic Connections

Control unit

To audio/video
input jack

To AC adapter (DC IN) connector

AC adapter

To audio/video output jacks

Video component such as a VCR,
LD player, DVD player, etc.

AV cable
(provided)

To display unit connector

CONNECTIONS (continued)

Power outlet

Connections Using S-Video Jack

If the connected video component has an S-video output jack, clearer video can be viewed by
connecting it through an S-video cable. When the S-video jack and video jack (pin jack) are
simultaneously connected, the S-video input has priority.

S-video cable (optional)

To audio/S-video output
jacks (pin jacks)

Audio
Right
(Red)

Audio
Left
(White)

S-video

Video component such as a VCR,
LD player, DVD player, etc.

To S-video input jack

AV cable (provided)

Video (Yellow)
* Does not need to

be connected.

When the video component has more than one type of output jack, it can be connected with more
than one Eye-Trek unit.

or

Summary of Contents for Eye-Trek FMD-150W-US

Page 1: ...Thank you very much for purchasing an OLYMPUS product Please keep this manual handy for future use FMD 150W US INSTRUCTION MANUAL ENGLISH...

Page 2: ...n or blue point may be observed but this is not a malfunction More than 99 99 of this product s effective pixels are guaranteed A vague striped pattern may appear depending on the type of image displa...

Page 3: ...e image clearly or who wears glasses that make it hard to see the whole screen clearly or who has an eye movement disorder or visual field disorder Under those conditions using this product for a long...

Page 4: ...when you are subject to strong vibrations such as in a car on a bumpy road This may cause dizziness nausea headaches or motion sickness Do not use this product continuously for long periods Continuou...

Page 5: ...as in the rain snow fog or a steamy bathroom Do not use it if it has condensation inside or if your hands are wet Do not use it near flammable gas liquid or vapor Do not expose it to very dusty envir...

Page 6: ...ong periods Doing so may cause the product to be deformed by heat resulting in a malfunction and an electric shock hazard Note the following points when plugging the AC adapter into a power outlet Whe...

Page 7: ...enclosure that may be of sufficient magnitude to constitute a risk of electric shock to persons The exclamation point within an equilateral triangle is intended to alert the user to the presence of i...

Page 8: ...This product may be equipped with a polarized alternating current line plug a plug having one blade wider than the other This plug will fit into the power outlet only one way This is a safety feature...

Page 9: ...nterference Causing Equipment Regulations Damage Requiring Service Unplug this product from the wall outlet and refer servicing to qualified service personnel under the following conditions a When the...

Page 10: ...switch POWER switch Power indicator Green Display unit connector Jog dial VOLume control AC adapter connector DC IN S video input jack Audio video input jack Battery pack holder Battery unloading swi...

Page 11: ...isplay cable pull it out by pressing the disconnect buttons on both sides of the connection plug simultaneously ME NU OK DISPLAYM OD E PO WER VO L PU SH Video component such as a VCR LD player DVD pla...

Page 12: ...deo output jack clearer video can be viewed by connecting it through an S video cable When the S video jack and video jack pin jack are simultaneously connected the S video input has priority S video...

Page 13: ...dio Left White Video Yellow To audio video output jack Plug adapters If the connected video component uses a mini jack and cannot be directly connected with the AV cable use plug adapters Audio Right...

Page 14: ...message LOW BATTERY AUTOMATIC POWER OFF appears on the screen and the power turns off automatically You cannot charge the battery pack using the control unit of this product Use the optional battery...

Page 15: ...adphone from each inner headphone holder by turning the headphone as shown in the figure First minimize the volume level by turning the VOLume control fully clockwise When attaching the inner headphon...

Page 16: ...ed without removing the inner headphones from your ears the inner headphone cords will be pulled excessively and may be disconnected Product Care To clean the display unit and control unit wipe with a...

Page 17: ...select OK The screen remains black until a video signal is input If no signal is present check the power and connection to the video component The mark appears next to the selected language The langu...

Page 18: ...he warning on the screen 2 When the password entry screen appears rotate the jog dial to select each number and press the jog dial to select OK The password is entered The password is set to when this...

Page 19: ...ears rotate the jog dial to select each number and press the jog dial to select OK When the wrong password is entered If you enter the wrong password the password entry screen appears again after INCO...

Page 20: ...d the contrast adjustment level is displayed on the screen 2 Rotate the jog dial to adjust the contrast 3 Press the jog dial to return the screen to the normal view 5 When you are finished When you ar...

Page 21: ...INEMA ZOOM WIDE ZOOM NORMAL Standard image with an aspect ratio of 4 3 Black bands are inserted at the right and left of the screen WIDE Wide screen with the top and bottom unchanged but the right and...

Page 22: ...pose of making a profit or letting the public use it and if the image is either compressed or enlarged using one of the display modes WIDE ZOOM CINEMA ZOOM it may be in violation of copyright law 3 0...

Page 23: ...nd press it to select OK The menu disappears from the screen when EXIT is selected and the adjustment is complete On Screen Display 2 Select any item from the VIDEO MENU 1 Rotate the jog dial to selec...

Page 24: ...video image Rotate the jog dial to adjust the tint to the desired level and press it to select OK 1 The higher the number the greener the image 2 The lower the number the redder the image COLOR Adjus...

Page 25: ...adjustment is complete then press it 3 The VIDEO MENU screen reappears 5 BRIGHTNESS Adjusts the brightness of the entire screen Select this mainly to enhance the blackness of the image 5 WHITE BALANC...

Page 26: ...display the MENU screen 2 Rotate the jog dial to select AUDIO SETTINGS and press it to select OK Select EXIT to return to complete the adjustment On Screen Display SURROUND Adds a more live atmospher...

Page 27: ...GS You can register 2 sets of audio video and display mode settings 1 Select SAVE LOAD in the MENU screen After adjusting the audio video settings and selecting the display mode rotate the jog dial to...

Page 28: ...ELING THE PASSWORD 1 Register change or cancel the password 1 Press the POWER switch for more than 5 seconds 2 The power will be turned off once the POWER switch is released When the power is turned o...

Page 29: ...jack 4 pole mini jack 3 5 mm dia Video 1 Vp p 75 unbalanced Audio 200 mVrms 20 k S video input jack 4 pin mini DIN connector Ambient Temperatures Operation 5 to 35 C Storage 10 to 60 C Dimensions Dis...

Page 30: ...t colored dots may be observed observed on the This is not a malfunction screen A striped pattern is This is due to the built in optical filter which smoothes the P 2 observed with the image and is no...

Page 31: ...OLYMPUS AMERICA INC Two Corporate Center Drive Melville NY 11747 3157 U S A Tel 516 844 5000 Printed in Japan TF5401 1...

Reviews: