APPLIED OPERATIONS
/Viewing 3D Image
OPERATION INSTRUCTIONS
2 - 3 0 5
Page
2-9 Viewing 3D Image
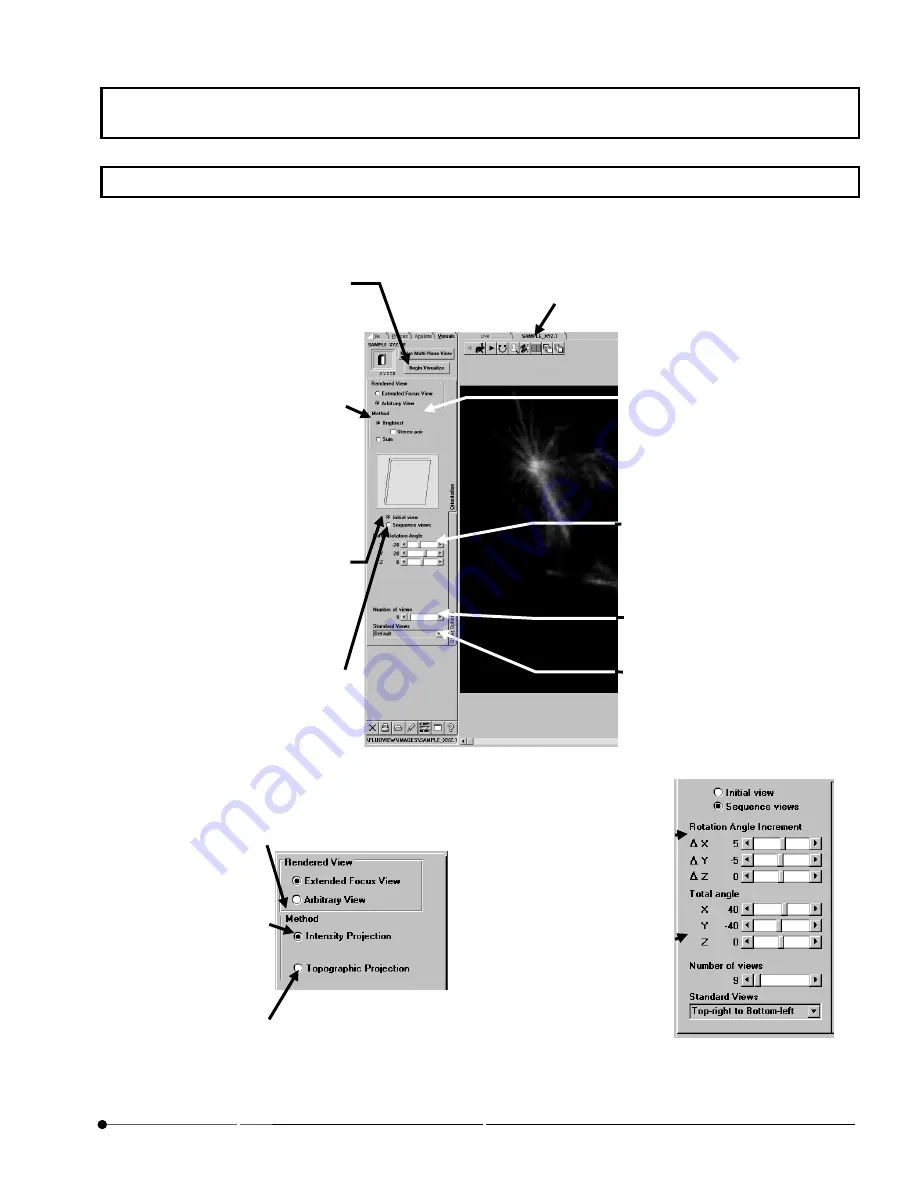
Use the [Visualize] panel to view an image three-dimensionally.
First display the [Visualize] panel.
Fig. 2-125 [Visualize] Panel and [orientation] Sub-panel
Fig 2-123 when [Extended
Focus View] option button is
selected
Fig 2-124 when [Sequence
Views] option button is
selected
[Begin Visualize] button
Starts building the images for 3D
display.
[Initial view] option button
Sets the angle at which the rotation
should start. The angle itself can be
set using the [Initial Rotation Angle]
scale immediately below the option
button.
[Sequence views] option button
It is selected to determine per what
degree the view should be rotated.
The [Rotation Angle Increment] scale
and the [Total angle] scale appear as
shown in lower right figure and each
angle factor can be set.
[Method] group box
(Explanation when the [Arbitrary
View] option button is selected)
[Brightest] option button
Builds the image by accumulating
the intensity value.
[Stereo Pair] check box
To be checked when building a pair
of stereo 3D images or a 3D image
to be viewed through color
(red/green) eyeglasses.
[Sum] option button
Builds the image by adding the
[Rendered View] group box
[Extended Focus View]
option button
Checking this option button
changes the check box in the
[Method] group as shown in the
lower left figure.
[Arbitrary View] option button
Builds the image for 3D display.
[Number of views] scale
Sets the number of views displayed
during rotation.
[Initial Rotation Angle] Scale
This appears when [Initial View] option
button is selected. Angle can be set.
[Rotation Angle Increment]
scale
Set the angles
image window
Shows the image. The file name of the image is
shown in the page tab of the panel.
[Standard Views] drop-down list
Selects the rotation direction. It is
possible to set an arbitrary direction.
[Method] Group Box
When [Extended Focus View]
option button is selected,
[Method] group box will
change as shown in figure.
[Intensity Projection]
Option Button
Builds an image that focused
on each cross section as
shown in Fig. 2-126.
[Topographic Projection]
Option Button
Builds an image that indicates
which cross section the focal
point is located as shown in
Fig. 2-127.
[Rotation Angle Increment]
Scale
Set an angle increment
for the view rotation.
[Total angle] Scale
Set the total angle from
1st view to the last one.


