background image

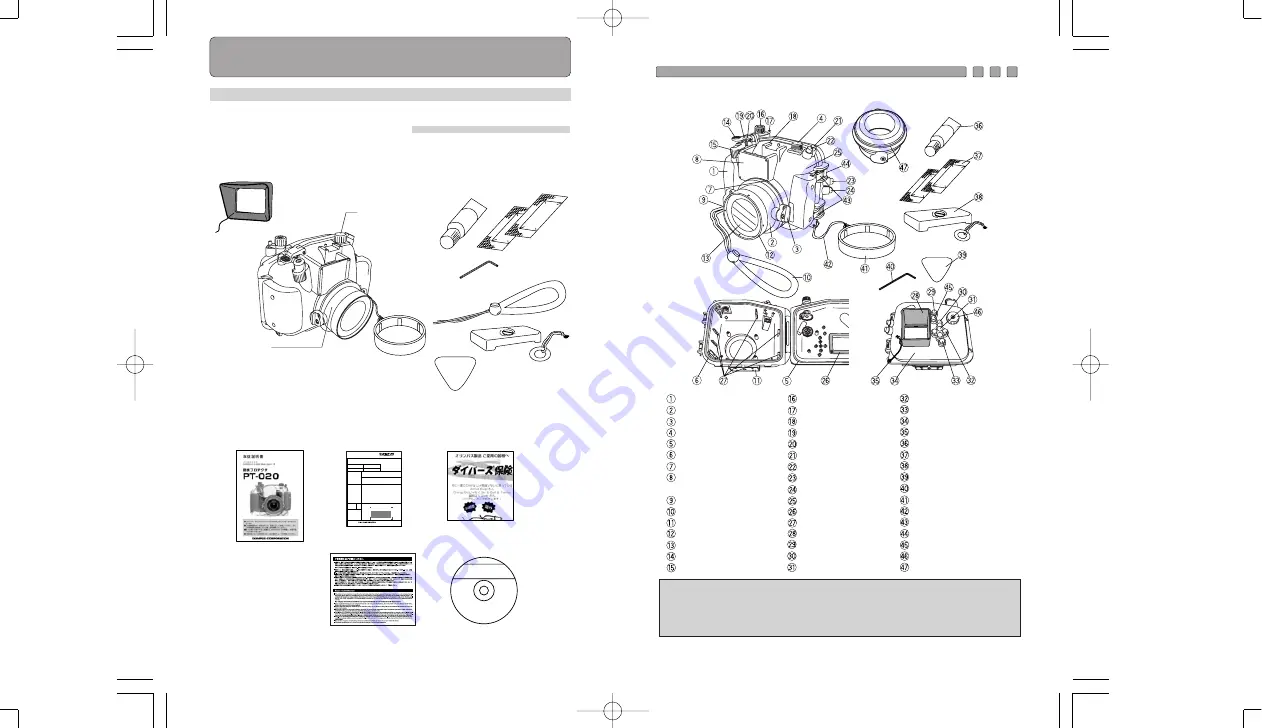
Cross button

Card select button
Rear lid
LCD hood strap
Grease for O-rings (White-cap tube)
Silica gel
Balance weight
Pick for removing O-rings
Buckle opener
Lens cap
Lens cap strap
Buckle open/close lever
Buckle hook

Quick View button

Control dial knob
O-ring for the standard port section (POL-101)

Palm grip
Standard port (PPO-01)
Port lock buckles
TTL cable connector
O-ring (POL-020A)
O-ring (POL-020B)
O-ring (POL-020C)
Diffuser plate and diffuser 
plate cover
Carrying strap ring
Carrying strap
Tripod socket
Lens ring
Lend window

Shutter release lever

Zoom lever

Mode dial knob

Power switch lever
Accessory mount

Custom button

Self-timer button

Metering button

AF/Macro/MF button

Exposure correction button

Flash mode button
Front lid
LCD inner hood
Mounting strap guide rails
LCD hood

AEL/Erase button

LCD monitor button

OK/Menu button

E-10

E-9

Names of the parts

Note

The Case operation parts marked by

❈ 

corresponds to the operation parts

of the digital camera. When the operation parts of the Case are operated,
the corresponding functions of the digital camera will operate. For details of
the functions, refer to the instruction manual for the digital camera. 

1. Preparations

Check the contents of the package.

Check that all accessories are in the box.
Contact your dealer if accessories should be missing or damaged.

Balance weight

Case body

LCD hood

(on the body)

(Check that the O-ring is normal.)

Hand strap

Silicone grease

Waterproof cap for  

the TTL cable 

connector

Silica gel

Buckle opener

Lenscap

Pick for O-ring removal

LCD hood
strap

Standard port
(Attached to the main body)

保 証 書

WARRANTY

本保証書は、本記載内容で無料修理を行うことをお約束するものです。
お買い上げの日から下記期間中、万一故障が発生した場合は、本契約書を添付ご持参の上
お買い上げ販売店、または当社サービスステーションにご依頼ください。

本保証書は日本において有効です。
This is a limited warranty for
1 year from your date of
purchase. Useful only in 
Japan.

期  間

お買上げ

本体1年間

年  月  日

お客様

Customer

販売店

Dealer's

name and

address

住所 Address

氏名 Name      性別(男・女)、年齢(  才)


            TEL    (    )

〔必ず店名印を押してください。〕

JAPAN

品名

防水・防塵
プロテクタ

型名

Model

Serial NO.

保証責任者
保証履行者
〒192-0032 東京都八王子市石川町2951

お問い合せ先/サービスステーション

       03(3292)1931        

(販売店控え)

CDーROM

Instruction manual

(this manual)

Warranty card

Diver's insurance guide

Please read before use.

Information disc

 PT̲020JE̲E-四.qxd    2003.11.27  17:07    ページ E-9 (1,1)

Summary of Contents for PT-020

Page 1: ...his instruction manual carefully and use the product safely and correctly Please keep this instruction manual for reference after reading it Wrong use may cause damage to the camera on the inside from water leakage and repair may not be possible Before use perform an advance check as described in this manual PT 020JE E 四 qxd 2003 11 27 17 07 ページ 1 1 1 ...

Page 2: ... this indication can be assumed WARNING CAUTION 1 Keep this product out of the reach of babies infants and children There is the possibility of occurrence of the following types of accidents Injury by dropping onto the body from a height Injury from parts of the body getting caught in parts which open and close Swallowing of small parts Please consult a physician immediately if any parts have been...

Page 3: ...d and the waterproof function may be lost Pay sufficient attention to temperature control Also do not place heavy objects onto the product during storage or transport and avoid unreasonable storage 8 When the O ring contact surface is pressed strongly from the Examples for foreign matter sticking to the O ring Hair Fibers Grains of sand Batteries Use an exclusive lithium ion battery Olympus BLM 1 ...

Page 4: ... sunlight in a closed vehicle etc and or where extreme differences in temperatures exist Places where there is a lot of dust Places where there are open fires Places subject to vibrations Places where volatile chemicals are stored or used Water deeper than 40 meters This product is made of polycarbonate resin with excellent impact resistance but it may be damaged by scraping against rocks etc It a...

Page 5: ... 39 Disclaimer E 1 Please read the following before using the product E 1 For safe use E 1 Batteries E 3 For Prevention of Water Leakage Accidents E 4 Handling the Product E 5 Contents E 7 8 1 Preparations E 9 Check the contents of the package E 9 Names of the parts E 10 Install the strap E 11 Master the basic operation E 11 Holding the Case E 11 How to Press the Shutter E 12 How to Use the Mode D...

Page 6: ...e are operated the corresponding functions of the digital camera will operate For details of the functions refer to the instruction manual for the digital camera 1 Preparations Check the contents of the package Check that all accessories are in the box Contact your dealer if accessories should be missing or damaged Balance weight Case body LCD hood on the body Check that the O ring is normal Hand ...

Page 7: ...dvice Please confirm that the mode dial knob has been set securely to the mode dial of the digital camera If the mode of the digital camera does not change when the mode dial knob is operated turn the dial while pushing it lightly Do not exert excessive force onto the lens window or the lens ring Take care not to put your fingers etc over the lens window and the flash diffuser Note Check your imag...

Page 8: ...dard port is attached improperly to the case water penetration may result Also make sure that the buckles on the left and right of the standard port are clamped firmly CAUTION Removing 1 First make sure that the case is dry and then turn each buckle slowly in the opening direction counterclockwise 2 When the two buckles have been turned by about 110 degrees the standard port begins to separate fro...

Page 9: ... optional PFL 01 s instruction manual for detailed instructions on using the TTL cable and hot shoe cable Removing the TLL cable connector cap TTL flash shooting by combining this case PT 020 and the case for FL 20 flash optional PFL 01 How to attach the TTL cable connector cap to the case Make sure there is no foreign matter attached to the O rings inside the cap and on the TTL cable connector At...

Page 10: ...ched firmly and that the cap is fitted tightly to the connector Advance Test 1 Before installing the digital camera in the Case immerse the empty Case to the intended water depth to confirm that there is no water leakage 2 Main causes of water leakage are as follows The O ring has not been installed A part of the O ring or the entire O ring is outside the specified groove O ring damage cracks dete...

Page 11: ...Remaining Number of Pictures to be Taken Confirm that the image storage has a sufficient remaining number of pictures to be taken Removing the carrying strap and lens cap from the digital camera If the digital camera has a carrying strap and lens cap attached be sure to remove them before inserting the digital camera into the case Note To make sure you aren t prevented from shooting because the ba...

Page 12: ... side to the inside Insert the silica gel all the way at the specified location and with the specified orientation When the orientation is not correct the silica gel bag will be caught when the Case is sealed and water leakage will be caused Attempting to seal the Case with the bag inserted only part of the way will cause the silica gel bag to get caught by the O ring and water leakage will occur ...

Page 13: ...connection between the port and case to make sure the O rings are not twisted that they sit properly in the grooves and that no foreign matter has been caught between the two parts Fit the lens cap onto the lens ring as shown in the figure Be sure to remove the lens cap before shooting Mounting and Removing the Lens Cap Hairs fibers and other narrow items are not very apparent but they may cause e...

Page 14: ... three seconds In case of trouble with the O ring three seconds are enough for water to enter Are there air bubbles coming out between the lids Please check carefully 3 Check that no water has entered into the Case Remove the Case from the water and check that no water has accumulated at the bottom of the Case Is there any water trickling down 4 Next immerse the Case for 30 seconds Check carefully...

Page 15: ...efully wipe away any moisture from the hinge between the front and rear lids the shutter release lever the handgrip and the buckles Water left between the front and rear lids or between the case and port can get inside the case once it is opened or the port is detached Please dry these areas carefully When opening the case or removing the port make sure no water from outside e g drops from your ha...

Page 16: ...se with pure water After use seal the Case again after taking out the camera and wash it sufficiently in pure water as soon as possible After use in sea water it is effective to immerse it for a fixed time in pure water to remove any salt Water leakage may be caused when a high water pressure is applied locally Before washing the Case with water remove the digital camera from it Operate the shutte...

Page 17: ... O ring and fit the O ring into the groove At this time confirm that the O ring does not stick out from the groove When a mechanical pencil or a similar other sharp object is used to remove the O ring or to clean the inside of the O ring groove the Case and the O ring may be damaged and water leakage may be caused When the O ring is checked with the fingertips take care not to stretch the O ring N...

Page 18: ...a dry cloth without any salt on it to wipe off any moisture and dry the Case in the shade Do not use hot air from a hair 7 Appendix Q A on the use of the PT 020 Q1 Which digital cameras can be used with this case A1 This case is designed exclusively for use with the CAMEDIA C 5060 Wide Zoom Q2 What points should be observed when inserting the digital camera into the case A2 When inserting the digi...

Page 19: ... metal parts The metal parts are made of aluminum brass or stainless steel Cleaning with pure water is sufficient drier or the like and do not dry the Case under direct sunlight Exposure to high temperatures or direct sunlight may cause deformation discoloration or breakage of the Case and deterioration of the O ring Wipe the inside of the Case with a soft cloth not causing any fibers Remove the O...

Page 20: ... adhesive for repairs or other purposes When repair is required please contact a service station of our company or your dealer Q11 Please tell me about repairs A11 Please contact a service station of our company or your dealer if repair should be necessary Do not try to repair disassemble or modify the Case yourself Repair disassembly or modification by you or third parties not authorized by Olymp...

Page 21: ...eel Grip shutter release lever zoom lever mode dial knob jog dial Red polycarbonate Lens window FL reinforced glass Lens ring Aluminum Buttons Nickel plated brass O rings lens cap Silicone rubber LCD hood NBR rubber Width 165 mm x height 143 mm x thickness 127 mm projections not included Weight 810 g LCD hood not included Diver s Insurance Guide We recommend to subscribe to diver s insurance for w...

Reviews: