background image

1

Setup

10

EN

Setup

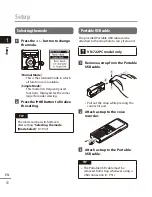
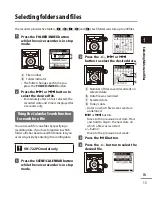
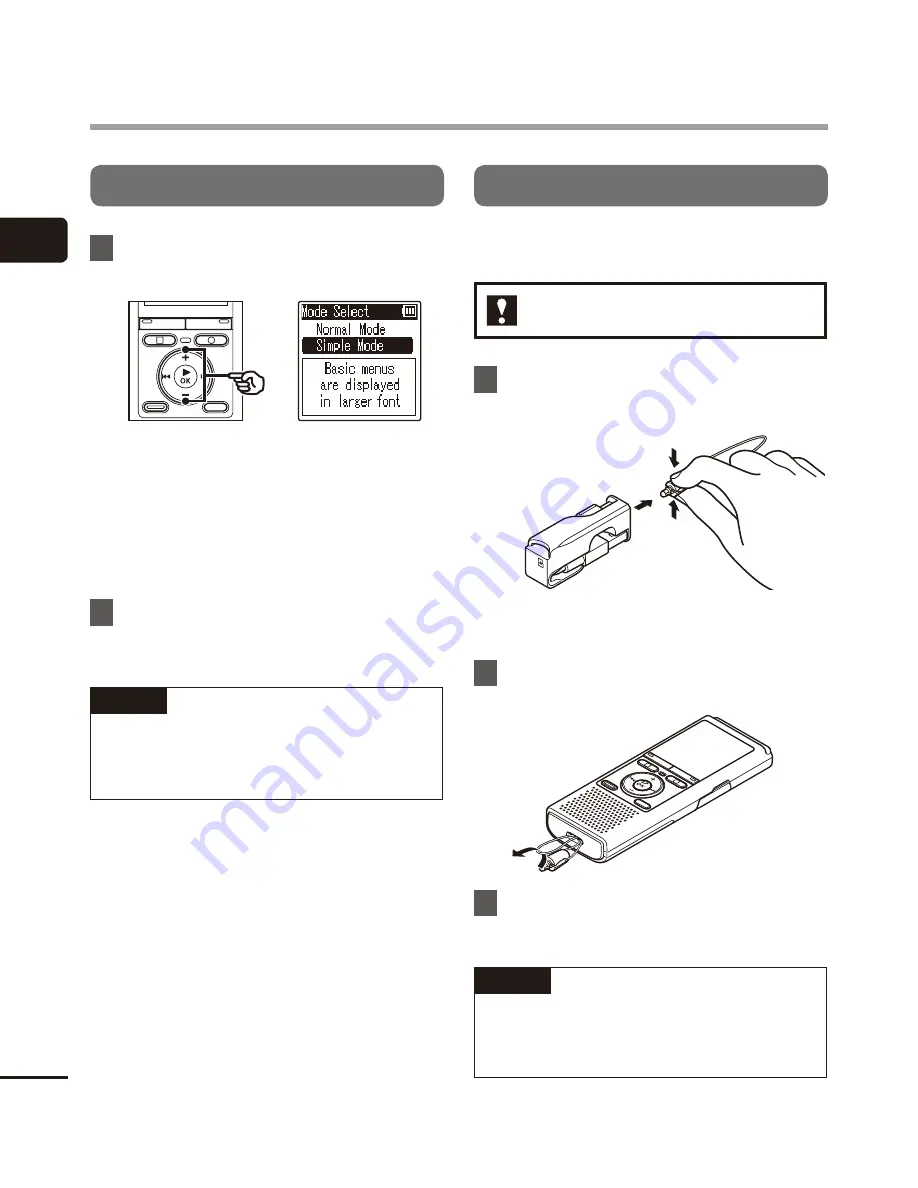
Selecting the mode


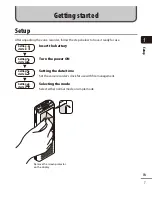
1

 Press 

the 

+

/

  button to change 

the mode.

[

Normal Mode

]:

This is the standard mode in which 
all functions are available.

[

Simple Mode

]:

This mode lists frequently used 
functions. Displayed text becomes 
larger for easier viewing.


2


Press 

the 

`

OK

 button to finalize 

the setting.

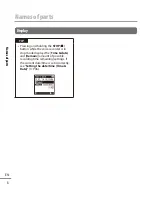
 TIP

The mode can be switched even 
after setting. “

Selecting the mode 

[Mode Select]

” (


P.47)

Portable USB cable

The provided Portable USB cable can be 
attached to the strap hole to carry it around.

VN-722PC model only


1

  Remove a strap from the Portable 

USB cable.

1

2

1

• 

Pull out the strap while pressing the 
connector part. 


2

  Attach a strap to the voice 

recorder.


3

  Attach a strap to the Portable 

USB cable.

 TIP

• 

The Portable USB cable must be 
removed from strap whenever using a 
USB connection (

 P.51).

Summary of Contents for VN-721PC

Page 1: ...ympus digital voice recorder Please read these instructions for information about using the product correctly and safely Keep the instructions handy for future reference To ensure successful recording...

Page 2: ...yback 24 Basicplaybackprocedure 24 Playbackthroughtheearphones 25 Fast forwarding 25 Rewinding 26 Skippingtothebeginningofafile 26 Changingtheplaybackspeed 29 A Brepeatplayback 30 Indexmarks tempmarks...

Page 3: ...tion disconnection 51 ConnectingthevoicerecordertoaPC 51 DisconnectingthevoicerecorderfromaPC 52 LoadingafiletoaPC 53 6 Other information Alarmmessagelist 54 Troubleshooting 55 Accessories optional 56...

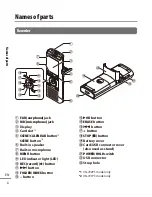
Page 4: ...2 6 Built in speaker 7 Built in microphone 8 MENU button 9 LED indicator light LED 0 REC record s button 9 button FOLDER INDEX button button OK button ERASE button 0 button button STOP 4 button Batter...

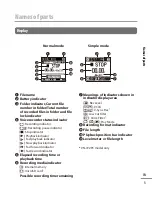
Page 5: ...dicator Stop indicator Playback indicator Fast playback indicator Slow playback indicator Fast forward indicator Fast rewind indicator 5 Elapsed recording time or playback time 6 Recording media indic...

Page 6: ...essing and holding the STOP 4 button while the voice recorder is in stop mode displays the Time date and Remain amount of possible recording time remaining settings If the current date time is set inc...

Page 7: ...started 1 3 Insert the battery Getting started 2 3 Turn the power ON Getting started 3 3 Setting the date time Set the voice recorder s clock for use with file management Getting started 4 Selecting...

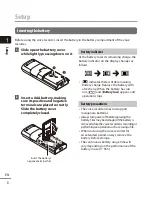
Page 8: ...icator on the display changes as follows indicates there is little remaining battery charge Replace the battery with a fresh one When the battery has run out and Battery low appear and operation stops...

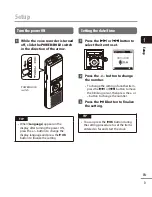
Page 9: ...nguage and press the OK button to finalize the setting Setting the date time 1 Press the 9 or 0 button to select the item to set 2 Press the button to change the number To change the setting of anothe...

Page 10: ...setting TIP The mode can be switched even after setting Selecting the mode Mode Select P 47 Portable USB cable The provided Portable USB cable can be attached to the strap hole to carry it around VN 7...

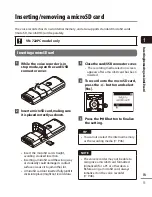
Page 11: ...mage its contact surface or cause it to jam in the slot A microSD card not inserted fully until it clicks into place might not record data 3 Closethecard USBconnectorcover The recording media selectio...

Page 12: ...with the voice recorder and not be recognized properly For microSD card compatibility under Olympus verification please contact our customer support at http www olympusamerica com Note that our custo...

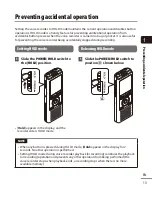
Page 13: ...1 Slide the POWER HOLD switch to the HOLD position Hold appears in the display and the recorder enters HOLD mode Releasing HOLD mode 1 Slide the POWER HOLD switch to position A shown below NOTE When...

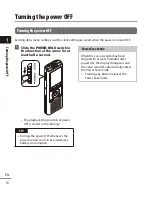
Page 14: ...second The playback stop position at power OFF is stored in the memory TIP Turning the power OFF whenever the voice recorder is not in use minimizes battery consumption Power Save mode When the voice...

Page 15: ...s by specifying a recording date If you have forgotten in which folder a file has been saved this feature lets you access it quickly by entering its recording date VN 722PC model only 1 Press the SCEN...

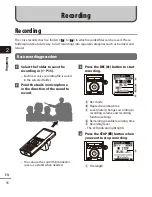
Page 16: ...ile is saved in the selected folder 2 Point the built in microphone in the direction of the sound to record You can use the card USB connector cover as a stand when needed 3 Press the REC s button to...

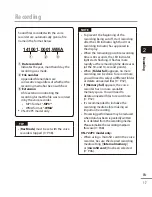
Page 17: ...in the display When the remaining possible recording time is 60 seconds the LED indicator light starts flashing It flashes more rapidly as the remaining time decreases at the 30 and 10 second points W...

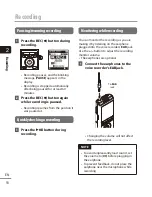
Page 18: ...ecording 1 Press the OK button during recording Monitoring while recording You can monitor the recording as you are making it by listening on the earphone plugged into the voice recorder s EAR jack Us...

Page 19: ...Reduces humming sounds from equipment such as air conditioners or projectors VCVA P 39 Sets the trigger level for voice activated recording VCVA V Sync Rec P 40 Sets the trigger level for voice synchr...

Page 20: ...ne microphone Telephone pickup TP8 set Rec Scene to Telephone Rec This allows you to record conversations on mobile and landline telephones clearly P 23 See Accessories optional P 56 for the compatibl...

Page 21: ...Duplication Auto Divide Files are automatically divided into each song when recording Duplication Timer Recording is saved to one file and stops when the previously set time has been reached 3 Press...

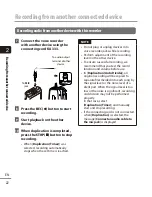
Page 22: ...ed NOTE Do not plug or unplug devices into voice recorder jacks while recording Perform adjustment of the recording level on the other device To ensure successful recording we recommend that you test...

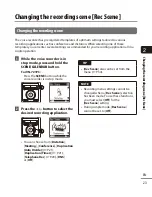
Page 23: ...ss and hold the SCENE CALENDAR button For VN 721PC Press the SCENE button while the voice recorder is in stop mode 2 Press the button to select the desired recording application You can choose from Di...

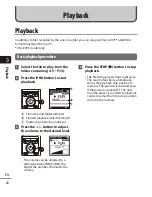
Page 24: ...ck time File length c Playback position bar indicator 3 Press the button to adjust the volume to the desired level The volume can be adjusted to a setting between 00 to 30 The higher the number the lo...

Page 25: ...h the earphones It may cause hearing damage or loss Fast forwarding Fast forwarding while the voice recorder is in stop mode 1 With the voice recorder stopped press and hold the 9 button Fast forwardi...

Page 26: ...g stops at the mark P 31 Rewinding stops when the beginning of the file is reached Press and hold the 0 button again to rewind from the end of the previous file Skipping to the beginning of a file Ski...

Page 27: ...file transferred to the voice recorder is unplayable check that its sampling rate and bit rate values are within the supported ranges The sampling rate and bit rate combinations supported for music fi...

Page 28: ...applications and tastes Voice Filter P 42 Cuts low and high frequency components emphasizing voices for greater clarity Play Mode P 42 Selecting from among three playback modes Skip Space P 43 A hand...

Page 29: ...on TIP When changing the playback speed playback operations such as stopping playback skipping to the beginning of a file and writing index marks temp marks are the same as during standard playback NO...

Page 30: ...the file is treated as the segment end position and repeat playback starts 3 Press the REC s button again when playback reaches the desired end position for A B repeat playback Segment A B is set and...

Page 31: ...orary markings They are automatically erased when you select a different file transfer the file to a PC or move the file on a PC You can write up to 99 index marks temp marks in a single file The mess...

Page 32: ...er returns to the stop mode if no operation is performed for 8 seconds 3 Press the button to select All in folder or One file All in folder Erases all the files saved in the same folder as the selecte...

Page 33: ...ished Erasing processes can take over 10 seconds to complete To prevent the risk of damage to data never attempt to perform any of the following processes before an erasing process has finished 1Remov...

Page 34: ...s in stop mode press the MENU button Go to Step 2 when in normal mode and go to Step 4 when in simple mode TIP Some menus contain items that can be set during recording playback P 36 2 Press the butto...

Page 35: ...ng the 0 button instead of the OK button 8 Press the STOP 4 button to exit the menu screen When the menu screen is displayed during recording or playback press the MENU button to return to the previou...

Page 36: ...at can be set during Playback Normal mode only Normal mode Simple mode Rec Level Low Cut Filter VCVA LED Property Voice Filter Play Mode Skip Space LED Skip Space VN 722PC model only Menu items that c...

Page 37: ...name_1 and the second half File name_2 NOTE Files cannot be divided if there are 199 files in the folder Locked files cannot be divided It may not be possible to divide some MP3 file with extremely s...

Page 38: ...ec Mode You can prioritize sound quality or recording time Select the recording mode that best matches your recording application MP3 192 kbps 1 MP3 128 kbps 1 WMA 64 kbps 2 WMA 32 kbps mono 3 WMA 5 k...

Page 39: ...unneeded quiet segments when recording such as long silences during conferences saving memory On Turns VCVA on You can adjust the voice activation level used for VCVA Off Turns VCVA off Restores stand...

Page 40: ...ene P 23 V Sync Rec Voice sync recording function V Sync Rec The voice sync recording function automatically starts recording when a sound louder than a preset voice sync recording level detection lev...

Page 41: ...the REC s button again The blinking message Standby appears in the display and the LED indicator light flashes Recording starts automatically if the input is louder than the voice sync level TIP The v...

Page 42: ...opping playback after the last file in the folder is played When Repeat was selected On The files in the specified playback range are played repeatedly Off Cancels repeat playback NOTE When Playback r...

Page 43: ...t the start position Setting a skip space Skip Space The Skip Space function lets you skip a preset amount forward forward skip or backward reverse skip in a file during playback It is handy for quick...

Page 44: ...ay Menu 44 EN Playback menu Play Menu Forward reverse skip playback 1 Press the OK button to start playback 2 Press the 9 or 0 button during playback Playback starts after skipping forward or backward...

Page 45: ...is switched on Off LED indicator light stays off Turning beeping sound ON OFF Beep The voice recorder makes beeping sounds when buttons are pressed or to warn in case of operation errors You can sele...

Page 46: ...e the blinking cursor then press the or button to change the number 3 Press the OK button to finalize the setting TIP When setting the hour or minute each time you press the FOLDER INDEX button the di...

Page 47: ...e lists frequently used functions Displayed text becomes larger for easier viewing 1 Press the button to select Start Rec Menu Rec Level High Rec Mode MP3 128 kbps 1 WMA 64 kbps 2 Low Cut Filter Off V...

Page 48: ...cluding locked files and read only files Before formatting replace the battery to ensure it will not run out before the process has finished The formatting process can sometimes take over 10 seconds t...

Page 49: ...dia from a menu screen NOTE Some recording media memory capacity is used as a management area so the actual usable capacity will always be slightly less than the displayed capacity Checking voice reco...

Page 50: ...eded for using a USB connection to save files recorded by the voice recorder on a PC Even when the requirements for the operating environment are satisfied updated versions of OS multiboot environment...

Page 51: ...rive name If there is a microSD card in the voice recorder it can be used as the Removable Disk Macintosh The voice recorder is recognized and displayed on the desktop with the model name as the drive...

Page 52: ...e window 2 Check that the voice recorder s LED indicator light is off before disconnecting the voice recorder from the PC Macintosh 1 Drag and drop the removable disk icon for the voice recorder shown...

Page 53: ...operating system it is recognized and displayed on the desktop with the model name as the drive name 2 Double click the removable disk icon labeled with your voice recorder s model name 3 Copy the des...

Page 54: ...have been written in the file Erase unneeded temp marks P 31 Folder full The maximum number of files 200 have been saved in the folder Erase unneeded files P 32 Memory error An internal memory error o...

Page 55: ...ory Erase unneeded files P 32 The maximum number of recordable files has been reached Select another folder P 15 Playback is inaudible The earphones are connected to the EAR jack To output the playbac...

Page 56: ...es the left right channel connections to be extended up to about 12 meters to capture sound from a broad range ME52W mono microphone unidirectional Designed to record sound from a distance while minim...

Page 57: ...olders of this manual Copyright law prohibits unauthorized reproduction of this manual or unauthorized distribution of reproductions thereof Note that Olympus will assume no liability in the event of...

Page 58: ...is handled incorrectly Voice recorder safety precautions f WARNING s Do not use the voice recorder in an atmosphere that might contain flammable or explosive gases It may cause fire or explosion s Do...

Page 59: ...ing caught on other items f CAUTION s Do not raise the volume before performing an operation Hearing damage or loss may result Batteries f DANGER s Do not place the battery near ignition sources s Do...

Page 60: ...of infants and children The battery could be swallowed by an infant or child If swallowed go to doctor immediately s If you notice abnormal sound heat burning odor or smoke from the voice recorder du...

Page 61: ...ng from recorded data damage or loss regardless of the nature or cause thereof Recorded file precautions Note that Olympus will assume no liability for recorded files being erased or becoming unplayab...

Page 62: ...N 721PC model 2 GB microSD card 1 Supports card capacities ranging from 2 to 32 GB Some recording media memory capacity is used as a management area so the actual usable capacity will always be slight...

Page 63: ...test method Actual battery life figures will vary greatly according to the battery used and usage conditions Changing the playback speed or using the Voice Filter function may affect the battery life...

Page 64: ...hours approx 64 hours approx VN 721PC 2 GB 63 hours approx 126 hours approx 790 hours approx microSD card 32 GB 2070 hours approx 12960 hours approx 515 hours approx 16 GB 1030 hours approx 6460 hour...

Page 65: ...ues Note that voice recorder specifications and appearance are subject to change without prior notice for performance improvements or other upgrading 4 MP3 format 1 Recording mode Recording time 192 k...

Page 66: ...relocate the receiving antenna Increase the distance between the equipment and receiver Connect the equipment to an outlet on a circuit different from that to which the receiver is connected Consult y...

Page 67: ...PA 18034 0610 U S A Tel 484 896 5000 Technical Support USA 24 7 online automated help http www olympusamerica com support Phone customer support Tel 1 888 553 4448 Toll free Our phone customer suppor...

Reviews: