background image

48

4

EN

 Settings relating to FM radio 

 [ Auto-preset ]

   P.49) 

 Automatically  adds 
receivable stations to the 
preset stations.  

 [ Scan  Level ]

   P.67) 

 Allows you to set the scan 
sensitivity for auto preset.  

 [ Output ]

   P.67) 

 Allows you to set the audio 
output of the FM radio.  

FM

 radio mode opera

tions

 •  To stop FM radio reception, press 

the  

LIST

  button to go to the [ 

 Home 

 ] 

display. From the [ 

 Home 

 ] display, you 

can change to a different mode. 


2

   Presetting radio stations. 


Presetting radio stations 
automatically:


Automatically preset stations to 
make it easy to tune. For details, 
see “ 

Registering radio stations 

automatically [ Auto-preset 


]

” 

   P.49). 

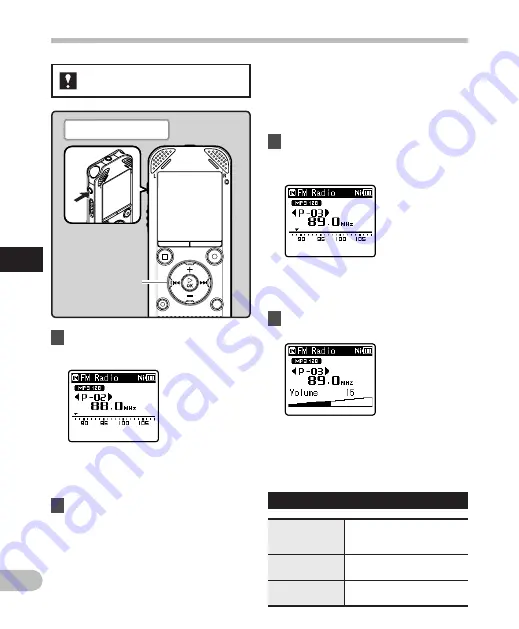
 FM radio mode operations 


1

   Set to [ 

 FM  Radio 

 ] mode ( 

   P.25). 

 •  Change the mode to [ 

 FM  Radio 

 ]. 

 •  The volume can be adjusted within 

the range of [ 

 00 

 ]  to  [ 

 30 

 ]. 

 •  You can also select a station which 

has not been preset. For details, see 
“ 

Changing the reception mode

 ” 

   P.50). 


4

   Press the  

+

  or  

  button to adjust 

the volume. 

 For  WS-803: 


Adding a radio station to the preset 
stations:


Change the reception mode to 
manual reception, and adjust the 
frequency. The station you are tuned 
to can then be added ( 

   P.50,  P.51). 


3

   Press the  

9

  or  

0

  button to 

select a station. 

 •  You can select a preset station. 


+


   button 


9


0

   button 

 Plug in the earphones 

Summary of Contents for WS-801

Page 1: ...GITAL VOICE RECORDER Thank you for purchasing an Olympus Digital Voice Recorder Please read these instructions for information about using the product correctly and safely Keep the instructions handy...

Page 2: ...ir performed by a third party other than Olympus or an Olympus authorized service station or for any other reason Trademarks and registered trademarks IBM and PC AT are trademarks or registered tradem...

Page 3: ...hanging the playback sound 41 Setting an index mark or a temp mark 42 How to begin segment repeat playback 43 Changing the playback scene Play Scene 44 Erasing 45 Erasing files 45 Erasing a folder 45...

Page 4: ...ibration Never drop the recorder or subject it to severe shock or vibration The recorder may malfunction if it is used in a location where it is subject to a magnetic electromagnetic field radio waves...

Page 5: ...ally being injured by the moving parts of the recorder Do not use or store the recorder in dusty or humid places Do not disassemble repair or modify the unit yourself Use microSD microSDHC memory card...

Page 6: ...e use of batteries Never attempt to disassemble a battery or modify it in any way by soldering it etc Do not connect the battery directly to a power outlet or the cigarette lighter in an automobile If...

Page 7: ...observe local laws and regulations Always charge a rechargeable battery before using it for the first time or if it has not been used for a long period Rechargeable batteries have a limited life When...

Page 8: ...rectional quality WS 803 only P 57 s It is equipped with a variety of features that support audio recording With this recorder you can customize a variety of recording functions such as the recording...

Page 9: ...card and within the folders in the memory WS 803 WS 802 only P 70 s You can divide files PCM MP3 that have been recorded with this recorder into two files P 72 WS 803 WS 802 only s Index mark and temp...

Page 10: ...t LED 4Card cover 5LIST button 6MIC Microphone jack 7Display LCD panel 8MENU button 9 button 0REC s Record button 9 button button SCENE INDEX button STOP 4 button 0 button OK button ERASE button Built...

Page 11: ...ent file name 3Battery indicator 4Folder indicator Recording mode indicator File Lock indicator 5Recorder status indicator K Record indicator Pause indicator Stop indicator Play indicator Forwarding i...

Page 12: ...2Current folder name 3Battery indicator 4File name When there are only files in the folder 1Recording media indicator 2Current file name 3Battery indicator 4Recorder status indicator Play indicator St...

Page 13: ...VCVA Voice sync Equalizer 1 WS 803 WS 802 only 2 WS 803 only 3 WS 801 only 1Recording media indicator 2Battery indicator 3Recording mode indicator 4Preset number 5Tuning frequency 6Frequency bar indi...

Page 14: ...it is recommended that you continuously charge the battery until full P 16 For WS 803 WS 802 This recorder cannot charge the rechargeable battery For WS 801 1 Lightly press down on the arrow and slid...

Page 15: ...Time Date P 21 The battery indicator on the display changes as the battery loses power Battery type Note When a voice music file is played depending on the volume level the recorder may be reset due...

Page 16: ...harge a primary battery such as an alkaline or lithium battery It may cause battery leakage or heating which may cause the recorder to malfunction For WS 803 WS 802 3 Make sure that the recorder is in...

Page 17: ...4 Charging is completed when Battery full is displayed The charging time depends on the amount of remaining power and the state of the battery Notes The recorder cannot be charged if the PC is not tu...

Page 18: ...cy and a shorter battery life In order to prevent battery leakage or rust remove the rechargeable battery from the recorder when you will not be using it for a long time and store it separately Notes...

Page 19: ...or longer default the display shuts off and the recorder goes into power save mode P 65 To exit power save mode press any button Turning off the power Slide the POWER HOLD switch in the direction of t...

Page 20: ...switch to the HOLD position After Hold appears on the display the recorder is set to HOLD mode Notes If you press any button while the recorder is in HOLD mode the clock display lights for 2 seconds...

Page 21: ...he value Follow the same steps by pressing the 9 or 0 button to select the next item and pressing the or button to change the value You can select between 12 and 24 hour display by pressing the LIST b...

Page 22: ...he recorder is in stop mode press the MENU button The menu will appear on the display P 53 2 Press the or button to select Device Menu tab You can change the menu display by moving the settings tab cu...

Page 23: ...icroSD card facing the correct way insert it into the card slot as shown in the diagram Insert the microSD card keeping it straight Inserting the microSD card in the wrong way or at an angle could dam...

Page 24: ...ct forcefully out of the slot Some microSD cards or microSDHC cards may not be recognized correctly depending on the manufacturer or type of card due to compatibility issues with this recorder See the...

Page 25: ...be able to record and play back files recorded by the recorder P 29 P 36 3 Press the OK button Note During recording you cannot switch the mode without stopping the recorder LIST button button OK butt...

Page 26: ...a branching tree About the folders for voice recordings Folder A Folder E within the Recorder folder are the folders for voice recordings When recording with this recorder select any one of the five...

Page 27: ...the device using Windows Media Player a folder is automatically created within the music playback folder which has a layered structure as shown in the diagram below Music files that are in the same f...

Page 28: ...folder or file selected in the list display and proceed down one level The 9 button can also serve as the OK button on a list display Selecting folders and files Operation of the folders for voice rec...

Page 29: ...Remaining recording time eLevel meter changes according to the recording level and recording function settings fFile length Before starting recording select a folder among to These five folders can be...

Page 30: ...y also be reduced due to repeated writing and deleting If that happens reformat the microSD card P 74 We recommend formatting the recording media in the recorder before recording P 74 For WS 803 You c...

Page 31: ...ecorded contents While the recorder is in recording mode press the OK button Settings relating to recording Rec Level P 56 Sets the recording sensitivity Rec Mode 1 P 56 Sets the recording rate for ea...

Page 32: ...rt recording after inserting the earphones into the EAR jack on the recorder you can hear the audio being recorded The recording monitor volume can be adjusted by pressing the or button Connect the ea...

Page 33: ...P3 128kbps or more WMA 128kbps Off Meetings and business negotiations with a small number of people MP3 128kbps WMA 128kbps Middle Dictation with a lot of background noise WMA 64kbps Low Music playing...

Page 34: ...ompact zoom microphone unidirectional ME32 This microphone is integrated with a tripod making it suitable to place on a table for recording conferences or lectures at a distance Highly sensitive noise...

Page 35: ...g audio from another device with this recorder Audio can be recorded when you have connected the audio output terminal earphone jack of another device and the MIC jack of the recorder using the connec...

Page 36: ...o stop playback L appears on the display Pressing this button stops the file being played back If the resume function has been activated the stop location is registered even if the power is turned off...

Page 37: ...ct the preferred playback mode Equalizer 4 P 62 When listening to music you can set your favorite sound quality by adjusting the equalizer setting Skip Space P 63 The skip interval can be set Play Sce...

Page 38: ...of the file Continue pressing the 9 button to continue forwarding from the beginning of the next file Forwarding Rewinding While the recorder is in stop mode in the file display press and hold the 0 b...

Page 39: ...kips to the beginning of the current file While the recorder is in stop mode press the 0 button The recorder skips to the beginning of the previous file If the recorder is in the middle of a file it w...

Page 40: ...recorded on the date selected are displayed in a list 6 Press the or button to select a file Press the 0 button to return to the previous screen 7 Press the OK button to start playback 3 Press the OK...

Page 41: ...ng on the sampling frequency and the bit rate of the file to be played back In such a case reduce the speed of fast playback Limits of fast playback Notes As in normal playback mode you can stop playb...

Page 42: ...ect the index or temp mark to be erased 3 While the index or temp number is displayed for approximately 2 seconds on the display press the ERASE button The index or temp mark is erased Index or temp n...

Page 43: ...ormal mode to find the end position P 41 If the recorder reaches the end of the file while w is flashing point x becomes the end of the file and repeat playback starts 3 Press the REC s button again a...

Page 44: ...at playback and makes the recorder skip to the beginning of the next file dPress the 0 button Pressing the 0 button releases segment repeat playback and makes the recorder skip to the beginning of the...

Page 45: ...t All in folder or One file 6 Press the OK button The display changes to Erasing and erasing starts Erased is displayed when the file is erased File numbers are reassigned automatically Erasing a fold...

Page 46: ...to Folder E and Radio Folder and Music cannot be erased WS 803 only In the Music folder all folders except Music can be deleted If there is a file that cannot be recognized by the recorder the file an...

Page 47: ...ast region radio signals may be difficult to receive in tunnels or underground roads inside or in the shadow of buildings and apartment blocks that have a concrete structure and other similar location...

Page 48: ...stations to make it easy to tune For details see Registering radio stations automatically Auto preset P 49 FM radio mode operations 1 Set to FM Radio mode P 25 Change the mode to FM Radio The volume...

Page 49: ...he MENU button The menu appears on the display P 53 4 Press the or button to select Auto preset 5 Press the OK button Auto preset appears on the display Select Cancel and press the OK button to return...

Page 50: ...tton to adjust the frequency and tune to a radio signal Manual reception Press and hold the 9 or 0 button to scan through the receivable radio stations Auto reception b Tuning frequency If you press t...

Page 51: ...d press the OK button to return to the previous display Deleting a preset radio station 1Tune to the preset radio station you wish to erase 2Press the ERASE button 3 Press the OK button Up to 30 radio...

Page 52: ...ain conditions there may be cases of electric interference when the recording starts To avoid such a problem perform a recording test before recording Also be sure to record in places with good recept...

Page 53: ...e OK button to move the cursor to the item you want to set 4 Press the or button to move to the item you want to set 5 Press the OK button The display shows the setting of the selected item 6 Press th...

Page 54: ...playback the menu settings are canceled if 8 seconds elapse with no buttons being pressed 4 Setting menu during playback Function Setting Property To menu item options Voice Playback 2 4 Noise Cancel...

Page 55: ...d in the number of files Select a file for which you would like to verify information in advance before operating the menu For WS 803 WS 802 This function extracts voice portions from a recorded voice...

Page 56: ...not displayed Rec Mode The recorder can record in the linear PCM format WS 803 WS 802 only High resolution recording at a high sampling rate and high bit rate equivalent or superior to that of a musi...

Page 57: ...CVA function Starts recording in VCVA mode Off Disables the VCVA function Resumes recording in normal mode 4 Adjust the start stop actuation level 1 Press the REC s button to start recording When the...

Page 58: ...rding starts when a voice louder than the voice sync level detection level is detected When the voice becomes low recording automatically stops When voice sync recording is on and the input level is e...

Page 59: ...nc level continues for the specified time voice sync recording ends automatically and the recorder returns to the recording standby mode or stop mode Every time the recorder enters standby mode the cu...

Page 60: ...VCVA Off V Sync Rec Off Meeting Rec Level Middle Rec Mode MP3 128 kbps Zoom Mic Off Low Cut Filter On VCVA Off V Sync Rec Off Dictation Rec Level Low Rec Mode WMA 64kbps Zoom Mic Off Low Cut Filter On...

Page 61: ...ction is being used the following functions are not available Change playback speed tone P 41 Voice Playback Voice Balancer Voice Filter For WS 803 WS 802 This function compensates for the low volume...

Page 62: ...ualizer level You can select the equalizer level from 6 to 6 in 1dB increments The higher the decibel value the louder the sound To change the settings again press the 9 or 0 button and repeat the pro...

Page 63: ...to skip forward or reverse skip rewind a small portion of the file being played This function is convenient for quickly skipping to another playback position or repeatedly playing back short phrases...

Page 64: ...e LED indicator light does not turn on On Enables the LED light function Off Disables the LED light function Beep The recorder beeps to alert you to button operations or warn you of errors System soun...

Page 65: ...nd from the radio is still output from the speaker P 67 Device Menu Memory Select When a microSD card is inserted you can select to record to either the internal memory or to the microSD card P 23 Int...

Page 66: ...dable capacity remaining and overall capacity of the recording media can be seen from the menu Time Date Setting the time and date beforehand enables easier file management See Setting the time and da...

Page 67: ...del Name Version System version and Serial No Serial Number appear on the display Scan Level You can change the scan sensitivity when scanning for radio stations with auto preset Select the sensitivit...

Page 68: ...elect the file from which you want to extract the voice portions button 9 0 button OK button Notes When extraction of voice portions ends the Voice Playback setting in the Play Menu switches ON If you...

Page 69: ...close the menu screen 4 Press the OK button The cursor will flash to confirm that the file can be moved Rearranging files Replace You can move a file in a folder to change the order of playback First...

Page 70: ...to select the number of files you want to move or copy Moving Copying files Move Copy Files saved in the internal memory or a microSD card can be moved or copied within the memory Files can also be m...

Page 71: ...cannot copy when the memory capacity is not sufficient The recorder cannot move or copy when the number of files exceeds 200 Do not remove the battery during moving or copying Doing so may damage the...

Page 72: ...vide from the menu on the File Menu For details on how to enter the menu settings see Menu setting method P 53 3 Press the button to select Start 5 Press the STOP 4 button to close the menu screen Not...

Page 73: ...or composite AC Adapter Setting for when the recorder is connected to a PC for charging or to the AC Adapter A514 optional Optional Setting to confirm the connection method each time a USB connection...

Page 74: ...tings will return to the defaults except the date and time settings Transfer any important files to a computer before formatting the recorder button 9 0 button OK button Notes When you first connect t...

Page 75: ...Cancel appear Notes Never format the recorder from a PC When the recorder is formatted all the saved data including locked files and read only files is erased After formatting recorded voice file name...

Page 76: ...the following during processing as such operations may damage the data 1Disconnect the AC Adapter during processing 2Remove the battery during processing 3Remove the microSD card during processing whe...

Page 77: ...ecorder to a computer play them back and manage them by using Windows Media Player or iTunes The recorder is compatible with WMA MP3 and WAV language content WS 803 WS 802 only In addition to its uses...

Page 78: ...eved on a PC For initialization follow the instructions in the Format display of the recorder P 74 Folder directory names that appear in file management tools such as Explorer in Microsoft Windows and...

Page 79: ...is connected through a USB hub operation may become unstable In such cases refrain from using a USB hub Use the dedicated USB cable If any other company s cable is used it may lead to malfunction of t...

Page 80: ...t has turned off before disconnecting the USB cable Windows 1 Click on the task bar located at the lower right corner of the screen Click Safely remove USB Mass Storage Device Macintosh 1 Drag and dro...

Page 81: ...d Removable Disk 3 Open the product name folder 4 Copy the data 5 Disconnect the recorder from the PC P 80 Macintosh 1 Connect the recorder to your PC P 79 When you connect the recorder to Mac OS it i...

Page 82: ...he Explorer window When you open My Computer the recorder is recognized by the drive name of the product 3 Open the product name folder 4 Copy the data 5 Disconnect the recorder from the PC P 80 Macin...

Page 83: ...elect from Folder A through Folder E and record No more can be set Index full The file is full of index marks maximum of 99 marks Erase unnecessary index marks P 42 Temp mark full The file is full of...

Page 84: ...ct the recorder to a computer and delete unnecessary files Cannot play this file File cannot be played Incompatible format Confirm which files can be played on this recorder P 39 Select a file Unselec...

Page 85: ...se unnecessary files P 45 The maximum number of files has been reached Change to another folder P 26 to P 28 WS 803 only Output in the FM Radio settings is set to Speaker Set Output to Earphone P 67 N...

Page 86: ...et Rec Mode to the stereo recording mode P 56 WS 803 only Zoom Mic is set to the side Set Zoom Mic to Off P 57 Cannot find the recorded Voice File Wrong folder Switch to the correct folder P 26 to P 2...

Page 87: ...lock the file or cancel the file s read only setting on the PC Cannot receive FM radio signal WS 803 only The earphones are not plugged into the EAR jack The supplied earphones also function as an ant...

Page 88: ...s Tie clip microphone omni directional ME15 This small unobtrusive microphone comes with a tie clip s Telephone pickup microphone TP8 This earphone type microphone can be placed into your ear while yo...

Page 89: ...V according to EN 50332 2 4 Wide band characteristic headphone output 75 mV according to EN 50332 2 4 Recording media Built in NAND FLASH memory WS 803 8 GB WS 802 4 GB WS 801 2 GB microSD card 2 GB t...

Page 90: ...40 Hz to 17 kHz WMA format 128 kbps 40 Hz to 19 kHz 64 kbps 40 Hz to 16 kHz 32 kbps 40 Hz to 13 kHz 16 kbps 40 Hz to 8 kHz 8 kbps 40 Hz to 3 kHz 1 WS 803 WS 802 only 2 WS 801 only 4 During recording...

Page 91: ...able battery Linear PCM format 44 1 kHz 16 bit 19 h 15 h MP3 format 128 kbps 21 h 17 h WMA format 128 kbps 21 h 17 h 8 kbps 24 h 20 h Recording mode Earphone playback Alkaline battery Ni MH Rechargeab...

Page 92: ...4 h 66 h 2 GB 16 h 30 min 22 h 33 h 4 WMA format Recording media Recording mode 128 kbps 64 kbps 32 kbps 16 kbps 8 kbps Internal memory WS 803 8 GB 132 h 261 h 522 h 1028 h 2043 h WS 802 4 GB 65 h 129...

Page 93: ...rding time per file is restricted to the following value Linear PCM format 44 1 kHz 16 bit 1 approx 3 h 20 min MP3 format 256 kbps 1 approx 37 h 10 min 192 kbps 2 approx 49 h 30 min 128 kbps approx 74...

Page 94: ...onformity Model Number WS 803 WS 802 WS 801 Trade Name DIGITAL VOICE RECORDER Responsible Party OLYMPUS IMAGING AMERICA INC Address 3500 Corporate Parkway P O Box 610 Center Valley PA 18034 0610 U S A...

Page 95: ...njuku 2 chome Shinjuku ku Tokyo 163 0914 Japan Tel 81 0 3 3340 2111 http www olympus com OLYMPUS IMAGING AMERICA INC 3500 Corporate Parkway P O Box 610 Center Valley PA 18034 0610 U S A Tel 1 888 553...

Reviews: