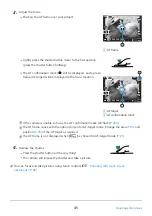
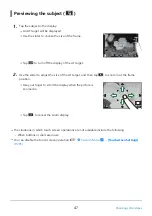
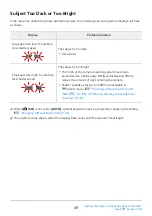
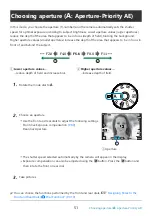
background image

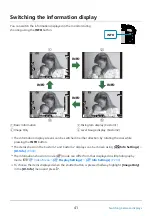
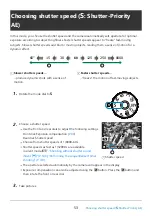
You can switch the information displayed in the monitor during
shooting using the INFO button.

INFO

Basic Information
Image Only

1
2

Histogram display (Custom1)
Level Gauge display (Custom2)

3
4

Switching the information display

1023

1:02:03

P

S-IS AUTO

S-IS AUTO

250 F5.6

0.0

30p

30p

4K

Y

F

Y

F

ISO-A

200

1023

1:02:03

P

S-IS AUTO

S-IS AUTO

250 F5.6

0.0

ISO-A

200

1023

1:02:03

P

S-IS AUTO

S-IS AUTO

250 F5.6

0.0

ISO-A

200

INFO

INFO

INFO

INFO

1

2

4

3

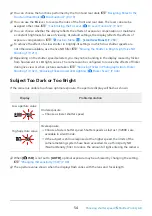
The information display screens can be switched in either direction by rotating the dial while
pressing the INFO button.
The items shown in the Custom 1 and Custom 2 displays can be chosen using [

G

/Info Settings] >

[LV-Info] (P. 333)

.

The information shown in movie (

n

) mode can differ from that displayed in still photography

mode. 

g


n

 Video Menu > [

n

 Display Settings] > [

n

 Info Settings] (P. 233)

To choose the items displayed when the shutter button is pressed halfway, highlight [Image Only]
in the [LV-Info] menu and press 

I

.

41

Switching between displays

Summary of Contents for OM-5

Page 1: ...S before using this product Keep these instructions available for future reference We recommend that you take test shots to get accustomed to your camera before taking important photographs The screen...

Page 2: ...ttery 22 Removing the battery 23 Charging the Battery using the supplied USB AC adapter 24 Charging the Battery Using an Optional BCS 5 Battery Charger 26 Inserting and Removing Memory Cards 27 Insert...

Page 3: ...xposures B Bulb Time 58 Bulb Time Photography 58 Lighten Blending B Live Composite Photography 62 Letting the camera choose the settings AUTO mode 64 Shooting in scene mode SCN mode 67 Types of scene...

Page 4: ...time lag Pro Capture shooting 107 Pro Capture Photography 108 Shooting still pictures in a higher resolution High Res Shot 109 The Super Control LV Super Control Panel 111 The Super Control and LV Su...

Page 5: ...Flash intensity control 153 Processing options Picture Mode 154 Picture mode options 154 Adjusting overall color Color Creator 157 Making fine adjustments to sharpness Sharpness 158 Making fine adjus...

Page 6: ...Share Order 190 Selecting RAW JPEG Pictures for Sharing 190 Selecting Multiple Pictures Share Order Selected 0 Erase Selected 192 Print order DPOF 193 Creating a print order 193 Removing all or selec...

Page 7: ...Menu 233 Choosing an Exposure Mode n Mode Movie Exposure Mode 238 Reducing Flicker Under LED Lighting n Flicker Scan 240 Frame Size Rate and Compression nX 242 Assigning Roles to the Front and Rear Di...

Page 8: ...F 273 d AF MF 273 B Button Dial 275 B Button Dial 275 gh Release g Image Stabilizer 277 g Release g Image Stabilizer 277 h Release g Image Stabilizer 277 ijkl Disp o PC 279 i Disp o PC 279 j Disp o PC...

Page 9: ...AF Target Size and Positioning t Target Mode Settings 309 Matching AF Target Selection to Camera Orientation K Orientation Linked Y 310 Lens Focus Range AF Limiter 312 Fine Tuning Autofocus AF Focus A...

Page 10: ...r Under LED Lighting K Flicker Scan 343 Fine Tuning Exposure Exposure Shift 345 Shutter speeds when the flash fires AX Sync ASlow Limit 346 Combinations of JPEG image sizes and compression rates X Set...

Page 11: ...pictures to a computer 371 Installing the PC software 373 Using the Camera as a Webcam Webcam 374 Using the Remote Control 376 Names of parts 376 Connection 377 Wired connection 377 Wireless connecti...

Page 12: ...dapter abroad 427 Information 428 Interchangeable lenses 428 Lens and camera combinations 428 MF Clutch Lenses 429 Camera Displays for Lens SET and CALL Functions 430 Optional Accessories 431 Grip ECG...

Page 13: ...pear on the subject in the picture taken 448 Functions that cannot be selected from menus 448 Functions that cannot be set from the super control panel 448 The subject appears distorted 448 Lines appe...

Page 14: ...sing from use of this product outside the country or region of purchase Wireless LAN and Bluetooth The camera features built in wireless LAN and Bluetooth Use of these features outside the country or...

Page 15: ...e the camera firmware The software can be downloaded from our website Be prepared to provide the camera serial number when downloading the software OM Image Share Download pictures marked for sharing...

Page 16: ...you want to know in this manual Search method Where to look Search based on what you want to do g Table of Contents Search based on names of buttons and parts of the camera g Names of parts P 18 Sear...

Page 17: ...ial a m Indicates an operation performed using the rear dial b FGHI Indicates an operation performed by pressing the buttons respectively the up down left and right arrow buttons on the arrow pad c C...

Page 18: ...4 5 6 7 8 9 10 11 12 13 gY sequential shooting self timer button P 101 Self timer lamp AF illuminator P 101 P 273 Microphone jack cover Remote cable terminal cover Connector cover Strap eyelet P 21 L...

Page 19: ...1 Speaker ISO button P 98 1 2 3 4 5 6 7 8 9 10 11 INFO button P 41 P 181 OK button P 111 P 182 P 200 Arrow pad P 182 q playback button P 182 D erase button P 189 CHARGE battery charge lamp P 24 Connec...

Page 20: ...INA 217 SLOVEN INA 227 SVENSKA 237 T RK E 247 257 269 279 Model No IM030 Basic Manual DIGITAL CAMERA Basic Manual Warranty Card Preparation Unpacking the box contents At purchase the package contains...

Page 21: ...trap through the strap eyelet and back through the keeper loop Pass the end of the strap through the buckle and tighten as shown Attaching the Strap Attach the other end of the strap to the other eyel...

Page 22: ...nt cover 2 1 1 2 Battery compartment lock Battery compartment cover 1 2 Insert the battery Use only BLS 50 batteries P 20 P 439 1 Direction indicating mark 1 Inserting and removing the battery Inserti...

Page 23: ...1 It is recommended to set aside a backup battery for prolonged shooting in case the battery in use drains See also Batteries P 426 Removing the battery Contact an authorized distributor or service c...

Page 24: ...able from the camera Charging the Battery using the supplied USB AC adapter The battery will not be fully charged at the time of purchase Charge the battery before use Connect the USB cable and USB AC...

Page 25: ...ke longer or the battery may not reach full charge when the battery is charged in a high temperature environment The USB AC Adapter Be sure to unplug the USB AC adapter for cleaning Leaving the USB AC...

Page 26: ...rging the Battery Using an Optional BCS 5 Battery Charger Charge the battery Charging indicator Charging in progress Lights orange Charging complete Off Charging error Blinks orange Charging time Appr...

Page 27: ...ment cover Close it securely until you hear it click 2 1 Inserting and Removing Memory Cards Inserting the card In this manual all storage devices are referred to as cards The following types of SD me...

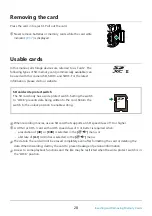
Page 28: ...ion to enable writing LOCK Removing the card Usable cards SD card write protect switch When recording movies use an SD card that supports an SD speed class of 10 or higher A UHS II or UHS I card with...

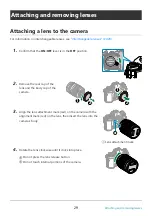
Page 29: ...d on the lens then insert the lens into the camera s body 1 Lens attachment mark 1 Rotate the lens clockwise until it clicks into place Do not press the lens release button Do not touch internal porti...

Page 30: ...ve the front lens cap 2 1 1 2 1 1 Confirm that the ON OFF lever is in the OFF position Hold the lens release button and rotate the lens as shown 2 1 Removing Lenses 30 Attaching and removing lenses 5...

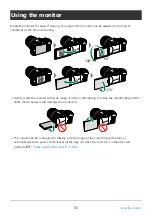
Page 31: ...he monitor within its range of motion Attempting to rotate the monitor beyond the limits shown below could damage the connectors The camera can be configured to display a mirror image of the view thro...

Page 32: ...y 1023 1 02 03 P S ISAUTO S ISAUTO 250 F5 6 0 0 30p 30p 4K YF YF ISO A 200 Turning the camera on Set the ON OFF lever to the ON position When the camera is turned on the monitor will turn on To turn t...

Page 33: ...nters sleep mode the camera will turn off automatically The camera can be reactivated by turning it on again The camera may require additional time to recover from sleep mode when On enabled is select...

Page 34: ...Espa ol T rk e Initial setup After turning the camera on for the first time perform the initial setup by choosing a language and setting the camera clock The file name is also included with the date a...

Page 35: ...ttons and press the OK button Press the INFO button to enable or disable daylight saving time Press the OK button to set the clock Date and time information is recorded on the card together with the i...

Page 36: ...Fi Bluetooth Highlight the desired language using the FGHI buttons and press the OK button W Set Back Suomi esky Italiano Polski Fran ais Nederlands Portugu s Pt Deutsch English Norsk Svenska Espa ol...

Page 37: ...W BKT HDR 1 ND8 LV LV 7 P SET SET CALL CALL FLK 1 2 3 4 47 46 45 44 43 42 41 40 39 38 58 54 55 57 56 48 49 53 52 50 51 33 32 30 31 34 35 36 37 61 62 5 6 7 16 17 18 19 25 12 13 14 15 8 9 10 11 26 27 2...

Page 38: ...17 18 19 20 21 22 23 24 25 26 27 28 29 30 31 32 Drive mode single frame sequential shooting self timer vibration reduction silent photography Pro Capture High Res Shot P 101 P 137 Aspect ratio P 138...

Page 39: ...rding indicator red border g Video Menu Red Frame during RREC P 233 63 64 65 66 67 Movie exposure mode P 238 Recording time displayed during recording P 83 Time code g Video Menu n HDMI Output P 233 S...

Page 40: ...tching between displays The camera uses an eye sensor to automatically switch between the monitor and viewfinder displays The monitor live view display and viewfinder also show information on camera s...

Page 41: ...O 250 F5 6 0 0 ISO A 200 INFO INFO INFO INFO 1 2 4 3 The information display screens can be switched in either direction by rotating the dial while pressing the INFO button The items shown in the Cust...

Page 42: ...evel gauge display The orientation of the camera is indicated The tilt direction is indicated on the vertical bar and the horizon direction on the horizontal bar The level gauge is intended as a guide...

Page 43: ...the various shooting modes see the following P Program AE P 48 A Aperture priority AE P 51 S Shutter priority AE P 53 M Manual exposure P 55 B Bulb time P 58 Live composite P 62 0 AUTO P 64 SCN Scene...

Page 44: ...e you wish to use When the mode dial lock has been pressed down the mode dial is locked Each time you press the mode dial lock it switches between locked released Frame the shot Be careful that your f...

Page 45: ...03 ISO A 200 1 2 AF target AF confirmation mark 1 2 Release the shutter Press the shutter button all the way fully The camera will release the shutter and take a picture Adjust the focus If the camer...

Page 46: ...ct in the selected area You can use the touch screen to choose the position and size of the focus frame Photographs can be taken by pressing the shutter button L Tap to choose the subject used for foc...

Page 47: ...target will be displayed Tap X to turn off the display of the AF target Use the slider to adjust the size of the AF target and then tap a to zoom in at the frame position Tap Z to cancel the zoom disp...

Page 48: ...d P Program AE The camera chooses the optimal aperture and shutter speed according to subject brightness Exposure compensation can also be adjusted using the F button Press the F button and then rotat...

Page 49: ...ng system have been exceeded Use a third party ND Neutral Density filter to reduce the amount of light entering the camera Shutter speeds as fast as 1 32000 s are available in I silent mode g Shooting...

Page 50: ...O 30p 30p 4K YF YF ISO A 200 1 Program shift 1 Program Shift Without changing exposure you can choose from different combinations of aperture and shutter speed selected automatically by the camera Thi...

Page 51: ...ing to subject brightness Lower aperture values larger apertures reduce the depth of the area that appears to be in focus depth of field blurring the background Higher aperture values smaller aperture...

Page 52: ...unable to achieve optimal exposure the shutter speed display will flash as shown Display Problem solution Slow shutter speed 60 F5 6 Underexposure Choose a lower aperture value Fast shutter speed 800...

Page 53: ...ISAUTO S ISAUTO 250 F5 6 0 0 S ISAUTO S ISAUTO 30p 30p 4K YF YF ISO A 200 1 Shutter speed 1 Choosing shutter speed S Shutter Priority AE In this mode you choose the shutter speed and the camera autom...

Page 54: ...ED light sources The camera can be configured to reduce the effects of flicker during live view or when pictures are taken g Reducing Flicker in Photographs Anti Flicker Shooting P 327 Reducing Flicke...

Page 55: ...goals for example by combining fast shutter speeds with small apertures high f numbers for increased depth of field Adjust aperture and shutter speed Use the front and rear dials to adjust the follow...

Page 56: ...r from fluorescent or LED light sources The camera can be configured to reduce the effects of flicker during live view or when pictures are taken g Reducing Flicker in Photographs Anti Flicker Shootin...

Page 57: ...Exposure compensation plus exposure difference 1 2 Using Exposure Compensation in Mode M In mode M exposure compensation is available when AUTO is selected for K ISO Because exposure compensation is...

Page 58: ...Releasing the button ends the exposure The amount of light entering the camera increases the longer the shutter is open When live bulb photography is selected you can check the results in the live vie...

Page 59: ...ISO 1600 Set Back Live Bulb 1sec Display Count 24 times 19 times 14 times 9 times Adjust aperture At default settings aperture can be adjusted using the front dial BULB F5 6 ISO 200 1023 1 02 03 B 30p...

Page 60: ...correction is in effect During shooting there are limits on the settings for the following functions Sequential shooting self timer shooting interval timer photography AE bracketing flash bracketing f...

Page 61: ...rnal drive circuit causing current to be generated in those sections of the image sensor that are not normally exposed to light This can also occur when shooting with a high ISO setting in a high temp...

Page 62: ...ck Set Lighten Blending B Live Composite Photography Leave the shutter open for a long exposure You can view the light trails left by fireworks or stars and photograph them without changing the exposu...

Page 63: ...e available varies with battery level and shooting conditions Some limitations apply to the choice of ISO sensitivity settings available The following cannot be used sequential shooting the self timer...

Page 64: ...guides to easily adjust such parameters as color brightness and background blurring In auto mode the camera automatically selects the scene mode option appropriate to your subject when you press the...

Page 65: ...played on the guide item for live guides that are already set To clear the live guides from the display press the MENU button Blur Background and Express Motions cannot be set at the same time Take pi...

Page 66: ...Choosing live guide settings that exceed the limits of the camera exposure meters may result in pictures that are overexposed or underexposed 66 Letting the camera choose the settings AUTO mode C...

Page 67: ...HI to highlight a scene mode and press the OK button Portrait Shooting in scene mode SCN mode The camera automatically optimizes settings for the subject or scene Take pictures To choose a different...

Page 68: ...ren and other active subjects Nightscapes G Nightscape Suitable for tripod shooting of night scenes We recommend that you use a tripod and either OM Image Share or an optional remote control P 366 P 3...

Page 69: ...can be accessed via live composite photography dark and light field composite in mode B P 62 Motion C Sport Suitable for fast action shooting The camera will take photos while the shutter button is pr...

Page 70: ...hs of children and other active subjects A Backlight HDR Suitable for high contrast scenes Each time the shutter button is pressed the camera takes four shots that are automatically combined to form a...

Page 71: ...s in JPEG format When the image quality mode is set to RAW the image is recorded in RAW JPEG When using a lens with an image stabilizer switch in Panning turn the image stabilizer switch off Sufficien...

Page 72: ...r c is displayed after the tenth shot During panorama shooting the image previously taken for position alignment will not be displayed With the frames or other markers for display in the images as a g...

Page 73: ...and press the OK button Take pictures Press the OK button to choose a different art filter If effects are displayed press F The effects available vary with the selected filter Soft Focus Effect Pin Ho...

Page 74: ...ocused areas Cross Process I II Creates an image that expresses a surreal atmosphere Cross Process II creates an image that emphasizes magenta Gentle Sepia Creates a high quality image by drawing out...

Page 75: ...III are altered versions of the original I To maximize the benefits of the art filters some of the shooting function settings are disabled If RAW is currently selected for image quality P 139 image qu...

Page 76: ...lect Partial Color I II III in the art filter menu Highlight an effect and press the OK button Rotate the front or rear dial to choose a color The effect is visible in the display Take pictures To cho...

Page 77: ...gs and shooting modes can be saved as custom modes and recalled as needed simply by rotating the mode dial Saved settings can also be recalled directly from the menus Save settings to positions C thro...

Page 78: ...Back Set Highlight Set using the FG buttons and press the OK button Custom Mode C Set Set current shooting mode and settings Back Set The Assign to Custom Mode menu will be displayed again Any existin...

Page 79: ...be updated automatically to reflect any changes made to settings while the mode is selected during shooting The changes will remain stored in the custom mode even after the mode dial is rotated to ano...

Page 80: ...custom mode using the FG buttons and press the I button Custom Mode C2 Custom Mode C Custom Mode C3 Custom Mode C4 Recall from Custom Mode Back Set Highlight Yes using the FG buttons and press the OK...

Page 81: ...ally Custom modes can be updated automatically to reflect any changes made to settings while the mode is selected during shooting Highlight Reset Custom Modes in 6 Shooting Menu 1 and press the OK but...

Page 82: ...t can cause distortion in pictures of moving objects This distortion is a phenomenon that occurs in pictures of fast moving subjects or if the camera is moved during shooting It is particularly notice...

Page 83: ...utton operations may be recorded The R button cannot be used to record movies in the following instances during multiple exposure still photography also ends while shutter button is pressed halfway in...

Page 84: ...enu n Shutter Function P 233 A beep does not sound when the camera focuses in movie mode The movie you are recording will be displayed on the monitor A red frame is displayed during movie recording If...

Page 85: ...elected for n Mode movie exposure mode P 238 F exposure compensation Adjust exposure compensation Available when AUTO is selected for n ISO P 98 with M selected for n Mode movie exposure mode P 238 IS...

Page 86: ...cluding those listed below Commonly used functions are assigned to buttons for quick access during viewfinder photography P 87 The controls that can be so used include the F gY and ISO buttons LV supe...

Page 87: ...ch functions can be assigned are listed below a e f g h b c d Direct button Assigned function a Preview button Preview P 167 b AEL AFL button AEL AFL P 100 c ISO button ISO sensitivity P 98 d Arrow pa...

Page 88: ...Direct button Assigned function g F button Exposure compensation P 89 h R button Movie recording P 82 Buttons can be assigned different roles g K Button Function P 167 88 Direct Buttons B...

Page 89: ...pensation The exposure selected automatically by the camera can be altered to suit your artistic intent Choose positive values to make pictures brighter negative values to make them darker Exposure co...

Page 90: ...en using the HI buttons Take pictures Mode M In movie mode exposure compensation can be adjusted when M is selected for nMode movie exposure mode You must first however select On for n Video Menu n Sp...

Page 91: ...Target Modes The only modes available when RAF is selected are single target 9 target group 3 3 and 25 group 5 5 modes The only options available during movie recording are single target 9 target gro...

Page 92: ...up of 5 targets arranged in a cross The camera chooses the target used for focus from within the selected group n Select a group of 9 targets arranged in a square The camera chooses the target used fo...

Page 93: ...s can be selected according to camera orientation g C Custom Menu b K Orientation Linked Y P 310 The following focus settings can be recalled simultaneously using the Fn lever Separate settings can be...

Page 94: ...nd either C AF is chosen for n AF Mode or S AF S AFJ C AF or C AFJ is chosen for K AF Mode P 118 select On2 for C Custom Menu b AF Area Pointer P 271 The camera will display AF targets for all areas t...

Page 95: ...he AF target during focusing when C AF or C AFJ is selected in still photography mode You can also reposition the AF target during movie recording When On is selected for AF Targeting Pad P 273 you ca...

Page 96: ...ratios you can focus on areas smaller than the standard focus target You can reposition the focus area as desired during zoom This function is only available when 8 is assigned to a camera control g...

Page 97: ...adjustment display for modes M and B Press the OK button to accept and exit Press the 8 button to return to the zoom frame Press the OK button to end focus zoom You can also end focus zoom by pressing...

Page 98: ...standard values for ISO sensitivity L64 L100 200 25600 still photography Choose a value for ISO sensitivity ISO 200 offers a good balance between noise and dynamic range Choose L100 or L64 for larger...

Page 99: ...ted for picture mode If the frame rate selected for nX is 24p 25p or 30p AUTO is restricted to sensitivities of ISO 400 3200 If the frame rate selected for nX is 50p or 60p AUTO is restricted to sensi...

Page 100: ...ected for AF mode AE lock is available only in mode1 If the AEL AFL button has been assigned a different role you will need to assign AEL AFL to another control g Assigning functions to buttons Button...

Page 101: ...a takes photos at up to about 6 fps while the shutter button is held all the way down You can choose the frame advance rate and the maximum number of shots in each series P 322 Focus and exposure conf...

Page 102: ...ile the button was pressed halfway when the button is pressed all the way down P 107 In t mode focus exposure and white balance are locked at the values metered when the shutter button is pressed half...

Page 103: ...SO 8000 The flash sync speed when Silent I is selected is 1 50 s It drops to 1 20 s at ISO settings over ISO 8000 Photographs taken in silent and pro capture modes may be distorted if the subject or c...

Page 104: ...using HI and use FG to choose an option Y Timer Choose how long the camera waits to begin shooting after the shutter button is pressed all the way down Number of Frames Choose the number of shots tak...

Page 105: ...i P 279 and placing a check P next to the appropriate item Press the gY button Select one of the items marked using the front or rear dial and press the OK button Take pictures When the set time has e...

Page 106: ...press the OK button Take pictures When the shutter is released the monitor screen will go dark for a moment No shutter sound will be emitted The fastest available shutter speed is 1 32000 s The desir...

Page 107: ...e Low u Choose this option if you anticipate that the distance to the subject will change during shooting The camera shoots at up to 10 fps A maximum of 14 frames can be captured before the shutter bu...

Page 108: ...aving pictures to the memory card Shooting will continue while the shutter button is pressed all the way down up to the number of shots selected for Frame Count Limiter Max fps t Pro Capture High only...

Page 109: ...NFO button and rotate the front or rear dial Press the OK button After enabling High Res Shot check the option selected for image quality Image quality can be adjusted in the LV super control panel P...

Page 110: ...MANUAL This option is available in P A S and M modes High Res Shot cannot be used with interval timer photography multiple exposure keystone compensation bracketing fisheye correction HDR and LV ND ph...

Page 111: ...ressing the U LV button during live view enables viewfinder photography and displays the LV super control panel in the monitor 1023 1 02 03 P S ISAUTO S ISAUTO 250 F5 6 0 0 30p 30p 4K YF YF ISO A 200...

Page 112: ...OK Super Control Panel Viewfinder Photography When you frame subjects in the viewfinder the super LV control panel will be displayed in the monitor at all times Press the OK button to activate the cu...

Page 113: ...tems by tapping them in the display KAF Mode sRGB Natural S Normal WB Auto ISO Auto 0 A 0 0 0 0 G 0 P 250 F5 6 p o S AF Off 30p 30p 4K S IS Auto YF 0 0 1023 1 02 03 M IS Rotate the front dial to chang...

Page 114: ...S AF Off 30p 30p 4K S IS Auto YF 0 0 M IS P S ISAUTO 9mm S IS S IS 1 S IS S IS 2 S IS S IS 3 S ISAUTO S ISAUTO OFF P S ISAUTO S IS S IS 1 S IS S IS 2 S IS S IS 3 mm 0 0 0 0 9 S ISAUTO S ISAUTO OFF Au...

Page 115: ...P 250 F5 6 YF p o 0 0 30p 30p 4K S AF Off 1023 1 02 03 M IS 1 2 8 9 10 11 12 13 3 4 5 6 7 14 15 16 17 18 19 Super control panel sRGB Natural S Normal WB Auto ISO Auto 0 A 0 0 0 0 G 0 P 250 1023 1 02 0...

Page 116: ...lor temperature 1 P 129 1 2 3 4 5 6 7 8 9 10 11 12 13 14 Picture mode P 154 S Sharpness P 158 F Contrast P 159 E Saturation P 160 D Gradation P 161 F Color filter P 162 T Monochrome color P 163 E Effe...

Page 117: ...30p 4K S IS Auto YF 0 0 1023 1 02 03 M IS Changing ISO sensitivity ISO Adjust ISO sensitivity g Changing ISO sensitivity ISO P 98 Separate options can be selected for still photography and movie mode...

Page 118: ...essed halfway During still photography a beep will sound and the in focus indicator and AF target will light when the camera focuses When the camera focuses in movie mode the in focus indicator and AF...

Page 119: ...n High Res Shot focus stacking focus bracketing interval timer photography HDR the live ND filter and fisheye correction PreMF Preset MF The camera automatically focuses on the preset focus point when...

Page 120: ...button to initiate starry sky AF when RAFJ is selected Keeping the shutter button pressed halfway rotate the focus ring to adjust focus manually To refocus using autofocus release the shutter button...

Page 121: ...ore taking photographs with Accuracy selected Your choice of AF target modes P 91 is restricted to single target 9 target group 3 3 and 25 target group 5 5 The camera will not be able to focus in brig...

Page 122: ...stom Menu d P 273 The camera also focuses at the preset distance when turned on and when you exit the menus to the shooting display Manual Focus Adjustment When S AFJ C AFJ MF C AF TRJ PreMF or RAFJ i...

Page 123: ...Sizing the AF Target AF Area Adjust AF target settings g Choosing an AF Target Mode AF Target Mode P 91 Choosing a Focus Target AF Target Point P 95 Press the OK button to display the LV super control...

Page 124: ...s brightness Metering You can choose how the camera meters subject brightness Press the OK button to display the LV super control panel Use the front dial to select an option A Digital ESP metering Me...

Page 125: ...The spot metering position can be set at the selected AF target g CCustom Menu o Y Spot Metering P 286 125 Choosing how the camera measures brightness Metering B...

Page 126: ...subjects Press the OK button to display the LV super control panel Use the front dial to select an option I Face Priority On The camera detects and focuses on faces v Face Priority Off Face priority A...

Page 127: ...rotate the front or rear dial Release the control when the desired subject is selected g Assigning functions to buttons Button Function P 167 The face used for focus can also be selected via touch con...

Page 128: ...riority On are not available in movie mode Face eye priority will not be available during C spot metering P 124 in single target AF target mode P 91 if Y Spot Metering is selected in C Custom Menu o P...

Page 129: ...oduce a deliberate color cast into your images Separate options can be selected for still photography and movie mode Press the OK button to display the LV super control panel Use the front dial to sel...

Page 130: ...phy O 5500K Light sources with the same color temperature as flash lighting One touch white balance J K L M Color temperature set by one touch WB Situations in which you want to set white balance for...

Page 131: ...J K L or M one touch white balance 1 2 3 or 4 Photograph a piece of colorless white or gray paper Frame the piece of paper so that it fills the display Ensure that it is free of shadows In still phot...

Page 132: ...he OK button After selecting AUTO press the INFO button N Keep Warm Color options will be displayed Highlight an option using the FGHI buttons and press the OK button OFF The camera suppresses the war...

Page 133: ...cast G G green magenta axis Positive values add a green cast negative values a magenta cast Press the OK button to display the LV super control panel The effect can be previewed by pressing the OK bu...

Page 134: ...p 30p 4K S IS Auto YF 0 0 M IS 1 2 n Image Stabilizer K Image Stabilizer 1 2 Reducing camera shake Image Stabilizer You can reduce the amount of camera shake that can occur when shooting in low light...

Page 135: ...ff Movie I S Off Image stabilization disabled M IS1 All Direction Shake I S Electronic image stabilization combined with VCM controlled image sensor movement M IS2 All Direction Shake I S VCM controll...

Page 136: ...focal length Highlight Image Stabilizer and press the OK button Press INFO choose a focal length using FGHI and press the OK button Choose a focal length between 0 1 mm and 1000 0 mm Choose the value...

Page 137: ...imer shooting You can take a series of pictures by keeping the shutter button pressed all the way down Alternatively you can take pictures using the self timer Other options including anti shock and s...

Page 138: ...t width to height ratio of 4 3 the camera offers settings of 16 9 3 2 1 1 and 3 4 Press the OK button to display the LV super control panel Use the front dial to select an option Image aspect can only...

Page 139: ...rom the following options Option Image size Compression rate File format LSF 5184 3888 SuperFine 1 2 7 JPG LF 5184 3888 Fine 1 4 JPG LN 5184 3888 Normal 1 8 JPG MN 3200 2400 Normal 1 8 JPG RAW 5184 38...

Page 140: ...raw data for images that will be processed after shooting RAW image files Have the extension orf Cannot be viewed on other cameras Can be viewed using OM Workspace digital photo management and editin...

Page 141: ...it intended for upload to a website The camera can store multiple combinations of frame size rate and compression from which you can select according to your goals Slow and fast motion and high speed...

Page 142: ...1 3840 2160 C4K 4K Digital Cinema 1 4096 2160 Movies are saved in MPEG 4 AVC H 264 format Compression Bit Rate Not available when 4K or C4K is selected for Movie Resolution A I All Intra 1 SF Super Fi...

Page 143: ...to four combinations of frame size rate and compression for later use 9 Custom Choose frame sizes of 4K or 4K Digital Cinema You can also film slow and fast motion Movies P 146 High speed movie g Fil...

Page 144: ...d multiplier Changes to settings are reflected in the movie quality icon as shown below Movie Resolution FHD Full HD 1920 1080 Movie type HS High speed 120 fps Playback Frame Rate 60p 60p 59 94 fps pl...

Page 145: ...ecording Individual movie files recorded to SD or SDHC memory cards can be up to 4 GB in size With SDXC cards recording will end before the movie reaches a length with a playback time of 2 hours High...

Page 146: ...Fast Motion using the HI buttons use the FG buttons to choose a speed multiplier and then press the OK button Choose high multipliers for fast motion movies low multipliers for slow motion movies The...

Page 147: ...trols and take pictures with the flash Attaching Compatible Flash Units The methods used to attach and operate external flash units vary with the unit See the documentation provided with the unit for...

Page 148: ...ver to the ON position Keeping the UNLOCK button pressed slide the flash unit from the hot shoe 2 1 Rotate the lever to the OFF position when the flash is not in use Removing Flash Units 148 Using a f...

Page 149: ...0 G 0 P 250 F5 6 p o S AF Off 30p 30p 4K M IS S IS Auto YF FULL Manual 1023 1 02 03 Flash Mode 1 2 Flash output manual value mode Flash intensity control other modes Flash mode 1 2 Choosing a Flash M...

Page 150: ...e main subject and the background Shutter speed is set according to the exposure value metered by the camera and is not restricted by the option selected for A Slow Limit f Red Eye Slow g slow sync co...

Page 151: ...er control panel Flash mode Flash timing Shutter speed A Fill In Front curtain sync 30 1 250 s e Red eye B Flash Off f Red eye slow Front curtain sync 60 1 250 s g Slow front curtain sync c Slow rear...

Page 152: ...lso note that red eye reduction may not produce the desired results in some conditions The fastest shutter speed available when the flash fires is 1 250 s Bright backgrounds in pictures taken with the...

Page 153: ...n though the exposure in the rest of the frame is appropriate Flash compensation is available in modes other than AManual manual When AManual is selected you can adjust flash output by pressing G to s...

Page 154: ...adjusts colors and contrast for optimal results according to the type of subject P 164 2 Vivid Choose for vivid colors 3 Natural Choose for natural colors 4 Muted Choose for pictures that will later b...

Page 155: ...a j Dramatic Tone k Key Line l Watercolor m Vintage n Partial Color P 76 o Bleach Bypass p Instant Film k Flat 1 Movies are recorded using a tone curve adapted to color grading l OM Log400 1 Movies ar...

Page 156: ...r Filter P 162 T Monochrome Color P 163 E Effect P 164 Picture Mode i Enhance sRGB WB Auto ISO Auto A 0 G 0 P 250 F5 6 p Standard S Normal 0 0 0 o S AF Off 30p 30p 4K S IS Auto YF 0 0 1023 1 02 03 M I...

Page 157: ...r Creator The camera permits intuitive adjustments to color saturation and hue Choose from 30 hues and 8 levels of saturation The results can be previewed in the display Press the OK button to display...

Page 158: ...F 0 0 1023 1 02 03 M IS Making fine adjustments to sharpness Sharpness Adjust image sharpness Outlines can be emphasized for a sharp clear picture Settings are stored separately for each picture mode...

Page 159: ...fine adjustments to contrast Contrast Adjust image contrast Increasing contrast heightens the difference between bright and dark areas for a harder more well defined picture Settings are stored separ...

Page 160: ...F 0 0 1023 1 02 03 M IS Making fine adjustments to saturation Saturation Adjust color saturation Increasing saturation makes pictures more vivid Settings are stored separately for each picture mode Pr...

Page 161: ...s are stored separately for each picture mode Press the OK button to display the LV super control panel Use the front dial to select an option D Auto Shadow Adj Divides the image into detailed regions...

Page 162: ...ellow red more contrast than orange Green is a good choice for portraits and the like Press the OK button to display the LV super control panel Highlight Picture Mode using the FGHI buttons Select Mon...

Page 163: ...ome selected for picture mode P 154 Press the OK button to display the LV super control panel Highlight Picture Mode using the FGHI buttons Select Monochrome using the front dial Use the front dial to...

Page 164: ...he strength of the i Enhance effect when i Enhance is selected for picture mode P 154 Press the OK button to display the LV super control panel Use the front dial to select an option E Low Effect Low...

Page 165: ...he LV super control panel Use the front dial to select an option sRGB The color space standardized by an international standards organization It is widely supported across displays printers digital ca...

Page 166: ...ear dial Midtone selected Use the front or rear dial To reset highlight and shadow control press and hold the OK button Shadow 0 Highlight 5 Highlight 5 Reset Reset Midtone Changing the brightness of...

Page 167: ...con Button Default role K n gY gY button gY sequential shooting self timer Off U U button U display selection F F button F exposure compensation R R button R REC movie recording V AEL AFL button V exp...

Page 168: ...e j button can be used for the functions available on some lenses Only available with power zoom lenses To change the function assigned to a button follow the steps below Press the OK button to displa...

Page 169: ...nu a P 299 RREC movie recording The control functions as a movie record button Press to start or stop recording Direct Function n Assign roles to the buttons on the arrow pad FGHI The following roles...

Page 170: ...dial to choose the AF target mode and the arrow pad to position the AF target You can choose the controls used g C Custom Menu b Y Select Screen Settings P 307 Y Home Y2 AF home position K only Recal...

Page 171: ...on to activate settings and then rotate the dials The adjustments available vary with the shooting mode P Use the front or rear dial or HI buttons for exposure compensation Use the FG buttons for prog...

Page 172: ...ettings P 98 or press the control to activate settings and then make adjustments using the front or rear dial or HI buttons WB white balance Hold the control and rotate the front or rear dial to adjus...

Page 173: ...is selected for K Fn Lever Function P 321 It will likewise have no effect during movie recording if mode2 is selected for n Button Dial Lever n Fn Lever Function in the n Video Menu P 233 Lens Info S...

Page 174: ...e button again To choose an option for Live View Boost hold the button and rotate the front or rear dial Focus Ring Lock O Press the control once to disable and again to enable the lens focus ring Thi...

Page 175: ...H button to zoom out This function can be assigned to the I and G buttons only You must first set d to Direct Function Movie A A n only Zoom in or out using the movie teleconverter P 177 Press the co...

Page 176: ...ghlighted Release the button to select the highlighted feature Press the button to which Multi Function is assigned Adjust settings Multi Function can be used to access the following features B Highli...

Page 177: ...ressing the F exposure compensation button followed by the INFO button Adjusting Zoom During Filming Movie A You can zoom in on a selected area of the frame for movie recording without using lens cont...

Page 178: ...the selected area in to fill the display To return to the zoom frame press the button to which Movie A is assigned a third time To end zoom press the OK button once or press and hold the button to whi...

Page 179: ...30 00 4 100 0004 P AUTO TC 00 00 00 00 DF 30p 30p 4K 2022 10 15 0 20 20 1 40GB 1 18 22 4 5 6 7 17 16 15 14 21 20 13 12 8 9 10 2 3 11 19 Overall display ISO 400 250 2 0 sRGB 12 30 00 15 WB AUTO A 4 F5...

Page 180: ...ode 1 g n Video Menu n Display Settings Time Code Settings P 233 1 2 3 4 5 6 7 8 9 10 11 12 13 14 15 16 17 18 19 20 21 22 Aspect border P 138 AF target display P 123 Shooting mode P 43 Shutter speed P...

Page 181: ...15 ISO 400 250 2 0 sRGB 12 30 00 15 WB AUTO A 4 F5 6 45mm 1 0 18 G 4 Natural 1 8 P 100 0015 4 3 HDR1 5184 3888 YF YF 10 48kHz JPEG 2022 10 15 INFO 1 3 2 Simplified display Overall display Image only...

Page 182: ...evious r P 183 next q P 183 Can also be used during playback zoom Arrow pad FGHI Single frame playback Next I P 183 previous H P 183 playback volume FG P 197 Close up playback playback zoom Scroll the...

Page 183: ...ntire n Back Set D button Delete image P 189 OK button View menus in calendar playback press this button to exit to single frame playback Watching movies Select Play Movie and press the OK button Movi...

Page 184: ...K button The following options will be displayed Play from Beginning Play the files back in sequence from the beginning without interruption Play Movie Play only the current file Delete entire n Delet...

Page 185: ...2 10 15 12 30 00 15 100 0015 4 3 YF YF 2022 10 15 2022 10 Sun Mon Tue Wed Thu Fri Sat 1 8 7 6 5 4 3 2 15 14 13 12 11 10 9 22 21 20 19 18 17 16 30 25 26 27 28 29 3 2 1 31 30 27 28 29 26 25 24 23 o n o...

Page 186: ...ose up playback 3 4 Zooming In Playback Zoom In single frame playback turn the rear dial to 8 to zoom in Turn to G to return to single frame playback 12 30 00 15 100 0015 4 3 YF YF 2022 10 15 2x 14x n...

Page 187: ...terclockwise G to rotate it clockwise the image rotates each time the button is pressed Press the OK button to save changes and exit Movies and protected images cannot be rotated The camera can be con...

Page 188: ...s When an unprotected image is displayed you can hold the 0 AEL AFL button and rotate the front or rear dial to protect all images displayed while the dial is rotated Any previously protected images d...

Page 189: ...will be deleted You can erase images without the confirmation step by changing the button settings g C Custom Menu q Quick Erase P 292 You can choose whether deleting pictures recorded in RAW JPEG im...

Page 190: ...Function g C Custom Menu B qR Function P 275 Press the 9 button when an unmarked image is displayed during single frame display index display playback zoom Keep the 9 button pressed and rotate the fro...

Page 191: ...g RAW Only the RAW copies will be marked for sharing RAW JPEG Both RAW and JPEG copies will be marked for sharing Changing the option selected for RAW JPEG 9 does not affect pictures already marked fo...

Page 192: ...ton again You can select an image during single frame playback and index playback When an unmarked image is displayed you can hold the 4 R button and rotate the front or rear dial to select all images...

Page 193: ...You can then have the pictures printed at a print shop that supports DPOF A memory card is required when creating a print order Creating a print order Press the OK button during playback and select Pr...

Page 194: ...reated with other devices Creating a new print order deletes any existing print orders created with other devices Print orders cannot include RAW images or movies Removing all or selected pictures fro...

Page 195: ...you have removed all the desired pictures from the print order Select the date and time format and press the OK button This setting is applied to all frames with print reservation data The setting wil...

Page 196: ...he image to which you want to add audio and press the OK button Audio recording is not available with protected images Audio can also be added to pictures using the Edit option in the playback menu Us...

Page 197: ...tton Raise volume G button Lower volume Audio Playback Playback begins automatically when a picture with audio is displayed To adjust the volume Display the picture whose audio you want to play back 1...

Page 198: ...your fingernails or other sharp objects Gloves or monitor covers may interfere with touch screen operation Full Frame Playback Displaying the previous or next image Magnify Lightly tap the screen to...

Page 199: ...k Viewing images Tap an image to view it full frame Other Functions Lightly tap the screen during single frame playback or tap U during index playback to display the touch menu You can then perform th...

Page 200: ...elated items Adjust advanced photo settings n Video Menu Items related to movie recording Adjust basic and custom settings q Playback Menu Playback and retouch related items C Custom Menu Items for cu...

Page 201: ...1 Press the MENU button to view the menus A guide is displayed about 2 seconds after you select an option Press the INFO button to view or hide guides Highlight a tab using the FG buttons and press t...

Page 202: ...able Items that are not available are grayed out and cannot be selected For the default settings of each option refer to Default Settings P 390 You can also navigate the menus using the front and rear...

Page 203: ...hooting Menu 2 High Res Shot P 212 Live ND Shooting P 213 Bracketing P 216 HDR P 224 Multiple Exposure P 227 Keystone Comp P 230 Anti Shock H Silent I P 232 Using Shooting Menu 1 Shooting Menu 2 Shoot...

Page 204: ...ings or only those directly related to photography Select Reset Custom Modes in 6 Shooting Menu 1 and press the OK button Highlight Full or Basic and press the OK button See Default Settings P 390 for...

Page 205: ...can be saved to custom modes C through C4 P 77 and recalled for use as required simply by rotating the mode dial P 79 Saved settings can also be recalled directly from the menus P 79 At default settin...

Page 206: ...s to parameters are stored for each picture mode separately The camera will display the picture mode available in the current shooting mode Highlight an option using the FG buttons and press the OK bu...

Page 207: ...ize Options KX P 139 You can change the JPEG image size and compression ratio combination and M and S pixel counts g Combinations of JPEG image sizes and compression rates X Set P 347 C Custom Menu G...

Page 208: ...length of the lens making it a good choice when you are unable to switch lenses or find it difficult to get any closer to your subject Select Digital Tele converter in 6 Shooting Menu 1 and press the...

Page 209: ...s shot Start Waiting Time Choose how long the camera waits before starting interval timer photography and taking the first shot 00 00 00 24 00 00 Interval Length Choose how long the camera waits betwe...

Page 210: ...Lapse Movie The options available for Movie Resolution are 4K FullHD HD The options available for Frame Rate are 30fps 15fps 10fps 5fps The actual Start Waiting Time Interval Length and Estimated Star...

Page 211: ...itiate shooting then lock focus and start recording Touch operations are disabled during time lapse shooting Time lapse shooting cannot be combined with HDR photography High Res Shot bracketing multip...

Page 212: ...gh Res Shot A Charge Time Choose how the long the camera waits for the flash to charge for High Res Shots taken with the flash You need not specify a value when using an external flash Shooting Method...

Page 213: ...ing Menu 2 Keystone Comp Multiple Exposure HDR Bracketing Back Set Anti Shock r Silent s Off High Res Shot Live ND Shooting Off On Slowing the Shutter in Bright Light Live ND Shooting The camera makes...

Page 214: ...30p 4K YF YF ND8 LV LV ISO A 200 A A Highlight an item using the FG buttons and press the OK button ND Number Choose an ND filter type the camera will convert it to an exposure value and reduce expos...

Page 215: ...ent to the selected shutter speed to produce LV Simulation results similar to the final image Art filter picture modes cannot be used The upper limit for K ISO during live ND photography is ISO 800 Th...

Page 216: ...rent forms of bracketing Use bracketing if you are unsure what settings to use or lack the time needed to change settings during shooting You can also store bracketing settings and later recall them s...

Page 217: ...own no modification negative positive ART BKT ISO BKT Focus BKT WB BKT AE BKT FL BKT A G 3f 1 0EV Back Set Bracketing Off 3f 0 3EV 3f 0 7EV 3f 1 0EV 3f 1 0EV WB BKT WB bracketing White balance can be...

Page 218: ...ptions selected are indicated by checks P ART BKT H Pop Art 2 Pop Art 1 Soft Focus Pale Light Color 1 Pale Light Color 2 Light Tone Grainy Film 1 Back ISO BKT ISO bracketing The size of the bracketing...

Page 219: ...arge using the ACharge Time option Charge Time 30sec Select time between shutter release for flash recharge This setting is not necessary when using the dedicated flash Back Set Focus BKT Focus bracke...

Page 220: ...cord the selected number of photos without creating a composite image Shooting will end if zoom is adjusted after the shutter button has been pressed all the way down to start focus stacking photograp...

Page 221: ...Keystone Comp Multiple Exposure HDR Bracketing Back Set Anti Shock r Silent s Off High Res Shot Live ND Shooting Off On Highlight a bracketing type using the FG buttons and press the I button ART BKT...

Page 222: ...turn to the previous display when settings are complete ART BKT H Pop Art 2 Pop Art 1 Soft Focus Pale Light Color 1 Pale Light Color 2 Light Tone Grainy Film 1 Back Focus BKT Highlight On and press th...

Page 223: ...r photography keystone compensation High Res Shot fisheye compensation or the live ND filter Bracketing is not available if there is not enough space on the camera s memory card for the selected numbe...

Page 224: ...a series of shots selects from each tone range with the highest level of detail and combines them to create a single picture with a wide dynamic range If the photo features a high contrast subject de...

Page 225: ...looking results HDR2 for a more painterly effect K ISO is fixed at ISO 200 Shutter speeds can be as slow as 4 s Shooting will continue for up to 15 s Picture mode is fixed at Natural and color space a...

Page 226: ...d for aperture and shutter speed as a base for HDR photography The image displayed in the monitor or viewfinder during shooting differs from the final HDR picture Noise may appear in the final picture...

Page 227: ...you record a multiple exposure with RAW selected for KX you can then select it for subsequent multiple exposures using Overlay allowing you to create multiple exposures combining three or more photogr...

Page 228: ...mpted to choose a picture for the multiple exposure Highlight a picture using FGHI and press the OK button RAW RAW RAW RAW RAW RAW RAW Overlay Back Set Only RAW images can be selected Press the OK but...

Page 229: ...multiple exposures The RAW pictures listed in the image selection display when On is selected for Overlay are those processed using the settings in effect at the time the photograph was taken Exit mu...

Page 230: ...rame the shot and adjust keystone compensation while viewing your subject in the display Rotate the front dial to make horizontal adjustments and the rear dial to make vertical adjustments Frame the s...

Page 231: ...recorded in RAW JPEG format The following cannot be used live composite photography burst photography bracketing HDR multiple exposure the live ND filter and digital teleconverter fisheye compensatio...

Page 232: ...self timer modes P 101 Select Off to disable anti shock mode when it is not in use Silent I Choose the delay between the shutter button being pressed all the way down and the shutter being released in...

Page 233: ...ose the shutter speed at which flicker reduction applies P 240 n Specification Settings Adjust image quality for movies nX Adjust compression frame size and bit rate settings for movie recording P 141...

Page 234: ...nce to subject when C AF or C AF TR is selected for focus mode nC AF Sensitivity Choose how rapidly the camera responds to changes in the distance to the subject while focusing with C AF or C AF TR se...

Page 235: ...e When set to 1 pressing the shutter button initiates autofocus Still image photography is not available When set to R REC movie recording can be started or stopped by pressing the shutter button all...

Page 236: ...t On to adjust the display hues for ease of viewing Movie c Select Off to disable audio recording during filming P 246 n HDMI Output Adjust output settings for movies recorded with the camera connecte...

Page 237: ...I cable Type D HDMI connector Camera HDMI connector 1 2 3 4 Connecting HDMI Devices Connect the camera to the HDMI device using an HDMI cable For more information see the documentation provided with t...

Page 238: ...er speed affects how the subject appears Use the front dial to adjust exposure compensation and rear dial to adjust shutter speed Shutter speed can be set to values between 1 24 s and 1 32000 s M Free...

Page 239: ...moving while the shutter is open can be reduced by selecting the fastest available shutter speed The low end of the shutter speed changes according to the frame rate of the movie record mode 239 Choo...

Page 240: ...eed while viewing banding in the display This option is available in n Mode movie exposure modes S and M The range of available shutter speeds is reduced Select S or M for n Mode movie exposure mode P...

Page 241: ...ress the INFO button the display will change and the o icon will no longer be displayed You can adjust aperture and exposure compensation Do so using the front or rear dial or the arrow pad Press the...

Page 242: ...24p 60p and 50p are not available when FHD Full HD is selected for frame size and A I All Intra is selected for bit rate or C4K or 4K is selected for frame size If the image size is set to C4K the fra...

Page 243: ...Press the OK button 243 Frame Size Rate and Compression nX 5...

Page 244: ...fect in n movie mode In P A S M and B still photography modes the dials perform the roles selected in the C Custom Menu Role Function Exposure mode P A S M Shutter Choose a shutter speed P P FNo Adjus...

Page 245: ...ton Choose a dial using the HI buttons and use the FG buttons to choose a role Press the INFO button to move between lever positions Press the OK button when settings are complete 245 Assigning Roles...

Page 246: ...one MIC c Adjust the sensitivity of external microphones connected to the microphone jack c Volume Limiter Choose the maximum volume at which the camera will record sound Use this option to automatica...

Page 247: ...the sounds produced by the camera and lens by selecting S AF MF or PreMF for n AF Mode P 118 or by using camera controls as little as possible Sound is not recorded with high speed or slow or fast mot...

Page 248: ...t Protect P 260 Reset share Order P 261 Device Connection P 359 1 2 On Playback Menu Reset Protect Print Order Edit R Reset share Order Device Connection Back Set Using the Playback Menu The Playback...

Page 249: ...ation Pictures for Playback n If set to On images in portrait orientation are automatically rotated to be displayed in the correct orientation on the playback display 249 Automatically Rotating Portra...

Page 250: ...P 250 The following options are available Current Save the picture at the settings currently selected with the camera Custom1 Custom2 Adjust settings while previewing the results in the display The s...

Page 251: ...3 YF RAW YF RAW Back Set Highlight RAW Data Edit using FG and press the OK button RAW JPEG Back Set RAW Data Edit JPEG Edit Movie Edit R The pictures on the memory card will be displayed The edit menu...

Page 252: ...Yes using FG and press the OK button to create a JPEG copy using the selected settings Highlighting ART BKT and pressing I displays a list of art filters Highlight art filters and press the OK button...

Page 253: ...esults can be previewed in the display L Create a resized copy 1280 960 640 480 or 320 240 pixels in size Pictures with an aspect ratio other than the standard 4 3 are resized to dimensions as close a...

Page 254: ...image to be edited and press the OK button 2022 10 15 12 30 00 15 100 0015 4 3 YF RAW YF RAW Back Set Highlight JPEG Edit using FG and press the OK button RAW JPEG RAW Data Edit JPEG Edit Movie Edit...

Page 255: ...sired option When M is selected you can size the crop using the dials and position it using FGHI When Aspect is selected you can select an option using FG and then position the crop using FGHI The new...

Page 256: ...the OK button Highlight Image Overlay using the FG buttons and press the OK button Select the number of images to be overlaid and press the OK button Highlight RAW images for the overlay using FGHI a...

Page 257: ...and press the OK button Select a movie using HI and press the OK button Select Movie Edit and press the OK button Highlight In Movie Image Capture using the FG buttons and press the OK button Using th...

Page 258: ...n You will be prompted to choose how you want to save the edited movie New File Save the trimmed movie in a new file Overwrite Overwrite the existing movie No Exit without trimming the movie Overwrite...

Page 259: ...lect different footage highlight No and press the OK button If you selected Overwrite you will be prompted to choose whether to trim additional footage from the movie To trim additional footage highli...

Page 260: ...Reset Protect Remove protection from multiple pictures simultaneously Highlight Reset Protect in the q Playback Menu and press the OK button Highlight Yes and press the OK button 260 Removing Protecti...

Page 261: ...Reset share Order Cancel share orders that are set on images Highlight Reset share Order in the q Playback Menu and press the OK button Highlight Yes and press the OK button 261 Cancelling a share ord...

Page 262: ...g the Setup Menu The Setup Menu Option Description Card Setup Format the card and delete all images P 264 m Settings Date time setting Set the camera clock P 34 W Changing the display language Choose...

Page 263: ...nd optional remote controls using the camera s wireless function P 362 P 369 P 357 Firmware Version View the versions of the firmware for the camera and any lenses or other peripherals currently conne...

Page 264: ...er being used with other cameras or computers All data stored on the card including protected images is erased when the card is formatted When formatting a used card confirm there are no images that y...

Page 265: ...Erase Format Back Set Deleting all images Card Setup All images on a card can be deleted at a time Protected images are not deleted Highlight All Erase and press the OK button Highlight Yes and press...

Page 266: ...the item will be added 1 2 1 Cancel Select My Menu to add 4 3 Off YF o Off Picture Mode Reset Custom Modes KK Set Intrvl Sh Time Lapse j Y Image Aspect Digital Tele converter f1 f2 f3 f4 f5 Using My...

Page 267: ...d once the seventh item is added to the current page Items marked with a E can be removed from My Menu by pressing the R button Select Yes and press the OK button 1 2 1 4 3 Off YF o Off Back Set Shoot...

Page 268: ...ghlighted item from My Menu Select Yes and press the OK button Remove this E tab Remove from My Menu all items on the current page Select Yes and press the OK button 1 2 f2 f3 f4 f5 f1 f1 YF My Menu 1...

Page 269: ...de KC AF Sensitivity KC AF Center Start KC AF Center Priority Back Set Using the Custom Menus The Custom Menus Custom Menus a b c d AF MF P 270 B Button Dial P 275 g h Release g Image Stabilizer P 277...

Page 270: ...imum range to infinity for focus point when the camera cannot focus on the subject or the contrast is not clear The selected option takes effect when C AF C AF TR C AFJ or C AF TRJ is chosen for K AF...

Page 271: ...and C AFJ modes the camera always assigns priority to the center target in the selected group for a repeated series of focus operations Only if the camera is unable to focus using the center focus tar...

Page 272: ...lection mode and AF target mode Press the OK button to select the desired options in the Y Set Home display P 305 Y Select Screen Settings Choose the roles played by the front and rear dials or arrow...

Page 273: ...Illuminator Select Off to disable the AF illuminator To use the AF illuminator during silent photography you will need to change the option selected for Silent I Mode Settings P 232 I Face Priority A...

Page 274: ...selected for AF Mode regardless of the position of the lens focus ring Manual focus is not available even when the focus ring is in the manual focus position Focus Ring Reverse the direction in which...

Page 275: ...e Fn lever P 321 Fn Lever Power Lever Use the Fn lever as a power switch Fn Follows settings for the Fn lever function Power 1 The power turns on when the Fn lever is in position 1 and off when in pos...

Page 276: ...n Description qR Function Choose the role played by the R button during playback 9 Create or modify a share order by marking pictures for upload to a smartphone 4 Select multiple pictures 276 B Button...

Page 277: ...rames buffered and the shot limit Figures for sequential shooting speed are the approximate maximums P 322 gH Settings Flicker Reduction Reduce flicker in photos taken under fluorescent or other artif...

Page 278: ...s priority over shooting speed The sensor will be reset to the center per frame of sequential shooting The shooting speed will drop slightly Half Way Rls With IS When set to Off the IS Image Stabiliza...

Page 279: ...s in shooting mode LV OFF Info Choose a shooting display G Settings Choose the information displayed in index and calendar playback Picture Mode Settings Choose the picture modes P 154 available for s...

Page 280: ...ing Quality Priority Prioritize display quality Frame Rate Priority Prioritize display speed Art LV Mode mode1 The filter effect is always displayed mode2 Priority is given to smooth display while the...

Page 281: ...tion Grid Settings Adjust settings for the framing grid Display Color Adjust guide color and transparency The camera can store up to two combinations of settings Displayed Grid Select the type of guid...

Page 282: ...h Histogram Settings Choose the upper and lower bounds for the shadow and highlight displays P 332 Highlight Choose the lower bound for the highlight display Shadow Choose the upper bound for the shad...

Page 283: ...rated using remotes for TVs that support HDMI control This option takes effect when pictures are displayed on a TV When On is selected the camera can be used for playback only Output Frame Rate Select...

Page 284: ...tically changes to ISO 800 when the live ND filter is enabled to ISO 1600 when Shooting Method Tripod is selected for High Res Shot and to ISO 1600 when Dramatic Tone or Watercolor is selected for pic...

Page 285: ...is generated during long exposures The time required for noise reduction is shown in the display Off is selected automatically during sequential shooting This function may not work effectively with so...

Page 286: ...AFL button This allows you to use one metering method when exposure is locked by pressing the shutter button halfway and another when exposure is locked by pressing the AEL AFL button Auto Exposure is...

Page 287: ...t On to add exposure compensation to the value selected for flash output P 89 P 153 A WB Adjust white balance for use with a flash Off The camera uses the value currently selected for white balance N...

Page 288: ...et Choose the combinations of image sizes and compression rates available when shooting JPEG photos You have a choice of three image sizes and three compression rates P 139 P 207 P 347 1 Highlight siz...

Page 289: ...e may be visible at the edges of photographs taken at high ISO sensitivities K WB Choose a white balance mode for still photography Each mode can be fine tuned P 129 K All d Fine tune white balance ac...

Page 290: ...When you insert a new card the folder numbers starts at 100 and the file name starts at 0001 If a card containing images is inserted the file numbers start at the number following the highest file num...

Page 291: ...appear in b 2 Repeat Step 1 to complete the name then highlight END and press the OK button To delete a character press the INFO button to place the cursor in the name area b highlight the character...

Page 292: ...ion performed when pictures recorded at settings of RAW JPEG are deleted using Erase P 189 Both the RAW and JPEG copies are deleted when selected images are deleted or when All Erase P 265 is selected...

Page 293: ...ly adjusted when EVF Auto Luminance is set to On The contrast of the information display is also adjusted automatically EVF Style Choose a viewfinder display style P 349 q Info Settings Choose the inf...

Page 294: ...way The level gauge appears in place of the exposure bar Off The level gauge is not displayed S OVF Select On to increase the dynamic range of the viewfinder display increasing the amount of detail vi...

Page 295: ...e the angle of the level gauge Reset Reset the gauge to factory default settings Adjust Choose the current camera angle as the 0 position Touchscreen Settings Activate the touch screen Choose Off to d...

Page 296: ...Fi or USB to a computer Auto Power Off The camera will turn off automatically if no operations are performed for a set time after it has entered sleep mode This option is used to choose the delay befo...

Page 297: ...Option Description Certification Display certification icons 297 rs K Utility...

Page 298: ...hotography in Sequential Low mode When C AFJ or C AF TRJ is selected you can switch to manual focus by rotating the focus ring while the camera is focusing in continuous AF and continuous tracking AF...

Page 299: ...tive Pressing the shutter button halfway initiates autofocus regardless of whether autofocus is currently assigned to the AEL AFL button In C AF mode the last button pressed is used to maintain focus...

Page 300: ...ode2 S AF Locks mode3 S AF 1 Locks C AF mode1 C AF Locks Ends mode2 C AF Ends Locks mode3 C AF 1 Locks Ends mode4 C AF 1 Ends Locks MF mode1 Locks mode2 Locks mode3 Locks RAF mode1 RAF Locks mode2 Loc...

Page 301: ...AF mode1 Locks mode2 Locks mode3 C AF mode4 C AF MF mode1 Locks mode2 Locks mode3 S AF RAF mode1 Locks mode2 RAF mode3 RAF start end The behavior of R AF is affected by the option selected for Starry...

Page 302: ...J selected for K AF Mode This can help autofocus track a quickly moving subject or prevent the camera refocusing when an object passes between the subject and the camera Choose from five levels of tra...

Page 303: ...art When used in combination with an AF target mode other than single target C AF C AFJ C AF TR and C AF TRJ focus on the center of the selected group only during the initial scan During later scans t...

Page 304: ...a Q K C AF Center Priority When focusing using group or target AF in C AF and C AF J modes the camera always assigns priority to the center target in the selected group for a repeated series of focus...

Page 305: ...us at the touch of a button This item is used to choose the home position To access Y Home assign it to a control using K Button Function P 167 If K Orientation Linked Y P 310 is active the camera wil...

Page 306: ...ntation Linked Y is active you will be prompted to select landscape or portrait camera rotated left camera rotated right orientation before pressing the I button to display options Press the OK button...

Page 307: ...choose up to two combinations If you select Set 2 the options in the Y Select Screen Settings menu will be checked P Set 2 can be recalled by pressing the INFO button in the AF target selection displ...

Page 308: ...d the edges of the display You can also choose whether you have the option of selecting q all targets before AF target selection wraps around to the opposite border of the display Y Loop Selection Off...

Page 309: ...et selection The camera can store up to four different combinations of settings If the AF target or step size is altered from the default value checks P will appear next to the custom target options i...

Page 310: ...ed between landscape wide or portrait tall orientations Rotating the camera changes the composition and consequently also the position of the subject in the frame The camera can store the AF target mo...

Page 311: ...tation and then the other Separate settings are stored for landscape orientation portrait orientation with the camera rotated to the right and portrait orientation with the camera rotated to the left...

Page 312: ...fence window or the like Distance settings Choose the range of focus distances available The camera can store up to three settings for different situations Distances are approximate and intended as g...

Page 313: ...d by up to 20 steps Normally there is no need to fine tune autofocus using this item Fine tuning focus may prevent the camera focusing normally Focus fine tuning has no effect in S AF and S AF J modes...

Page 314: ...zoom lenses you can press the INFO button to choose between long telephoto and short wide focal lengths Choose a fine tuning value using the FG buttons and press the OK button The selected value will...

Page 315: ...se the FG buttons to highlight the name of the lens you wish to delete from the fine tuning list and then press the I button 1 50 200 F2 8 3 5 Data List Create Lens Data Set Back Set Highlight Delete...

Page 316: ...tries for the current lens select Off for AF Focus Adj The camera can store multiple values for each lens Enabling Fine Tuning Display the lens data list and place checks P next to the items you wish...

Page 317: ...s with edge enhancement You can select the enhancement color and intensity g C Custom Menu k Peaking Settings P 281 Press the INFO button to change the color and intensity when peaking is displayed Wh...

Page 318: ...ode B bulb you can adjust focus manually while the exposure is in progress This allows you to defocus during the exposure or focus at the end of the exposure Highlight an option using the FG buttons O...

Page 319: ...e effect in n movie mode The roles that can be performed by the dials in photo shooting and q playback modes are listed below Available Roles Function Exposure mode P A S M B Ps Program shift P 50 P S...

Page 320: ...are displayed s Move the cursor left or right while menus are displayed G8 index playback zoom Zoom in or out or switch to the index display during playback Prev Next View the next or previous image...

Page 321: ...conform to the setting selected for K Dial Function P 319 mode2 Switch between two groups of settings previously selected for AF Mode AF Target Mode and AF Target Point You can choose the options sel...

Page 322: ...ential low and i sequential high modes gL Settings sequential low options Choose the frame rate and maximum number of shots per burst for h sequential low G anti shock sequential low and C silent sequ...

Page 323: ...Priority S AF Release Priority J j tj j gH Settings sequential high options Choose the frame rate and maximum number of shots per burst for i sequential high and D silent sequential high modes You can...

Page 324: ...he I button j Off 10fps Frame Count Limiter Max fps Back Set Choose settings for Pre shutter Frames or Max fps To keep shooting as long as the shutter release button is pressed all the way down select...

Page 325: ...er in the live view display or uneven exposure in photos taken at fast shutter speeds This item reduces these effects Reducing Flicker in Live View Anti Flicker LV Reduce flicker under fluorescent lig...

Page 326: ...G buttons and press the OK button Anti Flicker LV Auto Automatically reduces flicker Back Set Flicker Reduction options will be displayed Press the MENU button repeatedly to exit the menu 326 Reducing...

Page 327: ...n Anti Flicker Shooting On Effects of flicker such as uneven exposures and colors will be reduced The shutter release time lag may become longer Valid when using mechanical shutter Back Set Reducing F...

Page 328: ...that use the electronic shutter including silent modes High Res Shot and Pro Capture modes The camera may be unable to detect flicker at some settings Normal release timing will be used if flicker is...

Page 329: ...displays marked with a check will be available in the selected shooting mode H Back Live SCP Live Control P A S M B Choosing the control panel displays K Control Settings MENU Q C Q i Q K Control Set...

Page 330: ...ISO Auto 0 A 0 0 0 0 G 0 Aspect P 250 F5 6 p o S AF Off 30p 30p 4K S IS Auto YF 0 0 1023 1 02 03 M IS 2 3 INFO INFO P A S M B Effect Off Pop Art 1 ART 1 ART 1 WB AUTO WB AUTO 4 3 S ISAUTO S ISAUTO o o...

Page 331: ...Live Controls Available settings Displayed in ART mode Displayed in SCN mode Displayed in movie mode Some functions cannot be used depending on the shooting mode Live controls are available in 0 P A...

Page 332: ...back information displays The added displays are displayed by repeatedly pressing the INFO button during playback You can also choose to not show displays that appear at the default setting Highlight...
Page 333: ...ormation display P 41 To add highlights and shadows to the LV Info display press the I button to place a check next to Custom1 or Custom2 The added displays are can be viewed by repeatedly pressing th...

Page 334: ...d by default with G Settings Screens with a check can be selected on the playback screen using the rear dial 12 30 00 20 2022 10 15 12 30 00 20 100 0015 4 3 YF YF 2022 10 15 12 30 00 20 2022 10 15 12...

Page 335: ...ting zoom ratio for playback zoom close up playback Recently Zoom in to the most recently selected zoom ratio Equally Value Images are displayed at a zoom ratio of 1 1 A a icon appears in the monitor...

Page 336: ...reversed for self portraits On When reversed for self portraits the monitor shows a mirror image of the view through the lens Off The display does not change when the monitor is reversed Select On fo...

Page 337: ...ital video signal type Choose a format that matches the input format selected with the TV Depending on TV settings the image may be cropped and some indicators may not be visible C4K The signal is out...

Page 338: ...rol g Using a TV Remote HDMI Control P 388 The camera monitor turns off You can operate the camera by following the operation guide displayed on the TV During single frame playback you can display or...

Page 339: ...ata on the camera memory card can be copied to the computer MTP The pictures on the memory card can be viewed or copied to the computer using standard software supplied with Windows P 371 Webcam The c...

Page 340: ...e display will be refreshed at the selected interval while live bulb photography is in progress allowing you to view the results in the display Live Bulb options can also be displayed by pressing the...

Page 341: ...e display will be refreshed at the selected interval while live time photography is in progress allowing you to view the results in the display Live Time options can also be displayed by pressing the...

Page 342: ...can be chosen in advance using the menus Choose an exposure time of from 1 2 to 60 s Press the OK button to select the highlighted option C Custom Menu n will be displayed Press the MENU button repea...

Page 343: ...ngs Off KFlicker Scan Off Back Set Off On Reducing Flicker Under LED Lighting K Flicker Scan MENU Q C Q n Q K Flicker Scan Banding may occur in photographs taken under LED lighting Use K Flicker Scan...

Page 344: ...adjusting shutter speed until banding is no longer visible in the display Press the INFO button the display will change and the o icon will no longer be displayed You can adjust aperture and exposure...

Page 345: ...ecessary In normal circumstances exposure can be adjusted using exposure compensation P 89 Fine tuning exposure reduces the amount of exposure compensation available in the direction or exposure was f...

Page 346: ...hutter speed conditions for when the flash fires Shooting mode Flash firing shutter speed Upper limit Lower limit P The camera automatically sets the shutter speed A X Sync setting A Slow Limit settin...

Page 347: ...ression rate Image size pixel count Compression rate Application Super Fine Fine Normal Large 5184 3888 1 LSF 1 LF 1 LN 1 Select for the print size Middle 3200 2400 1 MSF MF MN 1 Middle 1920 1440 Smal...

Page 348: ...mation for Lens Info Settings in C Custom Menu p Select Lens Name and enter a lens name After entering a name highlight END and press the OK button Use FGHI to choose the Focal Length Use FGHI to choo...

Page 349: ...S ISAUTO S ISAUTO 30p 4K 0 0 YF YF ISO A 200 Style 3 Selecting the display style of the viewfinder EVF Style MENU Q C Q I Q EVF Style Style 1 2 Similar to film camera viewfinder displays Style 3 The s...

Page 350: ...h intensity control P 153 Bottom Exposure compensation P 89 Available recording time P 424 Number of storable still pictures P 422 Level gauge 2 P 42 Recording time displayed during recording P 83 Fli...

Page 351: ...ected for n Display Settings n Info Settings in the n Video Menu P 233 takes effect in n movie mode Basic Information The camera displays icons and the like showing camera settings Custom1 Custom2 In...

Page 352: ...all EVF Auto Switch End q8 End P Reset P Switch 7 Lock touch controls Call BKT Settings End Flicker Scan Button Hold Options Press and hold Time MENU Q C Q r Q Press and hold Time Choose how long butt...

Page 353: ...to give photos the appearance of pictures taken with a wide angle lens The amount of correction can be selected from three different levels You can also opt simultaneously to correct distortion in pho...

Page 354: ...On is selected for Fisheye Compensation press the MENU button to exit the menus Take pictures Pictures taken with RAW selected for image quality are recorded in RAW JPEG format Fisheye compensation is...

Page 355: ...sks can be accomplished by connecting the camera to an external device such as a computer or smartphone g Connecting to Smartphones P 358 Copying pictures to a computer P 371 Connection P 377 Connecti...

Page 356: ...rohibited g Disabling the Camera s Wireless Functions P 357 Wireless transmissions are vulnerable to interception by third parties Use wireless features with this in mind The wireless transceiver is l...

Page 357: ...362 and Bluetooth P 361 To disable wireless LAN Bluetooth only while the camera is off select Off for Wi Fi Bluetooth Settings Power off Standby in the e Setup Menu g Wireless Settings for When the Ca...

Page 358: ...with the specified app OM Image Share Download images from the camera to the smartphone Download pictures marked for sharing P 190 to your smartphone You can also use the smartphone to select images f...

Page 359: ...luetooth settings The Bluetooth local name and passcode the Wi Fi SSID and password and a QR code are displayed in the monitor Tap the camera icon at the bottom of the OM Image Share display An Easy S...

Page 360: ...and end the connection OM Image Share At default settings Bluetooth is kept active even after Wi Fi connection is terminated allowing you to shoot remotely with a smartphone To set the camera to also...

Page 361: ...smartphone start Device Connection P 359 in the q Playback Menu of the camera Onq When the camera is on it will emit wireless signal and be on standby for wireless connection You can connect the camer...

Page 362: ...red option and press the OK button Select When you turn the camera off you will be prompted to choose whether to maintain the wireless connection to the smartphone Off Turning the camera off terminate...

Page 363: ...off and terminate the wireless smartphone connection If no operations are performed about a minute after the confirmation dialog is displayed the camera will end the wireless connection to the smartp...

Page 364: ...OM Image Share on the smartphone Depending on the smartphone a confirmation screen for Wi Fi connection may appear Follow the on screen guidance to connect the smartphone and the camera The images in...

Page 365: ...0 enable power off standby P 362 and if you are using an iOS device launch the OM Image Share app in advance When you mark an image for sharing on the camera and turn the camera off a notification app...

Page 366: ...ting Onq for Bluetooth P 361 puts the camera on standby ready for a wireless connection Launch OM Image Share and tap Remote Control Tap Live View Tap the shutter button to shoot The image taken is sa...

Page 367: ...Bluetooth P 361 select Onq Selecting Onq for Bluetooth P 361 puts the camera on standby ready for a wireless connection Launch OM Image Share and tap Remote Control Tap Remote Shutter Tap the shutter...

Page 368: ...displayed in OM Image Share Take pictures with the camera When it is possible to add position information 3 will be lit on the shooting screen When the camera cannot acquire position information 3 bl...

Page 369: ...Wireless Functions P 357 Bluetooth P 361 Connection Password P 370 and Power off Standby P 362 Resetting wireless settings ends pairing between the camera and smartphones Before connecting to a smartp...

Page 370: ...Highlight Connection Password and press I Press the R button as directed by the on screen guide A new password will be set You can change both password for smartphone connections and Bluetooth connect...

Page 371: ...ies with the computer For more information refer to the documentation provided with your computer The selection screen for the USB connection is displayed If USB connection options are not displayed c...

Page 372: ...the following environments even if your computer is equipped with a USB port Computers with a USB port added by means of an extension card etc computers without a factory installed OS or home built co...

Page 373: ...via USB OM Workspace This computer application is used to download and view photos and movies recorded with the camera It can also be used to update the camera firmware The software can be downloaded...

Page 374: ...ons are not displayed choose Select for USB Mode P 339 in the camera Custom Menus If the camera display remains blank after the computer is connected the battery may be exhausted Use a fully charged b...

Page 375: ...yed Using any of the above functions may temporarily disrupt audio and video in some web meeting or streaming apps While the camera is supplying audio and video to the computer you will not be able to...

Page 376: ...ames of parts 1 2 3 4 5 6 7 8 Shutter button Data transfer indicator Shutter button lock Mode dial 4 K n CONNECT Cable connector Battery compartment lid Battery compartment cover Strap eyelet 376 Name...

Page 377: ...hutter button Before recording movies select R REC for n Shutter Function g n Video Menu n Button Dial Lever n Shutter Function P 233 Wireless remote control is not available while the cable is connec...

Page 378: ...If you rotate the mode dial before it is complete the data transfer indicator flashes rapidly The data transfer indicator lights when pairing starts The data transfer indicator goes out when pairing i...

Page 379: ...hutter Setting and press I Select Delete Pairing and press the OK button Select Yes and press the OK button When you have paired the camera with a remote control you have to perform Delete Pairing to...

Page 380: ...soon as it is turned on When the mode dial of the remote control is set to K still photography mode When you lightly press the shutter button of the remote control down to the first position press the...

Page 381: ...from the remote control when it is connected to a smartphone Pairing and remote photography are not available when Off is selected for Wireless Function P 357 The camera does not enter sleep mode whe...

Page 382: ...MAC address of the remote control The MAC address of the remote control is printed on the warranty card provided with the remote control 382 MAC address of the remote control...

Page 383: ...rop or swing the remote control while holding the cable Moisture on the cable or remote control connectors could interfere with wireless control and render wired connections unreliable Confirm that th...

Page 384: ...pictures to an audience The TV remote can be used to control the display while the television is connected to the camera No app or other software is required You can also film movies while the camera...

Page 385: ...160 priority 1080p Full High Definition 1080p priority 720p High Definition 720p priority 480p 576p 480p 576p HDMI Control The television remote control can be used to operate the camera in playback m...

Page 386: ...Highlight an item using the FG buttons and press the I button HDMI HDMI Control Output Frame Rate Output Size 60p Priority Back Set Off 4K Highlight the desired option using the FG buttons and press...

Page 387: ...off when an HDMI cable is connected For information on switching to HDMI input see the manual provided with the TV Depending on TV settings the image may be cropped and some indicators may not be visi...

Page 388: ...f 4K Off On Using a TV Remote HDMI Control When connected to a TV via an HDMI cable the camera can be operated using the television remote control The television must support HDMI control See the tele...

Page 389: ...en In single frame playback use the red button on the remote control to choose the information displayed and the green button to switch to the index display Some functions may be unavailable on some t...

Page 390: ...efault Settings Default Settings Live Controls LV Super Control Panel P 391 K Shooting Menus P 396 n Video Menu P 400 q Playback Menu P 404 e Setup Menu P 405 C Custom Menus P 406 390 Default Settings...

Page 391: ...e A P P P 7 0 P P P Manual Value A FULL flash set to AMANUAL P P P K Image Stabilizer S IS AUTO P P P n Image Stabilizer M IS1 P P P WB Auto On selected for N Keep Warm Color P P P WB compensation A 0...

Page 392: ...mal P P Effect i Enhance selected for Picture Mode E Standard P P Color Filter Monochrome selected for Picture Mode N None P P P Monochrome Color Monochrome selected for Picture Mode N None P P P Aspe...

Page 393: ...e Stabilizer S IS Auto P P P n Image Stabilizer M IS1 P P P WB Auto On selected for N Keep Warm Color P P WB compensation A 0 P WB compensation G 0 P Kelvin 5400K CWB selected for WB P AF Area Center...

Page 394: ...Contrast 0 P P Saturation 0 P P Gradation Gradation Normal P P Aspect 16 9 fixed C4K selected for nX 17 9 Color Space sRGB fixed Highlight Shadow Control f 0 P P P n Mode P P Movie c On P P P 394 Liv...

Page 395: ...P P P 5B group B Off P P P 5C group C Off P P P 8 Camera Flash Off P P P Flash compensation 0 TTL Auto P P P Flash level 1 1 Manual P P P A FP A Normal P P P f optical signal strength Low P P P Channe...

Page 396: ...ng Basic for Reset Function Default 1 2 3 Reset Custom Modes Reset Basic P Assign to Custom Mode Shooting mode P Image quality LF RAW P Custom Mode Save Settings Reset P Recall from Custom Mode P Pict...

Page 397: ...P Interval Mode Time Priority P P Exposure Smoothing On P P Time Lapse Movie Off P P Movie Settings Movie Resolution FullHD P P Frame Rate 10fps P P High Res Shot High Res Shot K 0 sec P P A Charge T...

Page 398: ...Off P P P Focus BKT Off P P P Focus Stacking Off P P P Set number of shots Off selected for Focus Stacking 99 On selected for Focus Stacking 8 P P P Set focus differential 5 P P P A Charge Time 0 sec...

Page 399: ...1 2 3 Anti Shock H Silent I Anti Shock H H 0 sec P P Silent I I 0 sec P P Noise Reduction I Off P P Silent I Mode Settings P P o Not Allow P P AF Illuminator Not Allow P P Flash Mode Not Allow P P 399...

Page 400: ...e P P n Flicker Scan Off P P n Specification Settings nX MOV n 4K 30p P P P bISO Auto Set Upper Limit Default Upper Limit 6400 Default 200 P P P b ISO Auto On P n Noise Filter Standard P P P n WB Auto...

Page 401: ...n Default 1 2 3 n Button Dial Lever n Button Function gY Off P U U View Selection P F Exposure F P R R REC P V AEL AFL P P ISO P d Y P M Y Electronic Zoom P K Y WB P W Magnify P j AF Stop P 401 n Vide...

Page 402: ...Position 1 z F y FNo P A Position 2 z c VOL y c VOL P S Position 1 z F y Shutter P S Position 2 z c VOL y c VOL P M Position 1 z FNo y Shutter P M Position 2 z c VOL y ISO P n Fn Lever Function mode2...

Page 403: ...ettings Time Code Mode Drop Frame P Count Up Rec Run P Starting Time 0 00 00 P a View Assist Off P Movie c On P P P Recording Volume Built in c 0 P MIC c 0 P c Volume Limiter On P Wind Noise Reduction...

Page 404: ...restored by selecting Full for Reset 3 Default can be restored by selecting Basic for Reset Function Default 1 2 3 n On P P P Edit Sel Image RAW Data Edit JPEG Edit Movie Edit c Image Overlay Print Or...

Page 405: ...selecting Basic for Reset Function Default 1 2 3 Card Setup m Settings m Time Zone W English b o 0 p 0 Natural P P Image Review Off P P Wi Fi Bluetooth Settings Wireless Functions On P Bluetooth Off P...

Page 406: ...AF P P P K AF MF Off P P P K AEL AFL S AF mode3 P P P C AF mode4 P P P MF mode3 P P P RAF mode3 P P P Half Way AF Operative P P P Face Priority AF 1 On V On P P P AF Scanner mode2 P P P K C AF Sensit...

Page 407: ...s tPos P P P Y Loop Settings Y Loop Selection Off P P P Via q No P P P t Target Mode Settings 1 1 vertical and horizontal step size 1 P P K Orientation Linked Y Off P P c AF MF Function Default 1 2 3...

Page 408: ...ot affect saved values d AF MF Function Default 1 2 3 Starry Sky AF Setting Speed P P P Preset MF distance 999 9 m P P P MF Assist Magnify Off P P Peaking Off P P Focus Indicator Off P P MF Clutch Ope...

Page 409: ...ult 1 2 3 K Button Function gY Sequential shooting self timer P P U U View Selection P P F Exposure F P P R R REC P P V AEL AFL P P P ISO P P d Y P P M Y Flash Mode P P K Y g Y P P W Preview P P j AF...

Page 410: ...Y WB P P S Position 1 z F y Shutter P P Position 2 z ISO Y WB P P M B Position 1 z FNo y Shutter P P Position 2 z F y ISO P P Menu z s y r Value P q z Prev Next y G8 P Dial Direction Exposure Dial1 P...

Page 411: ...r Function Default 1 2 3 S AF Release Priority Off P P P C AF Release Priority On P P P gL Settings g F Max fps 6 fps P P P Frame Count Limiter Off P P P B Max fps 10 fps P P P Frame Count Limiter Off...

Page 412: ...30 fps P P P Pre shutter Frames 12 shots P P P Frame Count Limiter 25 shots P P P Flicker Reduction Anti Flicker LV Auto P P Anti Flicker Shooting Off P P h Release g Image Stabilizer Function Default...

Page 413: ...Only Overall P P P q8 Info Magnify Frame Magnify Scroll Select Frame P LV Info Image Only Custom 1 Custom 2 P P Informations during half way On P P LV OFF Info Shooting Information P P G Settings 25 C...

Page 414: ...Up Settings LV Close Up Mode mode2 P P Live View Boost Off P P q8 Default Setting Recently P z Settings z Lock Off P P Live View Boost Off P P k Disp o PC Function Default 1 2 3 Grid Settings Display...

Page 415: ...P P P HDMI Output Size 4K P HDMI Control Off P Output Frame Rate 60p Priority USB Mode Select P P m Exp ISO BULB A Function Default 1 2 3 EV Step 1 3 EV P P P ISO Step 1 3 EV P P P K ISO Auto Set Upp...

Page 416: ...in P P P Live Composite Timer 3h P P P Bulb Time Monitor 7 P P Live Bulb Off P P Live Time 0 5 sec P P Composite Settings 1 sec P P K Flicker Scan Off P P P o Exp ISO BULB A Function Default 1 2 3 Met...

Page 417: ...A WB Off P P A RC Mode Off P P P G X WB Color Function Default 1 2 3 X Set X1 LSF X2 LF X3 LN X4 MN P P P Pixel Count Middle 3200 2400 P P P Small 1280 960 P P P Shading Comp Off P P P K WB Auto P P P...

Page 418: ...opyright Name Lens Info Settings 1 Off P Using Reset to perform a full or standard reset does not affect saved values q Record Erase Function Default 1 2 3 Quick Erase Off P P P RAW JPEG Erase RAW JPE...

Page 419: ...le 3 P q Info Settings Basic Information Custom1 Custom2 P P EVF Grid Settings Display Color Preset 1 P P Displayed Grid Off P P q Half Way Level On P P S OVF Off P P P r K Utility Function Default 1...

Page 420: ...7 0 7 sec P P Reset B 0 7 sec P P Reset R 0 7 sec P P Reset Y 0 7 sec P P Call EVF Auto Switch 0 7 sec P P End q8 0 7 sec P P End P 0 7 sec P P Reset P 0 7 sec P P Switch 7 Lock 0 7 sec P P Call BKT...

Page 421: ...s K Utility Function Default 1 2 3 Backlit LCD Hold P P P Sleep 1 min P P P Auto Power Off 4h P P P Quick Sleep Mode Off P P P Backlit LCD 8 sec P P Sleep 10 sec P P Certification 421 C Custom Menus...

Page 422: ...es IF RAW Tripod 10368 7776 Lossless compression ORF Tripod 168 2 Handheld 117 1 Tripod 355 Handheld 489 Handheld 8160 6120 8160 6120 1 4 JPEG 5184 3888 Lossless compression ORI JF RAW Tripod 10368 77...

Page 423: ...2 7 1 0 54252 SSF 1 4 0 8 69752 SN 1 8 0 5 97654 SSF 1024 768 1 2 7 0 8 69752 SSF 1 4 0 6 97654 SN 1 8 0 3 244135 The number of storable still pictures may change according to the subject whether or n...

Page 424: ...es N 13 hours 59 minutes Figures are for footage recorded at the maximum frame rate The actual bit rate varies with the frame rate and scene recorded When an SDXC card is used movies over 2 hours are...

Page 425: ...g those for the connectors and the battery and card compartments the mounting surfaces on the camera and lens and all connectors for accessories and the like Remove any foreign matter with a clean lin...

Page 426: ...low battery warning being displayed Remove the batteries before putting the camera into storage for periods of a month or more Leaving the batteries in the camera for extended periods shortens their...

Page 427: ...o 240 V AC 50 60 Hz around the world However depending on the country or area you are in the AC wall outlet may be shaped differently and the USB AC adapter may require a plug adapter to match the wal...

Page 428: ...the camera Do not remove the body cap or attach the lens in dusty places Do not point the lens attached to the camera toward the sun This may cause the camera to malfunction or even ignite due to the...

Page 429: ...ing Check the position of the MF clutch before shooting Sliding the focus ring to the AF MF position at the end of the lens selects autofocus while sliding it to the MF position closer to the camera b...

Page 430: ...F YF 1023 1 02 03 ISO A 200 Camera Displays for Lens SET and CALL Functions The camera displays SETN when the focus position is saved using the SET option and CALLN when a saved focus position is rest...

Page 431: ...n the ECG 5 is not in use a a b Store the connector cover a in the ECG 5 Optional Accessories Grip ECG 5 The grip helps you keep the camera steady when using large lenses Make sure to turn the camera...

Page 432: ...required and whether the unit supports macro photography Flash units designed to communicate with the camera support a variety of flash modes including TTL auto and super FP Flash units can be mounte...

Page 433: ...FL 900R Supported flash control modes TTL AUTO AUTO MANUAL FP TTL AUTO FP MANUAL MULTI RC SL AUTO SL MANUAL GN Guide Number ISO 100 GN 58 100 200 mm 1 GN 27 12 24 mm 1 Supported wireless systems RC S...

Page 434: ...ess remote control RC The remote flash units are controlled via a unit mounted on the camera hot shoe Settings can be adjusted separately for the camera mounted unit and units in up to three other gro...

Page 435: ...ts in the selected group Choose 8 to adjust settings for the unit mounted on the camera Supported flash control modes Choose a flash mode Flash compensation Adjust flash output When MANUAL is selected...

Page 436: ...pictures after confirming that the remote units and the unit on the camera are charged Wireless Flash Control Range The illustration is intended as a guide only The flash control range varies with the...

Page 437: ...ge the camera Connecting flash units with signal contacts that do not conform to our specifications may damage the camera Select mode M choose a shutter speed no faster than the flash sync speed and s...

Page 438: ...nverter lenses attach to the camera lens for quick and easy fish eye or macro photography See our website for information on the lenses that can be used Eyecup EP 16 You can switch to a large size eye...

Page 439: ...ithium ion Charger BCS 5 USB AC Adapter F 5AC Eyecup EP 16 EP 15 Remote Cable RM CB2 Remote Control RM WR1 Accessories For the latest information please visit our website Power Supply Viewfinder Remot...

Page 440: ...ns on the lenses that can be used with the adapter Visit our website for details Four Thirds Adapter MMF 2 MMF 3 FCON P01 fisheye WCON P01 wide MCON P01 macro MCON P02 macro Lens Micro Four Thirds sys...

Page 441: ...ctronic Flash FL 700WR Macro Flash STF 8 Wireless radiowave commander FC WR Wireless radiowave receiver FR WR Grip ECG 5 Flash Grip Case Strap Camera case Strap Connection Cable USB cable HDMI cable a...

Page 442: ...ory cards are available from third party suppliers Microphone Microphones are available from third party suppliers Software Digital photo management and editing software OM Workspace Smartphone app OM...

Page 443: ...rolonged period remove the battery and card Store the camera in a cool dry place that is well ventilated Insert the battery periodically and test the camera s functions Remove dust and other foreign m...

Page 444: ...urned on the camera should be held upright for the dust reduction function to be effective Pixel Mapping Checking the image processing functions The pixel mapping feature allows the camera to check an...

Page 445: ...at low temperatures Remove the battery and warm it by putting it in your pocket for a while A dialog prompting you to choose a language is displayed See Initial setup P 34 for information on choosing...

Page 446: ...high contrast object at the same distance from the camera as your main subject compose the shot and shoot Subjects that are difficult to focus on It may be difficult to focus with auto focus in the fo...

Page 447: ...when the mode dial is rotated to another setting or the camera is turned off Settings altered in custom modes C C4 are reset to saved values when the mode dial is rotated to another setting or the cam...

Page 448: ...current shooting settings Check if the same function is displayed in gray in the menus The subject appears distorted The following functions use an electronic shutter movie recording P 82 silent mode...

Page 449: ...on and switch to another display mode Focus mode cannot be changed from MF manual focus The lens you are using may be equipped with the MF clutch mechanism In this case manual focus is selected when t...

Page 450: ...the card or erase unwanted pictures Before deleting pictures be sure any you wish to keep have been copied to a computer Card Full There is not enough space on the memory card to record additional pic...

Page 451: ...he internal temperature of the camera has risen due to sequential shooting Wait a moment for the camera to turn off automatically Allow the internal temperature of the camera to cool before resuming o...

Page 452: ...ength on a 35 mm film camera Approx twice the focal length of the lens Image sensor Product type 4 3 Live MOS sensor Total no of pixels Approx 21 77 million pixels No of effective pixels Approx 20 37...

Page 453: ...pixels Approx 1 04 million dots aspect ratio 3 2 Shutter Product type Computerized focal plane shutter Shutter speed 1 8000 60 sec bulb photography time photography Flash sync speed Up to 1 250 sec A...

Page 454: ...y L64 L100 200 25600 in steps of 1 3 or 1 EV Exposure compensation 5 0 EV in steps of 1 3 1 2 or 1 EV White balance Mode setting Auto Preset WB 7 settings Customized WB One touch WB camera can store u...

Page 455: ...ps D t Self timer Operation time 12 sec 2 sec custom Flash Flash control mode TTL AUTO TTL pre flash mode MANUAL X Sync Up to 1 250 sec Wireless LAN Compatible standards IEEE 802 11b g n Bluetooth Com...

Page 456: ...g 0 9 Ib including battery and memory card Operating environment Temperature 10 C 40 C 14 F 104 F operation 20 C 60 C 4 F 140 F storage Humidity 30 90 operation 10 90 storage Water resistance Type IE...

Page 457: ...4 F charging Dimensions Approx 35 5 mm W 12 8 mm H 55 mm D 1 4 0 5 2 2 Weight Approx 46 g 0 1 Ib USB AC adapter MODEL NO F 5AC 1 F 5AC 2 Rated input AC 100 V 240 V 50 60 Hz Rated output DC 5 V 1500 mA...

Page 458: ...ms HDMI and HDMI High Definition Multimedia Interface and the HDMI Logo are trademarks or registered trademarks of HDMI Licensing Administrator Inc in the United States and other countries 458 Specifi...

Page 459: ...RONMENT General Precautions Read All Instructions Before you use the product read all operating instructions Save all manuals and documentation for future reference Power Source Connect this product o...

Page 460: ...any unusual odors noise or smoke around it unplug the power plug from wall outlet immediately and stop using it Then contact an authorized distributor or service center Stop using the camera immediat...

Page 461: ...ntact an authorized distributor or service center Do not try to remove the battery by force Damage to the battery exterior scratches etc may produce heat or an explosion Always store batteries out of...

Page 462: ...s do not remove it immediately after using the camera This camera uses one of our lithium ion batteries Use the specified genuine battery There is a risk of explosion if the battery is replaced with t...

Page 463: ...unload the battery from the camera before storing the camera for a long period When storing the battery for a long period select a cool location for storage For plug in type USB AC adapter Connect th...

Page 464: ...ed with high quality accuracy however there may be a stuck or dead pixel on the monitor These pixels do not have any influence on the image to be saved Because of the characteristics the unevenness of...

Page 465: ...ed trademarks of Microsoft Corporation SDXC Logo is a trademark of SD 3C LLC Micro Four Thirds Four Thirds and the Micro Four Thirds and Four Thirds logos are trademarks or registered trademarks of th...

Page 466: ...era may include third party software Any third party software is subject to the terms and conditions imposed by the owners or licensors of that software under which software is provided to you Those t...

Page 467: ...date of issue 2022 10 WD880000 https om digitalsolutions com 2022...

Reviews: