background image

1

Getting started

22

EN

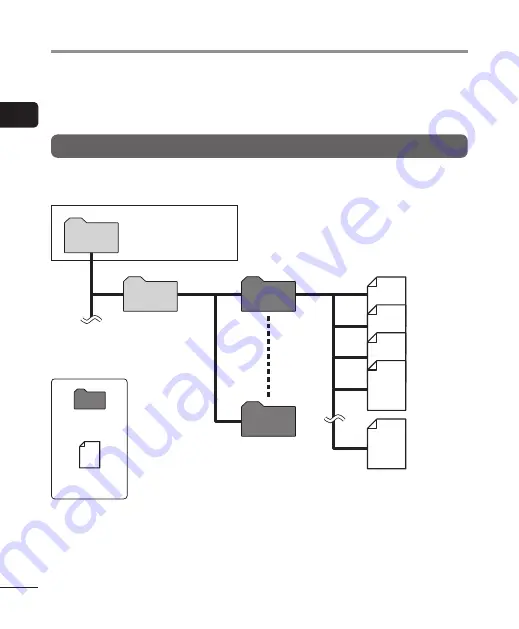
You can use the internal memory or microSD cards as data recording media. Regardless 

of the recording media, audio files, music files, and content files are sorted into folders 

with a tree structure and saved. You can rearrange the saved files in the desired order 

(

g


P.55).

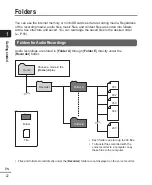
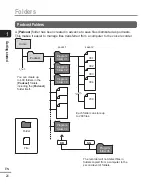
Folders for Audio Recordings

Audio recordings are stored in [

Folder A

] through [

Folder E

] directly under the 

[

Recorder

] folder.

Folder

File

  Each folder can store up to 200 files.

  To transfer files recorded with the 

voice recorder to a computer, copy 

these files to the computer.

Choose a mode in the 

[

Home

] display.

Home

Folder A

200

001

002

003

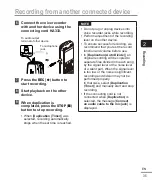
004

Folder E

Recorder

  Files and folders stored directly under the [

Recorder

] folder are not displayed on the voice recorder.

Folders

Summary of Contents for WS-883

Page 1: ...ecautions P 83 P 87 before using this product Keep these instructions available for future reference Read the Basic Manual and this manual PDF version thoroughly before using the product and record te...

Page 2: ...sing resuming recording 29 Quickly checking a recording 29 Monitoring while recording 30 Changing the recording scene Rec Scene 31 Changing the recording scene 31 Recording with an external microphone...

Page 3: ...67 Device menu Device Menu 68 Selecting the recording media Memory Select 68 Setting the battery in use Battery 68 Setting the time date Time Date 68 Selecting the mode Mode Select 69 Restoring the de...

Page 4: ...button 7 Built in speaker 8 USB connector USB connector cover retractable 9 Built in stereo microphone R 0 POWER switch a Card cover b REC record K button c FOLDER INDEX button d CALENDAR SCENE butto...

Page 5: ...Fast playback indicator Slow playback indicator Fast forward indicator Fast rewind indicator 5 Elapsed recording time or playback time 6 Recording media indicator Internal memory microSD card Possibl...

Page 6: ...ck indicator Slow playback indicator Fast forward indicator Fast rewind indicator 4 Elapsed recording time or playback time 5 Recording media indicator Internal memory microSD card Possible recording...

Page 7: ...ting the battery setting WS 883 model only Select the battery setting to match the inserted battery Select the setting for a nickel metal hydride rechargeable battery or the setting for an alkaline ba...

Page 8: ...battery in the battery compartment of the voice recorder 1 Slide open the battery cover while pressing down on it 2 Insert AAA batteries making sure to place the positive and negative terminals corre...

Page 9: ...ng started EN Setup Turning the power ON 1 Slide the POWER switch to the ON position POWER switch Setting the language 1 Press the or button to select a language 2 Press the NOK button to finalize the...

Page 10: ...button to finalize the setting NOTE The mode can be switched even after setting Setting the battery in use Battery g P 68 Setting the time date 1 Press the M or L button to select the item to set 2 Pr...

Page 11: ...lable Simple Mode This mode lists frequently used functions Displayed text becomes larger for easier viewing 2 Press the NOK button to finalize the setting TIP The mode can be switched even after sett...

Page 12: ...t Battery to Ni MH g P 8 P 68 1 Start the PC 2 Slide the USB connector slide lever in the direction of the arrow 3 After making sure the voice recorder is stopped connect the USB connector to a USB po...

Page 13: ...in standby sleep or auto power OFF mode Do not use a USB hub when charging the battery by connecting to the PC You cannot charge the battery if 1 or 2 is blinking Charge the battery in an ambient temp...

Page 14: ...NOTE Before charging the batteries insert the rechargeable batteries provided and set Battery to Ni MH g P 8 P 68 indicates there is little remaining battery charge Charge the batteries or replace th...

Page 15: ...the power of the computer is OFF or the computer is in the standby sleep or auto power OFF mode Do not use a USB hub when charging the batteries by connecting to the computer You cannot charge the ba...

Page 16: ...e storage The continuous battery usage time is reduced when using a microSD card g P 89 The continuous battery usage time will vary depending on the performance of the battery in use g P 89 Rechargeab...

Page 17: ...Operation is not guaranteed if batteries from another manufacturer is used Always dispose rechargeable batteries in the legally prescribed manner Before disposing rechargeable batteries that are not f...

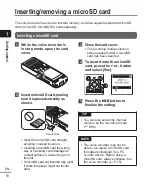
Page 18: ...t surface or cause it to jam in the slot A microSD card not inserted fully until it clicks into place might not record data 3 Close the card cover The recording media selection screen appears after a...

Page 19: ...with the voice recorder and not be recognized properly For microSD card compatibility please visit our website s customer support page Note that our customer support will provide information on microS...

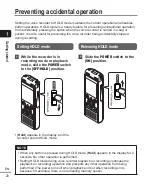
Page 20: ...ing mode or playback mode slide the POWER switch to the OFF HOLD position Hold appears in the display and the recorder enters HOLD mode Releasing HOLD mode 1 Slide the POWER switch to the ON position...

Page 21: ...back stop position at power OFF is stored in the memory TIP Turning the power OFF whenever the voice recorder is not in use minimizes battery consumption Power Save mode When the voice recorder has be...

Page 22: ...order g P 55 Folders for Audio Recordings Audio recordings are stored in Folder A through Folder E directly under the Recorder folder Folder File Each folder can store up to 200 files To transfer fil...

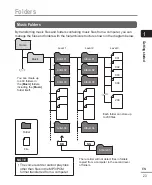
Page 23: ...el 1 Level 2 Artist 02 Artist 03 Artist 04 Album 01 Album 02 Album 03 Album 04 200 001 002 003 004 Each folder can store up to 200 files You can create up to 400 folders in the Music folders including...

Page 24: ...ecorder Folder File Home Podcast Program folder 01 Level 1 Level 2 Program folder 02 Program folder 03 Program folder 04 200 001 002 003 004 Each folder can store up to 200 files You can create up to...

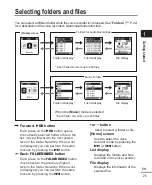
Page 25: ...the list moving forward to the next lower level in the folder hierarchy When a list is displayed you can perform the same function by pressing the M button Back FOLDER INDEX button Each press on the F...

Page 26: ...s to 1 Press the CALENDAR SCENE button while the voice recorder is in stop mode 2 Press the M or L button to select the desired date c d b a a Number of files saved recorded on selected date b Date fi...

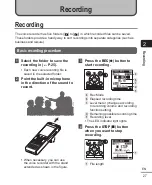
Page 27: ...n the selected folder 2 Point the built in microphone in the direction of the sound to record When necessary you can use the voice recorder with the stand extended as shown in the figure 3 Press the R...

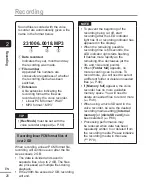
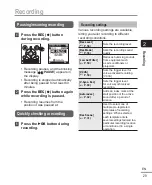
Page 28: ...If the 200th file exceeds 2 GB recording will end NOTE To prevent the beginning of the recording being cut off start recording after the LED indicator light has lit or recording indicator has appeared...

Page 29: ...rding to different recording conditions Rec Level g P 58 Sets the recording level Rec Mode g P 58 Sets the recording sound quality Low Cut Filter g P 59 Reduces humming sounds from equipment such as a...

Page 30: ...hones are optional 1 Connect the earphones to the voice recorder s earphone jack Changing the volume will not affect the recording level NOTE To avoid unpleasantly loud sound set the volume to 00 befo...

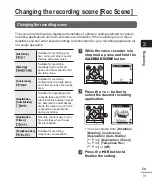
Page 31: ...space and other sounds over a wide area Duplication Auto Divide Suitable for duplicating from cassette tapes and CDs The silent intervals between tracks are detected to automatically divide the tracks...

Page 32: ...Low Cut Filter On VCVA Off V Sync Rec Off Auto index Off Meeting Rec Level High Rec Mode MP3 128 kbps Low Cut Filter Off VCVA Off V Sync Rec Off Auto index Off Conference Rec Level Auto Rec Mode MP3...

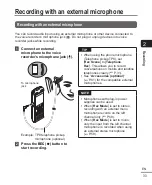
Page 33: ...TIP When using the phone microphone Telephone pickup TP8 set Rec Scene to Telephone Rec This allows you to record conversations on mobile and landline telephones clearly g P 31 See Accessories option...

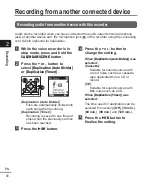
Page 34: ...es are automatically divided into each song when recording Duplication Timer Recording is saved to one file and stops when the previously set time has been reached 3 Press the NOK button 4 Press the o...

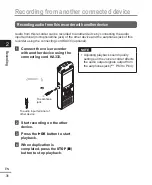
Page 35: ...f the recording level on the other device To ensure successful recording we recommend that you test the record function and volume before use In Duplication Auto Divide an original recording will be c...

Page 36: ...ptional 1 Connect the voice recorder with another device using the connecting cord KA333 To audio input terminal of other device To earphone jack 2 Start recording on the other device 3 Press the NOK...

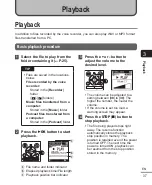
Page 37: ...he NOK button to start playback a b c a File name and folder indicator b Elapsed playback time File length c Playback position bar indicator 3 Press the or button to adjust the volume to the desired l...

Page 38: ...ing stops when the end of the file is reached Press and hold the M button again to fast forward from the beginning of the next file Rewinding Rewinding while the voice recorder is in stop mode 1 With...

Page 39: ...layback position is the beginning of the file To skip to the beginning of the previous file during playback press the L button twice consecutively NOTE If an index mark is reached when skipping to the...

Page 40: ...sates low volume portions during playback Play Mode g P 64 Selecting from among three playback modes Skip Space g P 65 A handy function for quickly moving the playback position and playing short segme...

Page 41: ...he sampling rate and bit rate combinations supported for music file playback by the voice recorder are shown below File format Sampling rate Bit count bit rate Linear PCM WAV format 22 05 kHz 16 bits...

Page 42: ...he playback speed can be selected from x0 5 Play slow playback to x2 0 Play fast playback x1 0 Play normal playback in increments of 0 1 The pitch can be selected from 10 to 10 in increments of 1 M L...

Page 43: ...layback speed or pitch will make the battery deplete more quickly The Noise Cancel function cannot be used when changing the playback speed or pitch g P 63 Fast playback restrictions Depending on thei...

Page 44: ...point for repeat playback A during playback 2 When the ending point B is selected repeat playback of the AB section starts 3 When the starting point for repeat playback A is canceled during repeat pl...

Page 45: ...he setting lights up after the repeated section is played normally lights up This sequence of actions is repeated until the setting is disabled Specifying new starting ending points g Go to Step 4 Sto...

Page 46: ...position When an index mark is written or erased during ABC repeat playback ABC repeat playback is canceled and the voice recorder returns to normal playback Canceling ABC repeat playback 1 Press the...

Page 47: ...ssage No more can be set appears if you attempt to write more than 99 marks You cannot write or erase index marks in files that have been locked by the file lock function g P 55 If files created with...

Page 48: ...display g P 25 File display File list display 2 Press the ERASE button while the voice recorder is in stop mode The voice recorder returns to the stop mode if no operation is performed for 8 seconds 3...

Page 49: ...OK button Erasing appears in the display and the erasing process starts Erased appears when the process has finished If you select Selected files 7 Press the or button to select the file you want to e...

Page 50: ...ay g P 25 2 Press the ERASE button while the voice recorder is in stop mode The voice recorder returns to the stop mode if no operation is performed for 8 seconds 3 Press the button to select Start 4...

Page 51: ...e recorder will not be erased nor will folders containing these files The voice recorder must be connected to a computer to erase these files and folders Before erasing a file or folder charge or repl...

Page 52: ...mode press the MENU button When the screen display is Simple Mode NOTE In Simple Mode press the MENU button while the voice recorder is in stop mode or playback mode TIP Some menus contain items that...

Page 53: ...s Simple Mode 5 Press the NOK button When the screen display is Simple Mode The setting of the selected item is displayed 6 Press the or button to change the setting When the screen display is Simple...

Page 54: ...r menu settings done during recording playback the voice recorder exits the menu if no operation is performed for 8 seconds Menu items that can be set during recording Normal mode only Rec Level Low C...

Page 55: ...sorts the files by date recording time date from oldest to newest files Date descending Automatically sorts the files by date recording time date from newest to oldest files 2 Press the or button to s...

Page 56: ...remely short recording times To prevent the risk of data damage never remove the battery while dividing a file Increasing the overall volume level of a file Normalize Increase the overall volume level...

Page 57: ...may be corrupted Displaying file or folder information Property You can display the information of a file or folder from a menu screen File information 1 Press the or button to switch the screen Infor...

Page 58: ...r s mouth 5 to10 cm away Setting the recording mode Rec Mode You can prioritize sound quality or recording time Select the recording mode that best matches your recording application MP3 128 kbps MP3...

Page 59: ...d quiet segments when recording such as long silences during conferences saving memory On Turns VCVA on You can adjust the voice activation level used for VCVA Off Turns VCVA off Restores standard rec...

Page 60: ...ync Rec g P 60 Auto index g P 62 Voice sync recording function V Sync Rec The voice sync recording function automatically starts recording when a sound louder than a preset voice sync recording level...

Page 61: ...n The blinking message Standby appears in the display and the LED indicator light flashes Recording starts automatically if the input is louder than the voice sync level TIP The voice recorder automat...

Page 62: ...of active sound after silence continues for 3 minutes Off Turns the auto index off Adjusting the index level 1 Press the REC K button to start recording 2 Press the M or L button to adjust the index l...

Page 63: ...recorder the ABC repeat playback g P 44 setting section is alternately played back at normal volume and silence lower volume or slower depending on the setting This is an optimal function for listenin...

Page 64: ...older is played When Repeat was selected On The files in the specified playback range are played repeatedly Off Cancels repeat playback Adjusting low volume portions during playback Voice Balancer Cut...

Page 65: ...nd random playback NOTE When Playback range is set to File End blinks in the display for 2 seconds after the last file in the folder has been played then playback stops at the start position of the la...

Page 66: ...de 1 Press the or button to select File Skip L5sec 10sec M or L5min 10min M File Skip Skips in units of files L5sec 10sec M Pressing the L button rewinds 5 seconds pressing the M button fast forwards...

Page 67: ...e LED setting to Off the LED indicator light will flash while files are being transferred between the voice recorder and a PC Turning beeping sound ON OFF Beep The voice recorder makes beeping sounds...

Page 68: ...del only Ni MH Select this setting when using Ni MH rechargeable BR404 batteries Alkaline Select this setting when using an alkaline dry cell battery Setting the time date Time Date If you set the dat...

Page 69: ...all the voice recorder s functions to their initial factory default settings Time setting and file number will remain the same 1 Press the button to select Start TIP When setting the year month or dat...

Page 70: ...again then press the NOK button Formatting appears and formatting starts Format done appears when the process has finished TIP To reset all the voice recorder s settings to their default values use th...

Page 71: ...ia to erase gP 68 Even when formatting or erasing gP 48 is performed only the file management information of the internal memory and or microSD card is updated and the recorded data is not completely...

Page 72: ...n disappears Never disconnect the USB connector before data communication has finished Always use the procedure on g P 74 to disconnect the USB connector Data may not be transferred correctly if you d...

Page 73: ...e the battery press the NOK button To cancel the battery charging press the any button other than NOK TIP For information on the PC s USB port see the PC s user manual Use the optional USB extension c...

Page 74: ...f the voice recorder has stopped blinking and then disconnect the USB cable TIP You can disconnect the USB cable and use the voice recorder before the battery is fully charged WS 883 model only NOTE T...

Page 75: ...ror occurred Contact the Customer Support Center g back cover Card error The microSD card was not recognized correctly Remove and reinsert the microSD card g P 18 P 19 Memory full There is no remainin...

Page 76: ...fore you can perform the operation g P 25 This file can t be divided An attempt was made to divide a file other than an MP3 and a linear PCM WAV format file recorded by the voice recorder Select anoth...

Page 77: ...HOLD mode g P 20 Unable to record There is no remaining memory Erase unneeded files g P 48 The maximum number of recordable files has been reached Select another folder g P 25 Playback is inaudible Th...

Page 78: ...o touch the voice recorder during recording The voice recorder was placed near a mobile phone or fluorescent light during recording or playback Redo the operation with the voice recorder in a differen...

Page 79: ...R404 and select Ni MH for Battery Do not use the rechargeable battery at higher lower temperatures than the recommended range g P 16 P 68 The NOK button was not pressed Press the NOK button as directe...

Page 80: ...h If the recorder is very dirty soak the cloth in mild soapy water and wring well Wipe the recorder with the damp cloth and then wipe it with a dry cloth K Display Wipe gently with a soft cloth NOTE D...

Page 81: ...about 12 meters to capture sound from a broad range ME30W two channel microphone omni directional An omni directional microphone pair with a low noise design ideal for recording in lecture halls or ot...

Page 82: ...rom third parties resulting from improper use of the product Trademarks and registered trademarks IBM and PC AT are trademarks or registered trademarks of International Business Machines Corporation m...

Page 83: ...handled incorrectly Voice recorder safety precautions WARNING K Do not use the voice recorder in an atmosphere that might contain flammable or explosive gases It may cause fire or explosion K Do not...

Page 84: ...n operation Hearing damage or loss may result Batteries DANGER K Do not place the battery near ignition sources K Do not incinerate heat or disassemble the battery Do not short circuit the battery s p...

Page 85: ...nd children The battery could be swallowed by infants and children Swallowing may lead to burns perforation of soft tissue and death Severe burns can occur within 2 h of ingestion If swallowed go to d...

Page 86: ...s wet or damp wipe off the moisture right away with a dry cloth Contact with salt water should be particularly avoided Do not place the voice recorder on top of or near a TV refrigerator or other elec...

Page 87: ...der and microSD cards disposal precautions Even when formatting gP 70 or erasing g P 48 are performed only the file management information of the internal memory and or microSD card is updated and the...

Page 88: ...er Impedance 2 k J Earphone jack 3 5 mm diameter Impedance 8 or more J Power source Standard voltage 3 V Battery Two AAA dry cell batteries model LR03 or two nickel metal hydride rechargeable batterie...

Page 89: ...ring speaker playback During earphone playback MP3 format 128 kbps 30 hours approx 11 hours approx 49 hours approx 64 kbps mono 31 hours approx 11 hours approx 53 hours approx 8 kbps mono 68 hours app...

Page 90: ...SD card 32 GB 530 hours approx 1060 hours approx 8480 hours approx 191 hours 45 minutes approx 16 GB 264 hours approx 525 hours approx 4220 hours approx 95 hours 50 minutes approx 8 GB 132 hours appro...

Page 91: ...ing memory the maximum recording time per file is restricted to the following values Recording mode Recording time MP3 format 128 kbps 74 hours 30 minutes approx 64 kbps mono 149 hours approx 8 kbps m...

Page 92: ...date of issue 2023 03 BS213900 2023 https om digitalsolutions com...

Reviews: