www.microscope.com
Page
6
Operation
Familiarization:
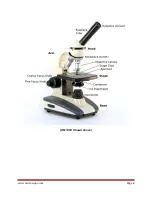
First, familiarize yourself with all the parts of a microscope so that you
can easily move from one part to another during operation.
Moving and Placement
: It is worth remembering that a microscope is a sensitive
scientific instrument that will suffer damage from sharp blows or impact. Always,
therefore, carry your microscope in both hands. Grasp the arm with one hand and place
the other hand under the base for support. Always place the microscope on a level and
stable surface.
Slide Preparation:
Microscope slides should always be prepared with a cover slip or
cover glass over the specimen. This will help protect the objective lenses if they touch
the slide. To hold the slide on the stage fasten it with the stage clips. You can push
down on the back end of the stage clip to open it.
Focusing the Microscope:
1. Start by turning the revolving nosepiece (turret) so that the lowest power
objective lens is "clicked" into position. The lowest power objective is the shortest
one. This objective is the easiest to focus and center the image in the field of
view.
2. Next turn on the light. Top light for, specimens that are visible to the naked eye,
low magnification, i.e. insects, crystals, rocks, leaves, etc. Bottom light for,
specimens not visible with the naked eye, higher magnifications that require
slides, i.e. cellular structures, bacteria, muscle tissue etc.
3. While looking at the objective lens and the stage from the side, turn the coarse
focus knob so that the stage moves upward toward the objectives. Move it as far
as it will go without touching the slide.
4. Now, look through the eyepiece(s) and adjust the illuminator and diaphragm until
you attain the maximum, comfortable level of light.
5. Slowly turn the adjustment so that the stage moves down (away from the slide).
Continue until the image comes into broad focus.
6. Move the microscope slide until the image is in the center of the field of view.
Then readjust the illuminator or diaphragm in order to attain the clearest image.
7. Once you have attained a clear image, you should be able to change to a higher
power objective lens with only minimal use of the focusing adjustment. If you
cannot focus on your specimen, repeat the above steps and work from objective
to objective until the higher power objective lens is in place.


