www.microscope.com
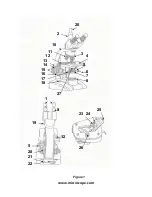
1.Eyepiece
15. Fine focus adjustment
2. Trinocular head
16. Movement locking handle
3. Nose piece turret
17. Condenser Iris adjustment handle
4. Mechanical stage
18. Brightness adjustment
5. Mechanical slide holder adjustment
19. Body securing thumbscrew
6. Condenser centering thumbscrew
20. Tension adjustment
7. Filter seat
21. Power Switch
8. Adjustment ring of field diaphragm
22. Power Socket
9. Dioptric ring
23. Ceramic lamp holder
10. Arm
24. Lamp
11. Objective
25. Thumbscrew
12. Clips of specimen
26. Cap of fuse
13. Movement lock ring
27. Condenser
14. Coarse focus adjustment
28. Video device
PREPARATION BEFORE USE
*Refer to Figure 1 on previous page
● Insert the trinocular viewing head (2) into the microscope arm (10) and lock up bolt (19)
per drawing.
● Attach the objectives (11) to the screw hole of nose piece (3) per big and small
gradation. Place eyepiece (1) into the eye tube (2).
● Plug the power cord into the microscope base (22) (Note: Voltage of power supply
must accord with the instrument.) The lamp will sparkle when you turn on the switch (21).
● Use the adjustment bolt to adjust the aperture diaphragm image in field center.
● Use the adjustment handle (17) to change the diameter of the aperture diaphragm.
● Turn the adjustment ring (8) to adjust the field diaphragm diameter.
● To adjust the brightness, use the lamp adjustment knob (18).
● Place the filter on the filter seat (7) and then replace to correct position.


