OMAX JetMachining® Center Operator’s Guide
Maintenance
4 - 6
400433D-EN
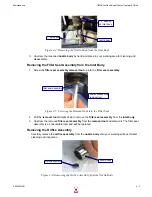
Removing the Nozzle Mixing Tube
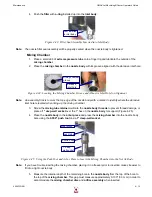
1.
Remove the
abrasive hose
from the
nozzle
.
Figure 4-2: Remove the Abrasive Hose from the Nozzle
2.
Place a piece of
cardboard
or equivalent blocking material directly under the
nozzle
to prevent
any dropped parts or tools from falling into the tank during servicing.
3.
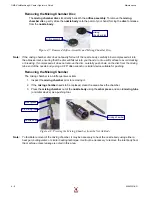
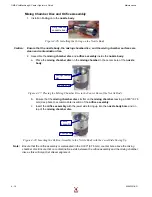
Remove the
nozzle mixing tube
:
a.
Place a
1" open-end wrench
on the
nozzle body
to counteract any torque while loosening
the
mixing tube locking nut
(Figure 4-3).
b.
Loosen the
mixing tube locking nut
using an
11/16" open-end wrench
. When loose, hold
the
mixing tube
with your fingers to prevent it from dropping while unscrewing it.
Figure 4-3: Removing the Nozzle Mixing Tube
c.
Remove the
mixing tube
along with the
locking nut
and
collet
. Carefully place all parts on
your working area for later cleaning and inspection.
Caution:
The mixing tube, even though it is made from abrasive resistant material, will break if dropped
or struck hard.
Removing the Nozzle Body from the Inlet Body
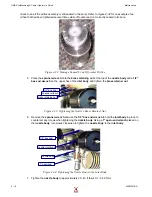
1.
Place a
1/2" wrench
on the upper hex portion of the
inlet body
located at the top of the
nozzle
assembly
. This will hold the
inlet body
in place when removing the
nozzle body
and counteract
any induced torque that can alter the Tilt-A-Jet’s alignment and accuracy.
2.
Using a
1" open-end wrench
placed on the
nozzle body
, loosen the right-hand threaded
nozzle
body
from the
inlet body
using both wrenches.
abrasive hose
nozzle
1" open-end
11/16" open-end
nozzle body
locking nut
Summary of Contents for JetMachining Center 2626
Page 8: ...OMAX JetMachining Center Operator s Guide viii 400433D EN ...
Page 12: ...OMAX JetMachining Center Operator s Guide xii 400433D EN ...
Page 22: ...OMAX JetMachining Center Operator s Guide Safety First 1 10 400433D EN ...
Page 140: ...OMAX JetMachining Center Operator s Guide OMAX Glossary 6 16 400433D EN ...
Page 144: ...OMAX JetMachining Center Operator s Guide Index 4 400433D EN ...


