OMAX JetMachining® Center Operator’s Guide
Maintenance
4 - 38
400433D-EN
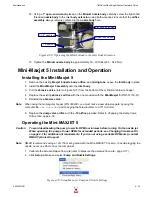
10. On the pump control panel, use the
UP
and
DOWN
arrow keys to set your desired cutting pressure
while the nozzle test is active:
Figure 4-79: Set the KSI for WaterPres on the Pump’s LCD
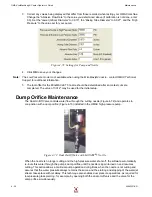
11. When your desired water cutting pressure is set, click
STOP
to halt the test and remove nozzle
pressure:
Figure 4-80: Click the Test STOP Button After Setting Your Desired Pump Pressure
12. With the
Variable Dump Orifice Adjustment Routine.ord
file still opened, click the
Begin Machining
button (Figure 4-77) to view the
OMAX Path Control
window:
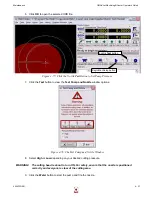
Figure 4-81: Click Start to Pressurize the Adjustable Dump Orifice
13. Click the
Start
button to activate the pump.
Note that the nozzle begins tracking the ORD file path with the water flow routed only to the ADO.
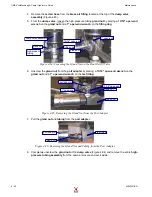
14. At the ADO, turn the Pressure Adjustment Knob (Figure 4-75) until the pressure indicated on the
pump’s control panel LCD (Figure 4-79) equals the
KSI
set previously in Step #10 above.
Note:
The ADO pressure should equal the nozzle pressure, but must never be allowed to exceed nozzle
pressure. Also, ADO pressure should not be more than 2 KSI below nozzle pressure.
WARNING!
Never continue unscrewing the adjustment knob until it’s able to detach itself from the ADO
body while the water is under pressure.
The pump should never be running while the ADO pressure adjustment knob is not securely
screwed in place.
15. Once the correct pressure is set, click the
Pause
button in the OMAX Path Control window (Figure 4-
81) followed by clicking
Close
.
pressure
value
Summary of Contents for JetMachining Center 2626
Page 8: ...OMAX JetMachining Center Operator s Guide viii 400433D EN ...
Page 12: ...OMAX JetMachining Center Operator s Guide xii 400433D EN ...
Page 22: ...OMAX JetMachining Center Operator s Guide Safety First 1 10 400433D EN ...
Page 140: ...OMAX JetMachining Center Operator s Guide OMAX Glossary 6 16 400433D EN ...
Page 144: ...OMAX JetMachining Center Operator s Guide Index 4 400433D EN ...

