background image


www.microscopenet.com


- 15 - 

7


Darkfield Condenser Installation and Operation 
Instructions 


7.1  Dry darkfield condenser of A191 

1)  Mounting the dry darkfield condenser 

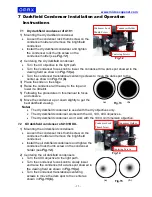
  Loosen the condenser lock thumb screw on the 

condenser holder and remove the brightfield 
condenser. 

  Install the dry darkfield condenser and tighten 

the condenser lock thumb screw on the 
condenser holder (see 

Fig. 12

)

2)  Centering the dry darkfield condenser 

  Turn the 4X objective to the light path.   

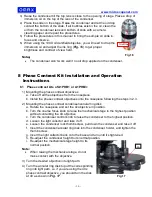
  Turn the condenser focus knob to lower the condenser till a dark spot showed in the 

viewing field as shown in 

Fig. 13


(a)

  Turn the condenser translational centering screws to move the dark spot to the 

center as shown in 

Fig. 13


(b)

3)  Place the slide on the stage.   
4)  Raise the condenser all the way to the top and 

lower it a little bit.   

5)  Following the procedures in this manual to focus 

and observe. 

6)  Move the condenser up or down slightly to get the 

best darkfield viewing. 

Note


  The dry darkfield condenser is used with the dry objectives only. 

  The dry darkfield condenser works with the 4X, 10X, 40X objectives. 


The dry darkfield condenser won

’t work with the 100X oil immersion objective.


7.2    Oil darkfield condenser of A191BOIL 

1)  Mounting the oil darkfield condensers 

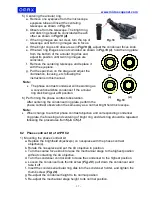
  Loosen the condenser lock thumb screw on the 

condenser holder and remove the brightfield 
condenser. 

  Install the


oil darkfield condensers and tighten the 

condenser lock thumb screw on the condenser 
holder (see 

Fig. 14

)

2)  Centering the oil darkfield condensers 

  Turn the 40X objective to the light path.   

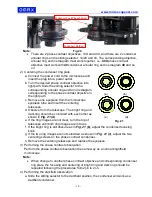
  Turn the condenser focus knob to slowly lower 

and raise the condenser till a dark spot showed in 
the viewing field as shown in 

Fig. 15


(a)

  Turn the condenser translational centering 

screws to move the dark spot to the center as 
shown in 

Fig. 15 (b)

.


(a)                                (b) 


(a)                                (b) 

Fig.12 

Fig.13 

Fig.14 

Fig.15 

Condenser Lock   

Thumb Screw 

Centering Screws 

Condenser Holder 

Condenser Lock   

Thumb Screw 

Centering Screws 

Condenser Holder 

Summary of Contents for MD827S30 series

Page 1: ...User Manual Digital Binocular Compound Microscope Model MD827S30 series MicroscopeNet com...

Page 2: ...1 Component Illustration 3 2 Installation 4 3 Operation 7 4 Specifications 10 5 Optional Parts 11 6 Troubleshooting Guide 13 7 Darkfield Condenser Installation and Operation Instructions 15 8 Phase C...

Page 3: ...cimen solutions or other liquids splash onto the stage objective or any other component disconnect the power cord immediately and wipe up the spillage Otherwise the instrument may be damaged 5 Importa...

Page 4: ...ng an excessive amount of solvents as this may cause problems with optical coatings or cemented optics or the flowing solvent may pick up grease making cleaning more difficult Oil immersion objectives...

Page 5: ...ody 21 Condenser Focus Knob 4 Nosepiece 13 Focus Tension Ring 22 Focus Stop Lever 5 Objective 14 Coarse Focus Knob 23 Abbe Condenser 6 Slide Holder 15 Fine Focus Knob 24 Color Filter Holder 7 Mechanic...

Page 6: ...mechanical stage is at its lowest position 2 Turn the caps counter clockwise to remove them from the nosepiece 3 Take the objectives out from the plastic cases and turn each one clock wise into the h...

Page 7: ...You may also loosen the two screws on the cover to adjust the position of the bulb to get centered and even brightness See Fig 3 6 Screw the cover on Caution Before you turn over the microscope be su...

Page 8: ...he hole at the center of the black disc See Fig 5 You may try to get reflected ambient light on either side of the mirror with different angles for best result Note The mirror is only used when there...

Page 9: ...tance is correct when the left and right fields of view converge completely into one image 3 4 Adjusting eyepiece diopter 1 Rotate the 10x objective into position 2 Rotate the diopter rings on the eye...

Page 10: ...t When you use the 100X objective to observe the specimen you have to finish observing the specimen with the 4X 10X 40X objectives When you use the 100X objective to observe the specimen you have to a...

Page 11: ...into the USB port Fig 11 on the back of viewing head and the other end to the computer 3 Turn on the computer install the camera following the manual in the mini CD 4 Open image observing software to...

Page 12: ...ing knobs on both sides w focus stop Minimum fine focusing adjustment at 0 002mm range 28mm Mechanical Stage Double layer Dimension 5 1 2 x 5 1 2 140mmx140mm Translational range 3 x 2 75mm X 50mm Came...

Page 13: ...kfield Condenser Numerical Aperture Objective Mounting Size diameter A191 Dry 0 7 0 9 37mm A191BOIL Oil 1 36 1 25 Plan 100X 1 25 oil 0 5 160 0 17 spring w iris diaphragm 37mm 2 Carrying Case Model Dim...

Page 14: ...hase plate Achromatic 40X with built in phase plate spring Achromatic 100X with built in phase plate spring oil five positions 10 for 10X phase contrast objective 20 for 20X phase contrast objective 4...

Page 15: ...too thick or thin Use a slide cover of the appropriate thickness 0 17mm Slide may be upside down specimen at the bottom Turn slide over so the cover glass faces up Diopter adjustment is not set proper...

Page 16: ...e condenser is not in the right position Lower or raise the condenser slightly to the position that the specimen is the brightest A191BOIL only Make sure the oil contact the bottom of the slide and th...

Page 17: ...e condenser up or down slightly to get the best darkfield viewing Note The dry darkfield condenser is used with the dry objectives only The dry darkfield condenser works with the 4X 10X 40X objectives...

Page 18: ...Install the phase contrast objectives onto the nosepiece following the steps in 2 3 2 Mounting the phase contrast condenser annular ring disk a Rotate the nosepiece and set the 4x objective in positio...

Page 19: ...k being put at B position 6 Performing the phase contrast observation After centering the condenser ring plate perform the phase contrast observation the same way as a normal bright field microscope N...

Page 20: ...cope d Observe from the telescope The bright ring and dark ring should be coincided with each other as shown in Fig 21 d e If the ring images are not clear turn the top of telescope until both ring im...

Page 21: ...ptional When you apply the immersion oil with the 100X objective do not let the immersion oil to contact with the dry objective lenses especially the 40X If the immersion oil is on the dry objectives...

Page 22: ...is hard to find put a normal white print paper on the stage and under the objective then you will see the dark ring as shown in Fig 25 a h If the bright ring is still obscure as in Fig 25 b raise or l...

Reviews: