background image

19

Maintenance

WATER DISTRIBUTION TUBE CLEANING

When you find that the ice cubes are incompletely formed or the output of ice cubes is low, the water 

distribution tube may be blocked. Set the power switch to OFF. Unscrew the six screws holding the top panel 

and remove the panel. You will see the water distribution tube. Rotate the water distribution tube so that the 

holes in it are facing up. Using a toothpick or similar tool, dredge the holes, then rotate the water distribution 

tube back to its original position. If the tube is badly blocked, clean it as follows:

1.  Shut off the water and power supplies.

2.  Disconnect the water hose from the distribution tube.

3.  Lift one side, remove the distribution tube.

4.  With a brush, clean the tube with a dilute solution of warm water and a mild detergent such as dish washing 

liquid. After removing the dirt and lint from the surface, rinse the tube with clean water.

5.  Replace the distribution tube.

6.  Reconnect the water supply and power supply lines.

7.  Re-attach the top panel.

ICE-MAKING SYSTEM CLEANING

Minerals that are removed from water during the freezing cycle will eventually form a hard, scaly deposit in the 

water system. Cleaning the system regularly helps remove the mineral scale buildup. How often you need to 

clean the system depends on how hard your water is or how effective your filtration may be. With hard water of 

15 to 20 grains/ gallon (4 to 5 grains/liter), you may need to clean the system as often as every 3 months.

1.  Set the power switch to OFF.

2.  Remove all ice cubes from the storage bin.

3.  Remove the screws in the front cover, push forward to remove the front cover. Locate the control box.

4.  Keep the ice maker connected to the water supply. Pour 8 oz. of Nickel-Safe Ice Maker Cleaner Solution 

into the water tank.

5.  Turn the power switch ON. Within 3 minutes, press the CLEAN button. The machine will run the Automatic 

Clean mode. The green Ice Making and the yellow Ice harvest LEDs will blink.

6.  The cleaning cycle will continue for 30 minutes unless you press the power switch (you can press the 

power switch to stop the cleaning cycle any time during the 30 minutes). After cleaning, the green Ice 

Making and yellow Ice Harvest LEDs go on steady and the machine returns to Stand-by mode.

7.  The dirty water must be drained out completely. Perform steps 2 and 3 in the Interior Cleaning section.

8.  Repeat steps 4 to 6 above three times to rinse the ice-making system completely. 

NOTE: Do not add Ice Maker Cleaner Solution to the water trough during the rinses.

9.  Reassemble the front cover.

10. If you want to make ice cubes after cleaning, turn off the power switch, drain off the waste water, then turn 

on the power switch. The next ice-making cycle will begin.

11. 

Discard the first batch of ice.

SANITIZING THE ICE-MAKING SYSTEM

1.  Set the power switch to OFF.

Summary of Contents for 37865

Page 1: ...Revised 05 05 2022 Toll Free 1 800 465 0234 Fax 905 607 0234 Email service omcan com www omcan com Ice Maker Model IC CN 0016 Item 37865 Instruction Manual...

Page 2: ...4 25 26 27 Table of Contents Section Disclaimer General Information Safety and Warranty Technical Specifications Installation Operation Maintenance Troubleshooting Parts Breakdown Electrical Schematic...

Page 3: ...GES DUE TO WATER LEAKS WARRANTY FOR WATER LEAKS IS VOID IF THE WICKING PAD IS NOT REPLACED EVERY SIX MONTHS AND IF THE AMBIENT ROOM TEMPERATURE EXCEEDS 75 F AND 55 RELATIVE HUMIDITY AND THE APPLIANCE...

Page 4: ...e It s of the utmost importance to save these instructions for future reference Also save the original box and packaging for shipping the equipment if servicing or returning of the machine is required...

Page 5: ...amiento de esta m quina y sta usando ropa apropiada y autorizada Cualquier modificaci n a la m quina an la la garant a y puede causar da os a las personas usando la m quina mientras esta en el funcion...

Page 6: ...It is important for the ice maker to be leveled in order to work properly You may need to make several adjustments to level it Never allow children to operate play with or crawl inside the ice maker...

Page 7: ...om installation in non commercial or residential applications The right is reserved to deny shipment for residential usage if this occurs you will be notified as soon as possible 1 YEAR PARTS AND LABO...

Page 8: ...22 x 33 540 x 559 x 838mm Packaging Dimensions 23 x 24 x 36 584 x 610 x 914mm Item Number 37865 The technical data and performance index listed above should be used for reference only They are subjec...

Page 9: ...or glue These products can damage the surface of your ice maker Cleaning before use After you remove all of the packaging materials clean the inside of your ice maker before using it See the Interior...

Page 10: ...n accordance with all state and local codes The unit should be located on a firm and level surface It is important for the ice maker to be leveled in order to work properly The plug must be accessible...

Page 11: ...ELECTRICAL REQUIREMENTS Before you move your ice maker into its final location it is important to make sure you have the proper electrical connection A standard electrical supply 115VAC 60Hz properly...

Page 12: ...e must be installed to the main water supply 3 Connect the water supply pipe to the tap the other end connect with the water inlet valve tight Tightly with hand 4 Turn on main water supply and tap Che...

Page 13: ...ons for Electrical requirements Water supply Leveling the ice maker Free standing Installation The ice cube machine can be installed to be free standing in any place you desire provided you have acces...

Page 14: ...ked or tested against the nameplate rating And has a proper earth been installed in the ice maker 9 Is the ice maker plug in 10 Do you turn on the main water supply and the tap 11 Do you check leaks t...

Page 15: ...nking continuously during the ice size adjustment Release the button when the LED blinks continuously to adjust the ice size 2 While in the Ice Size Adjustment mode press the Clean button or the Mode...

Page 16: ...ing from the water bin to the evaporator plate may make a splashing sound Water running from the evaporator to the water bin may make a splashing sound As each cycle ends you may hear a gurgling sound...

Page 17: ...not use solvent based or abrasive cleaners Use a soft sponge and rinse with clean water Wipe with a soft clean towel to prevent water spotting Stainless steel models can discolor when exposed to chlor...

Page 18: ...o the power switch can be inadvertently disconnected 3 Locate the condenser surface Remove dirt and lint from the condenser fins and the unit compartment with a brush attachment on a vacuum cleaner 4...

Page 19: ...ter is or how effective your filtration may be With hard water of 15 to 20 grains gallon 4 to 5 grains liter you may need to clean the system as often as every 3 months 1 Set the power switch to OFF 2...

Page 20: ...Ice Harvest and the green Ice Making LEDs go on steady and the machine returns to Stand by mode 8 The dirty water must be drained out completely Perform steps 2 and 3 in the Interior Cleaning section...

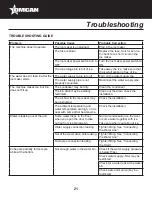
Page 21: ...y restricted Clean out the drain check the installation The air flow to the ice maker may be obstructed Check the installation The ambient temperature and water temperature are high or it is near with...

Page 22: ...state range Cut off the electricity let the ice maker stop working till the temperature returns within the stated range The body of the ice maker is electrified The ground line isn t in the socket Pl...

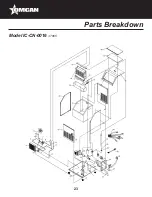
Page 23: ...23 Parts Breakdown Model IC CN 0016 37865...

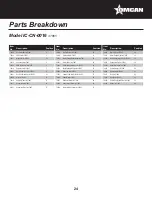
Page 24: ...for 37865 6 70022 Water Pump Inlet Hose for 37865 24 70034 Water Inlet Hose for 37865 37 70014 Compressor for 37865 7 70023 Multi Connection Pipe for 37865 25 70035 Power Switch for 37865 38 39282 Ho...

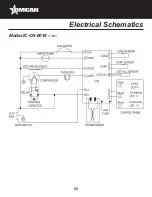
Page 25: ...25 Electrical Schematics Model IC CN 0016 37865...

Page 26: ..._______________ ________________________________________________________________________________________ ________________________________________________________________________________________ ______...

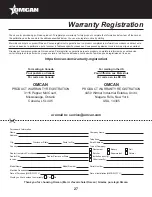
Page 27: ...ter online by visiting OMCAN PRODUCT WARRANTY REGISTRATION 3115 Pepper Mill Court Mississauga Ontario Canada L5L 4X5 https omcan com warranty registration or email to service omcan com Purchaser s Inf...

Page 28: ...relations avec nos clients et les fabricants de valeur Aujourd hui avec des partenaires en Am rique du Nord Europe Asie et Am rique du Sud nous travaillons continuellement am liorer et d velopper l e...

Reviews: