


7
Maintenance
Operation
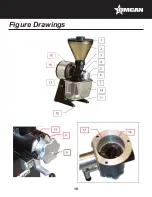
ADJUSTING THE GRIND
• Turn the grinding-wheel gap adjuster button (6) clockwise for a coarser grind and counterclockwise for a
finer grind. The factory setting is for the finest grind, with the grinding-wheels nearly touching each other.
SERVICING
• Clean the dispensing outlet, the poppy seed holder and the grinding mechanism from time to time. Always
turn the appliance off (switch 13 on position 0) and unplug it.
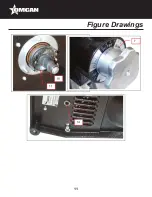
Before carrying out any work on the appliance, it must in all cases be unplugged from the mains power supply
and the motor start capacitor discharged:
DISCHARGING THE CAPACITOR:
Use a screwdriver with insulated handle to touch the 2 connectors on the capacitor (13). The appearance of an
electric arc shows that the capacitor has discharged.
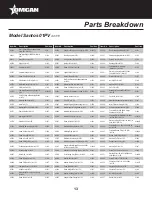
SPARE PARTS:
This machine requires no specific maintenance. The bearings are lubricated for life. If work is required to
replace worn parts such as the grindstones or the electric or other components, refer to the parts list.
IMPORTANT:
It is prohibited to use spare parts other than those certified by Omcan
For all spare part orders (see references in the exploded view at the end of the manual), state:
•
The type.
•
The machine serial number.
• The electrical specifications recorded under the machine.
REPLACING THE GRINDSTONES
IMPORTANT: always change both 2 grindstones (17) at the same time.
The 2 grinding wheels are identical and can be fitted equally either on the moving plate (18) (moving grinding
wheel) or on the cast metal adjustment block (19) (fixed grinding wheel).
1.
Stop the machine by putting the switch (13) to “0” and disconnect the power supply cord.
2.
Close the shutter (3) on the hopper (2). Take off the hopper (2).
3.
Turn the grinding wheel gap adjuster button (6) clockwise until it comes to a halt at the “COARSE” setting.
4.
Unscrew the nuts (16) and remove the whole grinding unit (15), to gain access to the grinding wheels.
5.
Change the grinding wheels (3 fastening screws) after carefully cleaning the supporting surfaces.
TAKE CARE: The slightest small coffee particle under the grinding wheel may prevent the machine
Summary of Contents for 44116
Page 10: ...10 Figure Drawings...
Page 11: ...11 Figure Drawings...
Page 12: ...12 Parts Breakdown Model Santos 01PV 44116...
Page 15: ...15 Electrical Schematics Model Santos 01PV 44116...


