background image

8

Installation

Tools required: Phillips screw driver.

•  Use a Phillips screw driver to remove the four (4) screws from the L-bracket connecting the unit to the 

wood skid. Then remove the L-bracket from the unit.

•  Remove skid by unscrewing all base rail anchor brackets. Place skid to the side.

•  Carefully upright cabinet.

When lifting unit do not use the counter top as a lifting point. Also remember to leave cabinet upright 

for 24-hours before plugging into power source.

•  Set unit in its final location. Make sure there is adequate ventilation in this location. Under extreme heat 

conditions (+100°F / +38°C) an exhaust fan may be necessary.

•  Proper leveling of the unit is critical to operating success (for non-mobile models). Effective condensate 

removal and door operation will be affected by leveling.

•  The cooler should be leveled front to back and side to side with a level.

Warning: Installation without proper ventilation will void the manufacturer’s warranty.

SEALING CABINET TO FLOOR

Step 1 - Position Cabinet

Allow six (6) inches between the wall and rear of the refrigerated bar equipment to assure proper ventilation.

Step 2 - Level Cabinet

Cabinet should be level side to side and front to back. Place a carpenter’s level in the interior cabinet floor in 

four places:

A Position level in the inside floor of the unit near the door. Level should be parallel to cabinet front.

B Position level at the inside rear of cabinet. Level should be placed parallel to cabinet back.

C Perform similar procedures to steps A and B by placing the level on inside floor left and right sides parallel to 

the depth of the cooler. Level cabinet.

Step 3 - Applying Sealant

•  Draw an outline on the base of the floor.

•  Raise and block the front side of the cabinet.

•  Apply a bead of NSF Approved Sealant (see list below) to floor half an inch inside the outline drawn. The 

bead must be heavy enough to seal the entire cabinet surface when it set down on the sealant.

•  Raise and block the rear of the cabinet.

•  Apply sealant on floor as outlined above on other 3 sides.

•  Examine to see that the cabinet is sealed to floor around entire perimeter.

Summary of Contents for BB-CN-0012-SH

Page 1: ...l Free 1 800 465 0234 Fax 905 607 0234 Email service omcan com www omcan com Back Bar Bottle Coolers Models BB CN 0012 GH 0012 SH 0016 GH 0016 SH 0020 GH 0020 SH Items 50058 50057 50060 50059 50062 50...

Page 2: ...formation Safety and Warranty Technical Specifications Installation Operation Cleaning and Maintenance Parts Breakdown Electrical Schematics Warranty Registration Model BB CN 0012 GH Model BB CN 0016...

Page 3: ...e It s of the utmost importance to save these instructions for future reference Also save the original box and packaging for shipping the equipment if servicing or returning of the machine is required...

Page 4: ...ol y que este ha sido entrenado en el correcto funcionamiento de esta m quina y sta usando ropa apropiada y autorizada Cualquier modificaci n a la m quina an la la garant a y puede causar da os a las...

Page 5: ...provides the best performance and also prevents overloading wiring circuits which could become a fire hazard from overheated wires Never unplug your cooler by pulling on the power cord Always grip the...

Page 6: ...ng inside REFRIGERANT DISPOSAL Your old refrigerator may have a cooling system that used ozone depleting chemicals If you are throwing away your old refrigerator be sure the refrigerant is removed for...

Page 7: ...x 60 2 x 31 508 x 1529 x 787mm Weight 271 lbs 123 kg 326 lbs 148 kg 355 lbs 161 kg Item Number 50058 50060 50062 SOLID DOOR BOTTLE COOLERS Model BB CN 0012 SH BB CN 0016 SH BB CN 0020 SH Number of Doo...

Page 8: ...SEALING CABINET TO FLOOR Step 1 Position Cabinet Allow six 6 inches between the wall and rear of the refrigerated bar equipment to assure proper ventilation Step 2 Level Cabinet Cabinet should be lev...

Page 9: ...th the control could lead to service difficulties Should it ever become necessary to replace the temperature control it should be ordered from your dealer or recommended service agent Good air flow in...

Page 10: ...ys the value of the probe set using parameter 4 1 ambient probe default 2 second probe 3 third probe In addition the display has LEDs that indicate the activation of the control functions see Table 1...

Page 11: ...a few moments Increase or decrease the value using UP or DOWN Press SET to confirm the new value Switching the device ON OFF Press UP for more than 3 sec The control and defrost algorithms are now di...

Page 12: ...continuously along with dust lint grease etc If you keep the condenser clean you will minimize your service expense and lower your electrical costs The condenser requires scheduled cleaning every day...

Page 13: ...als on all finishes for grease fatty acids blood and burnt on foods Any good commercial detergent can be applied with a sponge or soft cloth to remove grease and oil Benefit Super Sheen Sheila Shine a...

Page 14: ...ilm on stainless steel 7 Hydrochloric acid muriatic acid should never be used on stainless steel 8 Regularly restore clean stainless steel KEG BEER LINE CLEANING 1 Tools needed 2 Pour cleaning solutio...

Page 15: ...15 Model BB CN 0012 GH 50058 Model BB CN 0016 GH 50060 Model BB CN 0012 SH 50057 Model BB CN 0016 SH 50059 Parts Breakdown...

Page 16: ...UBB 48G HC UBB 48F HC 23 37734 Plate of Lock for Right Door for UBB 48G HC UBB 48F HC 37 37691 Evaporator Cover for UBB 48G HC UBB 48F HC 09 37707 Lateral Cover of Machine Room for UBB 48G HC UBB 48F...

Page 17: ...UBB 60G HC UBB 60F HC 23 37734 Plate of Lock for Right Door for UBB 60G HC UBB 60F HC 37 37691 Evaporator Cover for UBB 60G HC UBB 60F HC 09 37707 Lateral Cover of Machine Room for UBB 60G HC UBB 60F...

Page 18: ...18 Parts Breakdown Model BB CN 0020 GH 50062 Model BB CN 0020 SH 50061...

Page 19: ...7 37704 Starter for UBB 72G HC UBB 72F HC 21 37731 Upper Right Hinge for UBB 72G HC UBB 72F HC 34 37690 Blade of Evaporator Fan Motor for UBB 72G HC UBB 72F HC 08 37705 Condenser Fan Motor for UBB 72G...

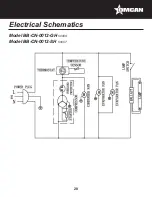
Page 20: ...20 Electrical Schematics Model BB CN 0012 GH 50058 Model BB CN 0012 SH 50057...

Page 21: ...21 Model BB CN 0016 GH 50060 Model BB CN 0016 SH 50059 Electrical Schematics...

Page 22: ...22 Electrical Schematics Model BB CN 0020 GH 50062 Model BB CN 0020 SH 50061...

Page 23: ...er online by visiting OMCAN PRODUCT WARRANTY REGISTRATION 3115 Pepper Mill Court Mississauga Ontario Canada L5L 4X5 www omcan com warrantyregistration html or email to service omcan com Purchaser s In...

Page 24: ...relations avec nos clients et les fabricants de valeur Aujourd hui avec des partenaires en Am rique du Nord Europe Asie et Am rique du Sud nous travaillons continuellement am liorer et d velopper l e...

Reviews: