background image

12

Operation

2.  Fully open gas valve. 

Note: 

For initial start or after any cylinder change, hold control knob in for 2 minutes to purge air from gas 

lines before proceeding.

3.  Depress control knob and turn knob counter. 

- Clockwise to IGNITE position, then to PILOT position (you will hear 2 clicks).

4.  With the pilot light lit, keep control knob depressed for 30 seconds. (Figure 3) 

NOTE:

 If the pilot light has not ignited, turn heater control knob to OFF position, fully close gas valve, wait 

5 minutes, then repeat steps 2–4 of the Lighting Instructions. 

NOTE:

 If the pilot light ignites but does not stay lit, turn heater control knob to OFF position, fully close 

propane gas valve, wait 5 minutes, then repeat steps 2–3. Now, using a lighter, ignite the pilot light through 

the ignition hole on the emitter screen.(Figure 4) Once the pilot light is lit, depress control knob for 30 

seconds.

5.  After depressing the control knob for 30 seconds, turn control knob to LOW. To increase the temperature, 

turn towards HIGH.(Figure 5)

If you experience any ignition problem please consult “Troubleshooting” 

on page 17.

CAUTION:

 Avoid inhaling fumes emitted from the heater’s first use. 

Smoke and odor from the burning of oils used in manufacturing will 

appear. Both smoke and odor will dissipate after approximately 30 

minutes. The heater should NOT produce thick black smoke.

NOTE:

 The burner may be noisy when initially turned on. To eliminate 

excessive noise from the burner, turn the control knob to the PILOT 

position. Then, turn the knob to the level of heat desired.

NOTE:

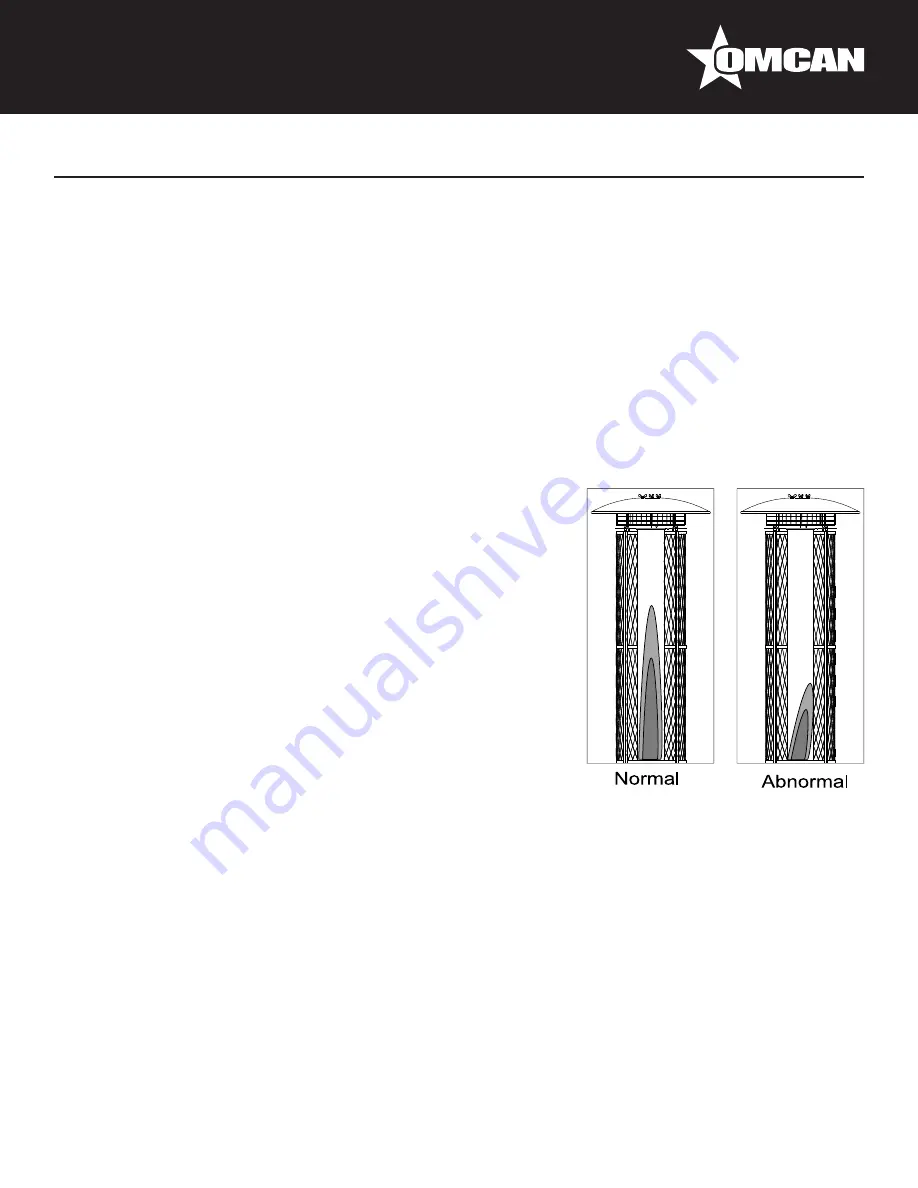
 In Normal condition, the height of flame is 2/3 height of glass 

tube under Hi position. The height of flame is 1/3 height of glass tube 

under Low position. The flame is stable and bright. No noise nor black 

smoke. Contrarily it is abnormal condition.

WARNING: FOR YOUR SAFETY

Be careful when attempting to manually ignite this heater. Holding in the control know for more than 10 

seconds before igniting the gas will cause a ball of flame upon ignition.

WHEN HEATER IS ON

The flame should be blue with straight yellow tops. If excessive yellow flame is detected, turn off heater and 

consult “Troubleshooting” on page 17.

RE-LIGHTING

Note:

 For your safety, control knob cannot be turned OFF without first depressing control knob in PILOT 

position and then rotating it to OFF.

1.  Turn control knob to OFF.

2.  Wait at least 5 minutes, to let gas dissipate, before attempting to relight Pilot.

3.  Repeat the “Lighting” steps on prior page.

Summary of Contents for PH-CN-1800-C

Page 1: ...Revised 07 14 2017 Factory CSA approved Toll Free 1 800 465 0234 Fax 905 607 0234 Email service omcan com www omcan com Patio Heaters Models PH CN 1800 C 2105 C Items 43584 43585 Instruction Manual...

Page 2: ...16 17 18 19 Table of Contents Section General Information Safety and Warranty Technical Specifications Installation Operation Maintenance Troubleshooting Parts Breakdown Notes Warranty Registration M...

Page 3: ...e It s of the utmost importance to save these instructions for future reference Also save the original box and packaging for shipping the equipment if servicing or returning of the machine is required...

Page 4: ...uier modificaci n a la m quina an la la garant a y puede causar da os a las personas usando la m quina mientras esta en el funcionamiento REVISE EL PAQUETE A SU LLEGADA Tras la recepcion de un envio O...

Page 5: ...ter in areas with high dust content Minimum heater clearances from combustible materials three 3 feet from the sides two 2 feet from the top Never store propane near high heat open flames pilot lights...

Page 6: ...ke sure propane cylinder valve outlet is clean During set up check all connections and fittings for leaks using soapy water Never use a flame Use as a heating appliance only Never alter in any way or...

Page 7: ...n authorized service technician to repair the equipment locally Unauthorized maintenance will void the warranty Warranty covers electrical and part failures not improper use Please see www omcan com w...

Page 8: ...m Total Height 70 9 1800mm 82 9 2105mm Power 11KW Consumption per Hour 800g hr Item Number 43584 43585 Installation PREPARATION Before beginning assembly of product make sure all parts are present Com...

Page 9: ...nk housing using 4pcs screw M5X10 4 Assemble the mesh Secure the mesh to the Heating Body using 3pcs screw M5X10 5 Assemble the upper protective mesh to the heating body directly 6 Assemble the reflec...

Page 10: ...es with national fuel gas code ANS Z223 1 NFPA54 natural gas and propane Installation Code CSA B149 1 or propane storage and handling code B149 2 A dented rusted or damaged propane cylinder may be haz...

Page 11: ...pt to operate until you have read and understand all General Safety Information in this manual and all assembly is complete and leak checks have been performed BEFORE TURNING GAS SUPPLY ON 1 Your heat...

Page 12: ...the heater s first use Smoke and odor from the burning of oils used in manufacturing will appear Both smoke and odor will dissipate after approximately 30 minutes The heater should NOT produce thick...

Page 13: ...s of outstanding performance from your heater make sure you perform the following maintenance activities on a regular basis KEEP EXTERIOR SURFACES CLEAN 1 Use warm soapy water for cleaning Never use f...

Page 14: ...t with inclement weather such as rain sleet hail snow dust and debris If desired cover heater to protect exterior surfaces and to help prevent build up in air passages Note Wait until heater is cool b...

Page 15: ...hermocouple Burner won t light Propane cylinder is frosted over Wait until the propane cylinder warms up and becomes unfrosted Blockage in orifice Clear blockage Control knob is not in ON position Tur...

Page 16: ...16 Parts Breakdown Model PH CN 1800 C 43584 Model PH CN 2105 C 43585...

Page 17: ...ud for BYHASS BYHCSS 2 63402 Protective Guard Support Tube for BYHASS BYHCSS 7 63407 Burner and Control Box for BYHASS BYHCSS 12 63398 Flame Screen for BYHASS BYHCSS 3 63403 Glass Tube for BYHASS BYHC...

Page 18: ...18 Notes...

Page 19: ...er online by visiting OMCAN PRODUCT WARRANTY REGISTRATION 3115 Pepper Mill Court Mississauga Ontario Canada L5L 4X5 www omcan com warrantyregistration html or email to service omcan com Purchaser s In...

Page 20: ...relations avec nos clients et les fabricants de valeur Aujourd hui avec des partenaires en Am rique du Nord Europe Asie et Am rique du Sud nous travaillons continuellement am liorer et d velopper l e...

Reviews: