background image

7

Installation

After mating the plug to the mains socket, the machine is ready for use. First, however, check out proper 

operation of all moving parts and components of the machine.

Operation

Prepare the machine before every process cycle. BE SURE that the machine, especially parts which come in 

contact with food products (extrusion sleeve, worm, pool, mixer and drawplate) are perfectly clean (see the 

Maintenance Section).

Always clean with machine off.

USE OF THE MACHINE

Only after making sure that the machine is completely clean, especially all the parts which are directly 

in contact with the product (extrusion sleeve, worm, pool, mixer, drawplate, cover, control system; if it is 

necessary, use some warm water; see Maintenance) you can carry out the requested operations in order to 

have the desired dough.

After having turned the machine off:

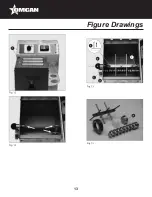
•  Position the selector on “0” (Fig.2C) and verify the correct set-up of the worm (Fig.1A) making sure that the 

cylinder part is sustained by the dragging shaft.

• 

Then make sure that the plastic cap (Fig.1B) which replaces the drawplate is correctly positioned and the 

ring nut (Fig.1C) is tightly well-screwed on.

•  Finally block the mixer (Fig.1D) in its place, thanks to the head-handle (Fig.1E). Pull up the pool cover 

(Fig.3A) and always put in the pre-established ingredients in the following sequence: flour and then, after 

closing the cap, all the other liquid elements.

In order to obtain the right dough, you need to create the right ratio between the weight of the flour and the 

weight of the liquid part; in order to obtain a very good product, the flour has to contain a humidity percentage 

of no more than 15%; this allows the addition of water equal to 35% or up to 38% of the flour’s weight. If you 

are using flours with different humidity contents, please change the quantity of the liquid in the opposite ratio. 

Moreover, in order to better use the machine, the product inside the pool has to be higher than at a minimum 

level which coincides more or less with the position of the mixer axle.

Now shut the cover and put the selector in the        position (Fig.4A). Push the start button (Fig.4B). Add 

the liquid part pouring it slowly but quickly through the small hole in the cover. At the end of the kneading 

operation, which should take around 10 minutes, make sure the product has the right thickness and should 

look like coffee beans (check through the small holes of the cover). Turn the machine off by switching the 

selector to “0” (Fig.4C), or push the Stop button (Fig.4E).

Summary of Contents for PM-IT-0002

Page 1: ...Pasta Machine Model PM IT 0002 Item 13317 Instruction Manual Revised 11 18 2020 Toll Free 1 800 465 0234 Fax 905 607 0234 Email service omcan com www omcan com...

Page 2: ...7 18 19 Table of Contents Section General Information Safety and Warranty Technical Specifications Installation Operation Maintenance Troubleshooting Figure Drawings Parts Breakdown Electrical Schemat...

Page 3: ...e It s of the utmost importance to save these instructions for future reference Also save the original box and packaging for shipping the equipment if servicing or returning of the machine is required...

Page 4: ...entrenado en el correcto funcionamiento de esta m quina y sta usando ropa apropiada y autorizada Cualquier modificaci n a la m quina an la la garant a y puede causar da os a las personas usando la m...

Page 5: ...s Check that power mains leading to distribution socket is fitted with an appropriate multipolar switch protected against overloads and shortcircuits Carry out all phase connections as well as any neu...

Page 6: ...obtain a product with the right thickness and humidity avoid air currents which will cause precocious drying of the product together with its deterioration In order to give the necessary stability to...

Page 7: ...ally block the mixer Fig 1D in its place thanks to the head handle Fig 1E Pull up the pool cover Fig 3A and always put in the pre established ingredients in the following sequence flour and then after...

Page 8: ...of the operation Stop the machine by switching the selector to the 0 position Fig 11C and then turn it on the kneading position Fig 11A for 10 15 seconds so that the pressure on the drawplate caused...

Page 9: ...infect with alcohol CLEANING OF THE WORM MIXER RING NUT AND DRAWPLATE Eliminate the dough residue and wash the pieces with water you may use a soft brush or a plastic egg slice These elements can be t...

Page 10: ...onents from the machine PROBLEMS CAUSES REMEDIES Machine operation failure Disconnected plug Connect plug Plug leads not correctly connected Check lead connections Trip switch adjusted for insufficien...

Page 11: ...11 Figure Drawings...

Page 12: ...12 Figure Drawings...

Page 13: ...13 Figure Drawings...

Page 14: ...14 Model PM IT 0002 13317 Parts Breakdown...

Page 15: ...or 13317 4 42545 Pinion Z 17 3 8 for 13317 14 42555 Start Stop Button for 13317 24 42536 Worm for 13317 5 42546 Bearing 7203 BEP for 13317 15 42556 Reverse for 13317 25 42537 Mixer for 13317 6 42547 B...

Page 16: ...16 Electrical Schematics Model PM IT 0002 13317...

Page 17: ..._______________ ________________________________________________________________________________________ ________________________________________________________________________________________ ______...

Page 18: ..._______________ ________________________________________________________________________________________ ________________________________________________________________________________________ ______...

Page 19: ...ter online by visiting OMCAN PRODUCT WARRANTY REGISTRATION 3115 Pepper Mill Court Mississauga Ontario Canada L5L 4X5 https omcan com warranty registration or email to service omcan com Purchaser s Inf...

Page 20: ...relations avec nos clients et les fabricants de valeur Aujourd hui avec des partenaires en Am rique du Nord Europe Asie et Am rique du Sud nous travaillons continuellement am liorer et d velopper l e...

Reviews: