GB
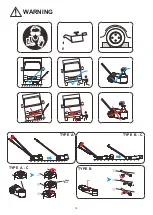
This is a lifting device only. It is not allowed to work under the raised load until it is secured by suitable means.
Do not move the load while on the jack .
Do not operate your jack with passengers in the vehicle or leaning against it.
Do not exceed the rated load
Do not use any type of extenders without authorisation by qualified personnel.
Always wear safety glasses when using the equipment.
Use only on hard level surface capable of sustaining the load.
Make sure that the lift point is stable and properly centered on the jack saddle.
It is your responsibility to keep warning decals legible and intact. Replacement decals may be obtained from the factory.
Study, understand, and follow all instructions provided with this jack prior to operation.
Failure to follow these warnings may result in loss of load, damage to jack, or failure resulting in property damage, personal, or fatal injury.
The owner shall retain this manual for future reference to important warnings, operating and maintenance instructions.
This jack is filled with OMEGA hydraulic jack oil. When use in extreme low temperature, please replace with OMEGA hydraulic oil. Never use
brake fluid, alcohol, glycerin, detergent, motor oil or dirty oil. Improper oil can cause serious internal damage to the jack. For more information
on jack oil please contact local service centers.
Visual inspection shall be made before each use of the jack, check for leaking hydraulic fluid, and damaged, loose or missing parts.
The owner and/or operator must be aware that repair of this equipment may require specialized knowledge and facilities. It is recommended
to have an annual inspection of the jack done by an authorized service center and that any defect parts are replaced with genuine parts.
Remove handle from carton #2
Remove one of two C-clips securing the handle fork axle.
Remove handle fork axle from jack frame, then insert and align the handle fork’s holes with the corresponding handle fork axle holes in frame.
Re-insert the handle fork axle, which in turn now acts as the pivot axle for the handle fork and integral handle.
Secure the axle place by installing the C-Clip removed earlier.
With the handle now securely in place, use the handle position lock to secure the handle in it’s upright, vertical position.
Ensure that the oil filler screw is tight, lean the jack over to one side to allow access to the air lines found at the base of the handle and
corresponding connections found on the power unit.
Position the handle routed hoses forward of the handle fork axle.
Insert the 0.25” (smallest of the two lines) air line into the corresponding 0.25” connection from the power unit. Press the connections together
BY HAND ONLY.
NOTE :
The handle routed hoses should insert 0.375” into the jack routed hoses connection. The hose connections are friction type couplers
which require no tools.
DO NOT USE TOOLS
to insert hoses as damage to the hose or coupler will occur. Take care not to bend the hoses
at 90L angles. Instead, gently loop the hoses into position.
Insert the 0.30” (larger of the two lines) air line into the corresponding coupler on power unit reservoir.
Verify that the product and the application are compatible, if in doubt call the local supplier for technical service.
With the ram fully retracted, locate and remove the oil filler screw. This will help to release any pressurized air which may be trapped within
the reservoir. Ensure that the oil level is just below the oil filler screw hole. Reinstall the oil filler screw.
Connect handle mounted air supply connection to an adequate air source. For the best results, an inline oiler and dryer should be used with
an air source.
Use wheel chocks to help prevent in advertent shifting and movement of vehicle being lifted.
Position the jack near the lift point. Consult vehicle service manual for the location of recommended lift points.
Hold the lift control valve to the right side until the saddle contacts load. To end the lift cycle, simply release the control valve and it will
automatically return to the center (neutral). Check to ensure proper saddle / lift point alignment.
Raise the load to the desired height. To end the lift cycle, simply release the lift control valve.
Raise the load high enough to clear the jack stands, then carefully remove the jack stand (always used in pairs).
Hold the lift control valve on the left side. If the load fails to lower :
a. Use another jack to raise the vehicle high enough to reinstall jack stands.
b. Remove the affected jack and then stands.
c. Using the other jack, lower the load.
After removing the jack from under the load, push the ram down to reduce exposure to rust and contamination.
1.
2.
3.
4.
5.
6.
7.
8.
9.
10.
11.
12.
13.
1.
2.
1.
2.
3.
4.
5.
6.
7.
8.
9.
10.
1.
2.
1.
2.
3.
4.
5.
1.
2.
3.
OWNER‘S RESPONSIBILITY
The owner and/or operator must have an understanding of these operating instructions and the following warnings before
operating the jack. It is necessary that the operator can watch the lifting device and the load during all movements.It is not
allowed to work under the raised load until it is secured by suitable means.
WARNING
INSPECTION
ASSEMBLY
INSTRUCTIONS BEFORE USE
OPERATION INSTRUCTIONS
LIFTING
IMPORTANT :
Never wire, clamp or otherwise disable the lift control valve to work by any means other than by using the operators hand.
LOWERING
2
Summary of Contents for 24213
Page 14: ...WARNING TYPE B C TYPE A TYPE A C TYPE B 14...
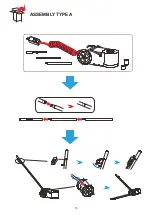
Page 15: ...ASSEMBLY TYPE A 15...
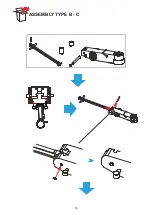
Page 16: ...ASSEMBLY TYPE B C 16...
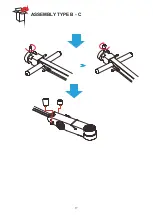
Page 17: ...ASSEMBLY TYPE B C 17...
Page 18: ...OPERATING TYPE A 0 8 1 2 MPa 18...
Page 19: ...OPERATING TYPE B C 0 8 1 2 MPa 0 8 1 2 MPa 19...
Page 20: ...2018 09...


