9
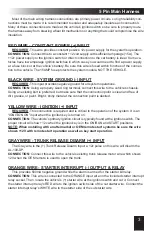
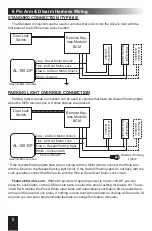
CENTER PIN - CONSTANT (+) OUTPUT
This output provides a 500mA positive output to drive the positive pin of added relay coils�
BLUE WIRE - UNLOCK (-) / LOCK (+) OUTPUT
This provides a 0�8 second 250mA negative unlock pulse and positive lock pulse for any lock-
ing or unlock operations�
CONNECTION:
Connect this directly to the vehicle’s unlock circuit if a negative pulse is required
or lock circuit if a positive pulse is required� Otherwise, a doorlock interface and/or relays are
required to convert the output�
GREEN WIRE - LOCK (-) / UNLOCK (+) OUTPUT
This provides a 0�8 second 250mA negative lock pulse and positive unlock pulse for any lock-
ing or unlock operations�
CONNECTION:
Connect this directly to the vehicle’s lock circuit if a negative pulse is required
or unlock circuit if a positive pulse is required� Otherwise, a doorlock interface and/or relays are
required to convert the output�
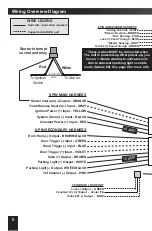
3 Pin Door Lock/Unlock Port (RED)
The Status Light
The included LED light can be dash mounted by drilling a 9/32” hole or it can be placed in the
included valet switch/status light holder�
Valet / Programming Switch
The included valet switch can be dash-mounted directly or using the combo valet switch/status
light holder�
Dual Zone Sensor Port (WHITE)
This system is equipped with a white dual zone sensor port� Any Omega single or dual zone
sensor will plug directly into this port� A dual zone shock sensor is included with this system�
Data Port (GREEN)
This port provides a direct digital interface for any Omega IntelliKit or OmegaLink interface
modules� It can eliminate the need for several wire-to-wire connections� Refer to the wire diagram
overview on page 6-7 to see which circuits are supported by this port and compare them to the
data functions available from the interface module� This port is capable of communicating using
the standard DBI protocol�
2 Pin Backup Battery Port (WHITE)
This system includes a bracket and harness for utilizing the backup battery option� Thanks to
its innovative design, it only requires a 9 volt battery� Simply insert the battery into the supplied
bracket and mount the battery pack on the slide bracket next to the backup battery port� Then con-
nect the harness to the battery and module� When running on backup battery power, the system
will only maintain the starter interrupt, siren, door trigger, and hood trigger functions to maintain
maximum battery life�


